Faux Patina Technique Featuring Stampin Up Tweet Leaves

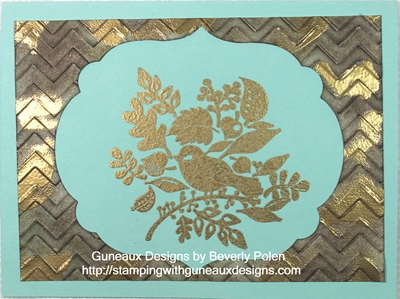
Have you created a card using the Faux Patina Technique?  Pull up a chair at your craft table, get out a few supplies (see below), and let’s make a card that uses the Faux Patina Technique and the Tweet Leaves Stamp Set from Stampin’ Up!  This is my first creation using the Faux Patina Technique, and I’m sure if I practice I’ll get better at it.  But for now, let’s try a simple card featuring the technique.  This is the card we’ll develop:

STAMPIN’ UP! SUPPLIES:

Stamp Set: Tweet Leaves (128111)

Paper:  Whisper White Card Stock (100730) and Pool Party Card Stock (122924)

Ink (Classic):  Crumb Cake (126975), Marina Mist (126962), Always Artichoke (126972), and Early Expresso (126974)

Accessories: Chevron Embossing Folder (127749), Labels Collection Framelits (125598),  Big Shot Die-Cutting Machine (113439), (Stamping Sponges (101610), VersaMark Ink (102283), Gold Embossing Powder (109129), and Heat Tool (129053)

INSTRUCTIONS:     Now let’s begin applying the Faux Patina Technique.

  • Cut a 5″ x 3-5/8″ piece of Whisper White Card Stock.
  • Center on the card stock the largest label from Labels Collection Framelits and run through the Big Shot on Tab 2.
  • Lightly ink one side of the Chevron Embossing Folder with Crumb Cake ink, insert the card stock, and run it through the Big Shot on Tab 1.

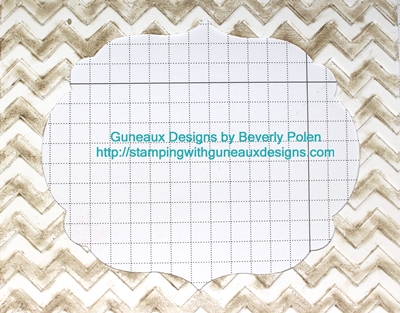
  •  Sponge Marina Mist ink over the embossed portion of the card stock.Faux Patina Technique
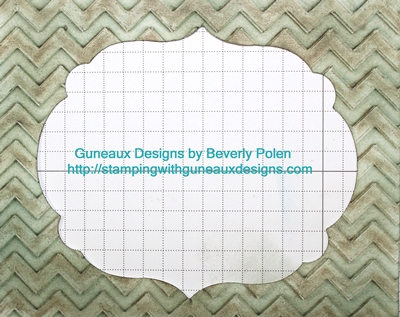
  • Sponge Always Artichoke ink over the Marina Mist ink.
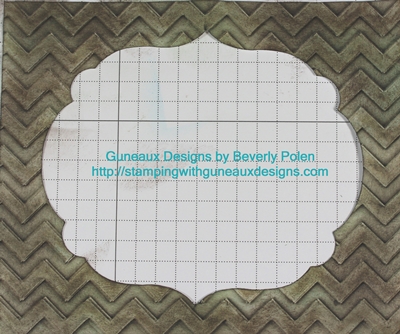
Sponge Early Expresso ink over the Always Artichoke ink.

  • Let the ink dry naturally or use a heat tool.
  • Randomly apply the edge of the VersaMark ink pad over the patina piece.  Do not completely cover the card stock with VersaMark.
  • Cover the patina piece with Gold Embossing Powder and heat set.

So, what do you think thus far about the Faux Patina Technique?  You can use other colors of ink of course if you desire.  Now, let’s create the card.

  • Cut an 8-1/2″ x 5-1/2″ piece of Pool Party card stock.
  • Fold the card stock in the center to form the card base.
  • Cover the Tweet Leaves stamp with VersaMark ink.
  • Stamp onto the card front, being careful to position the image on the card so the patina piece will be centered over the image.
  • Apply Gold Embossing Powder and heat set.
  • Attach the patina piece onto the card front centering it over the Tweet Leaves image.

You have just created a beautiful card using the Faux Patina Technique!  It will be interesting to try other color combinations for the technique.

God’s Blessings!

Stamping With Guneaux Designs

by

Beverly Polen

Have fun with the Faux Patina Technique!

Labels Collection Framelits

Labels Collection Framelits are one of Stampin Up Framelits sets that you can use for various rubber stamping techniques.  Today, I have for you a “thinking of you card” made with the Labels Collection Framelits and the card features stamping multiple card stock layersStampin Up Framelits

Before discussing the Labels Collection Framelits, let me share information about the  first layer for the card.  It reflects the hot waxing technique, which I’ve not used before but really enjoyed it.  I heated gold, silver, and red wax, one at a time, and spread it across the cardstock to create the background.   I used one of the Adorning Accents Edgelits (125595) to shape the top of the card stock. 

Now, on to the Labels Collections Framelits cut outs that make up the center piece of the card.  I used three of the Labels Collections Framelits.  Counting from the largest to the smallest with the largest numbered 5, I used the 4th, 3rd, and 2nd frames from the Labels Collections Framelits.   To begin the layering of the frames on which to stamp, I used a temporary adhesive on the back side of the frames and glued the 2nd frame to the 3rd and the 3rd to the 4th, as shown below.

Labels Collection Framelits

To decorate the Labels Collection Framelits cut outs and create the card, follow these steps:

1. Using the flower image from the Papaya Collage Stamp Set (126612), cover the stamp with Pretty In Pink Ink (126955) and randomly stamp the image.

Labels Collection Framelits

2.  Using the multiple floral stamp from the Betsy’s Blossoms Stamp Set (126006), cover the largest flower with VersaMark Ink and randomly stamp around the Labels Collection Framelits cut outs.

3.  Cover the VersaMark images with Gold Emboss Powder (109129) and set with heat. Labels Collection Framelits

 4.  Cover the leaf on the flower stamp from the Papaya Collage Stamp Set with the Gumball Green Stampin’ Write Marker and stamp the image in the spots shown in the below image.

Stampin Up Framelits

5.  Cut an 8-1/2″ x 5-1/2″ piece of Pretty in Pink Card Stock (100459) and fold in the center to create the card base.

6.  Emboss the top front of the card base with one of the Adorning Accents Folders (125601).

7.  Adhere your first layer (mine is the waxed background) to the card base.

8.  Adhere the decorated Labels Collection Framelits cut outs onto the first layer.

9. Stamp the sentiment, “thinking of you” onto a piece of Pretty in Pink Card Stock with VersaMark ink.  Cover with Gold Emboss Powder and heat set it.  Attach to the card.

Buy Stampin Up Products

God’s Blessings!

Stamping With Guneaux Designs

by

Beverly Polen

Enjoy your Labels Collection Framelits!

A Cherry on Top Stamp Set, Floral District DSP, Labels Collection Framelits – Happy Birthday

Don’t you love making Stampin’ Up! greeting cards for people who are very special to you?  I sure do.  This card is just that ~ a happy birthday card for a very special friend.  It features the new Hostess Stamp Set, A Cherry On Top (125971).  Also featured are the beautiful Floral District Designer Series Paper (126919) and Labels Collection Framelits(125598).

INSTRUCTIONS:
  • Cut a 6″ x 12″ piece from a 12″ x 12″ piece of Rich Razzleberry Card Stock, folding it in a 6″ square so it opens from the bottom up.
  • Cut a 5-3/4″ square of Floral District DSP, round the edges with the  Stampin’ Up! Corner Punch(119871), and adhere to the card base.
  • Using the two largest Labels Collection Framelits, cut two frames; the largest with Rich Razzleberry Cardstock and second one with Lucky Limeade Card Stock.
  • Cover the cake dish top stamp image from the A Cherry On Top Stamp Set with VersaMark ink and stamp onto Whisper White Card Stock.
  • Emboss it with White Embossing Powder(109132).
  • Using Rich Razzleberry and Lucky Limeade inks, stamp the cake dish pedestal and cupcake bottom and top images on the Whisper White Card Stock in appropriate location (see pics).
  • Using Real Red ink, stamp the cherry on top of the cupcake.
  • Cover only the cake dish top with Crystal Effects (101055) and let dry.
  • Cut out the images as one piece and adhere it the Lucy Limeade Card Stock.
  • If desired, place a ribbon bow onto the pedestal.
  • Place foam dimensionals on the back of the Lucky Limeade frame.
  • Adhere it to the Rich Razzleberry frame.
  • Adhere that to the Floral District DSP.

The following pictures are of the recipient of this beautiful card!  Happy Birthday, Lin!

God’s Blessings!
 
Stamping With Guneaux Designs

Stampin Up Valentine Card-Guneaux Designs

If I have to say it myself, I think this Stampin Up Valentine Card is beautiful. The center piece of the card features Stampin’ Up!’s new Framelits Dies, the Labels Collection from the Occasions Mini Catalog.  Are you enjoying your Stampin’ Up! 2012 Occasions Mini Catalog?  Isn’t it full of beautiful stamps, papers, dies, and embellishments? Today’s card features one of the Occasions Mini products and others from the upcoming Sale-A-Bration Catalog that debuts on January 24th.

Stampin Up Valentine Card
I used two sizes of the labels framelits dies to cut Silver Glimmer Paper*, Whisper White, and Basic Black frames. After cutting the Basic Black frame, I used paper snips to cut off about an 1/8″ around the frame. This gives the appearance that I used three separate framelits dies. The Silver Glimmer Paper* behind the Basic Black frame gives the centerpiece a nice pop.The centerpiece’s floral image (beneath the hearts) on the Whisper White frame is from the Fresh Vintage Stamp Set (125117-Clear) from the upcoming Sale-A-Bration Catalog. This stamp set is FREE when you purchase $50 of Stampin’ Up! products (taxes and shipping apply) during Sale-A-Bration. Atop the floral image are three hearts, one of which is made with the Silver Glimmer Paper*, and two made from stamp images in the I {Heart} Hearts stamp set. These images were stamped with Real Red Ink and embellished with Basic Rhinestones. Behind the centerpiece is a piece of Real Red Card Stock that is embellished with the Stripes Textured Impressions Embossing Folder.The sentiment “Be Mine” is from another Sale-A-Bration Stamp Set, the Outlines Occasions (126016), which is also FREE with a $50 purchase during Sale-A-Bration. I used the Scallop Trim Border Punch to create the embellishment on the left side of the card, and a ribbon strip and bow made with retired Stampin’ Up! ribbon on the right side. Enjoy!
*The Silver Glimmer Paper is a “carry over” from the 2011 Holiday Mini Catalog.

I hope you have enjoyed this Stampin Up Valentine Card!

God’s Blessings!
Stamping With Guneaux Designs by Beverly Polen
Stampin’ Up! Demonstrator in FL