Home for Christmas DSP – Stamping With Guneaux Designs

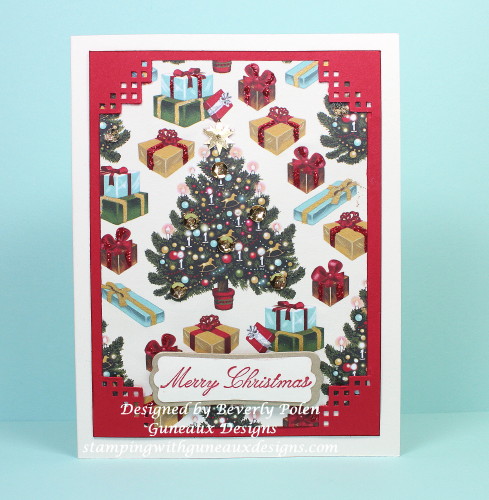
Are you searching for an easy and fast handmade card featuring the Home for Christmas DSP from Stampin’ Up!?  If you are, you have come to the right place! 🙂 But first, to make sure we are referring to the same DSP, let me show you a picture of the Home for Christmas DSP.  This Home for Christmas DSP card features the Christmas Tree design.

Home for Christmas DSP, Home for Christmas Designer Series Paper Blue Poinsettia

Home for Christmas Designer Series Paper (#139592)

Home for Christmas DSP

Here’s a closeup of the decorated tree and packages:

Home for Christmas DSP

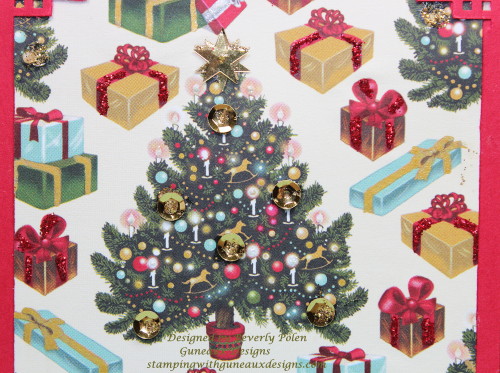
Don’t you want to pick those little gold rocking horses off the tree?  They are so cute!

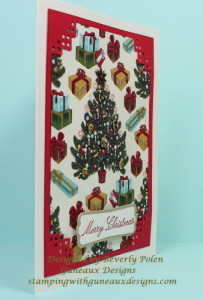
How to create the Home for Christmas DSP Christmas Card:

  • Cut an 8-1/2″ x 5-1/2″ piece of Stampin’ Up! Very Vanilla Card Stock (*#101650) and fold it in the middle.  This creates an A2 card.
  • Cut a 4″ x 5-1/4″ piece of Stampin’ Up! Real Red Card Stock (*#102482) for your first card layer.  I used an EK Success corner punch and punched the four corners on mine.  (This, of course, is optional.)
  • Cut a 3-1/2″ x 4-3/4″ piece of the Christmas Tree design from the Stampin’ Up! Home for Christmas DSP for your top card layer.  Try to ensure a Christmas Tree is in the center of your cut.  (Mine is off a little and I did not notice it until I had the card finished.  Oh well, that’s life!)
  • If you want to add a little dazzle to the Christmas Tree design, do as I did:  1) add glitter glue (e.g., red Stickles) on the packages with red ribbons, 2) add gold gel ink on the packages with gold ribbons, and 3) add sequins strategically on the tree.
    • TIP:  If you add sequins, please use a strong adhesive or they will fall off your paper.  I used gold sequins from Stampin’ Up! Metallic Sequin Assortment (*#138390) and Stampin’ Up! Crystal Effects (*#101055) to adhere mine to the card.  I know, Crystal Effects is a lacquer, not an adhesive!  Well, let me tell you, it is a great adhesive; it just takes some time to dry.
  • Adhere your card pieces together and add a sentiment.
  • You are finished and you have a simple and easy Home for Christmas DSP Christmas card!!

Now, wasn’t that easy?  Have a blessed and wonderful day!

CLICK HERE to see another Home for Christmas DSP Christmas Card!

*When you see this symbol “#” in my post, it means the item number of the Stampin’ Up! product that is listed before the number.


Click on the bubble to the right of this post title to leave a comment and/or ask a question.  I would love to hear from you!

Butterfly

God’s Blessings!

Stamping With Guneaux Designs

By

Beverly Polen

Home for Christmas DSP

HOME FOR CHRISTMAS DSP CHRISTMAS CARD

Home for Christmas Designer Series Paper Blue Poinsettia

It is a delight to share with you my Stampin’ Up! Home for Christmas Designer Series Paper Blue Poinsettia Christmas card.

Home For Christmas Designer Series Paper - Blue Poinsettia

Stampin’ Up! Home for Christmas Designer Series Paper:

Home for Christmas Designer Series Paper Blue Poinsettia
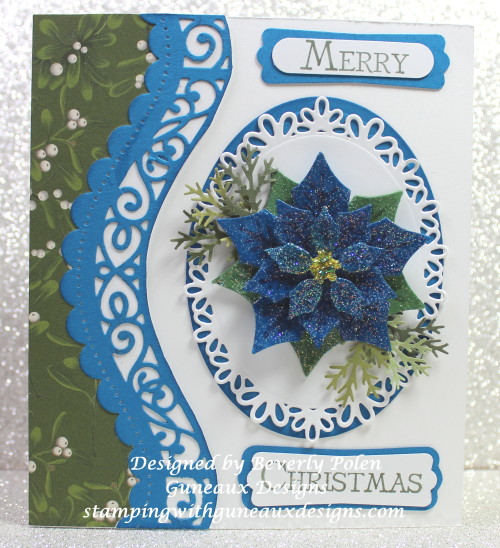
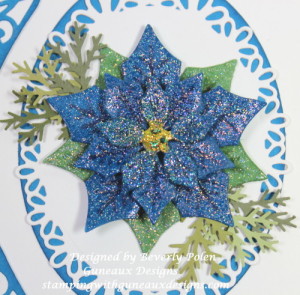
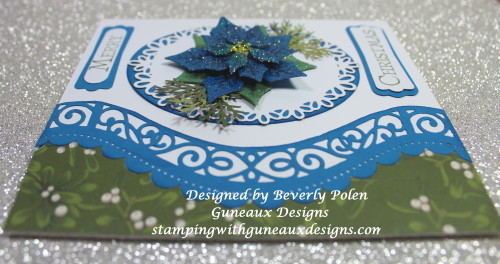
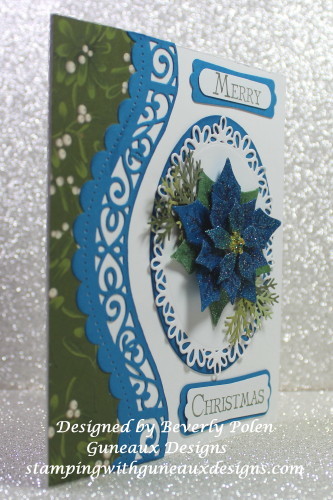
Have you seen blue poinsettias?  Here’s a picture of a group of them.  Aren’t they pretty? They are beautiful to me, but maybe that is because I love the color blue.  I guess there are a lot of colors of poinsettias.

blue_poinsettia

Back to my card!  The card measures 4-3/4″ x 5-1/2″ which is an odd size.  I made it this size so I could get on the card the elements I wanted.  Besides the Home for Christmas Designer Series Paper, the card also features Spellbinders Layered Poinsettia dies and Spellbinders Curved Borders Two dies.  For the left side of the card, I used the mistletoe design from the Stampin’ Up! Home for Christmas Designer Series Paper, Spellbinders Curved Borders Two Dies, and Stampin’ Up! Pacific Point Card Stock.

This picture is a closeup of the poinsettia that I created with the Spellbinders Layered Poinsettia dies.  I embossed the poinsettia with Stampin’ Up!’s Iridescent Ice Embossing Powder (101930).  I added a small amount of yellow and green glitter glue (i.e., Ranger Stickels) onto the center of the flower.  To further enhance the poinsettia, I added some “branches” behind the flower.  I used Martha Stewart’s Branch Medium Punch to create the branches.  The poinsettia sits upon an oval floral die cut from the Spellbinders Oval Floral dies.

Home For Christmas Designers Series Paper-Blue Poinsettia

I used the Spellbinders Curved Borders Two dies also for the inside of the card. Instead of using the Pacific Point Card Stock, as I did on the card front, I used the mistletoe design from the Home for Christmas Designer Series Paper when using the Curved Borders dies.

Home for Christmas Designer Series Paper Blue Poinsettia

Home for Christmas Designer Series Paper Blue Poinsettia

Select the pictures you want to pin onto www.pinterest.com before leaving!

I love hearing from you!  Please feel free to ask questions or leave comments!

Butterfly

God’s Blessings!

Stamping With Guneaux Designs

By

Beverly Polen

Home for Christmas Designer Series Paper Blue Poinsettia

Stampin Up Madison Avenue & Sycamore Street DSP

I have another Stampin Up Madison Avenue stamp set greeting card for you today, and this one features the beautiful Sycamore Street Designer Series Paper.  Both products become available on January 22.

 Stampin Up Madison Avenue


SUPPLIES USED FOR THE STAMPIN UP MADISON AVENUE & SYCAMORE STREET CARD:

Stamps:  Stampin Up Madison Avenue Stamp Set (129660, You Are Loved Stamp Set (1237779)

Paper:  Rich Razzleberry Card Stock, Pool Party Card Stock, Whisper White Card Stock (100730), and Sycamore Street Designer Series Paper (127540 – Sale-a-bration)

Ink:  Stampin Up Pool Party, Summer Starfruit, and Rich Razzleberry Classic Ink

Accessories:  Retired Rich Razzleberry Grosgrain Ribbon, Sycamore Street Ribbon and Button Pack (130812 – Sale-a-bration), and Basic Rhinestones (119246)

INSTRUCTIONS FOR MAKING THE CARD:

Cut an 8-1/2″ x 5-1/2″ piece of Rich Razzleberry Card Stock (for card base), a 4″ x 5-1/4″ piece of Pool Party Card Stock, and a 3-3/4″ x 4″ piece of Sycamore Street Designer Series Paper

Sycamore Street Designer Series Paper

Adhere a piece of ribbon around the center of the Sycamore Street DSP (I used the retired Rich Razzleberry Ribbon as that is one of the colors within the DSP.

Sycamore Street DSP

Adhere the DSP to the Pool Party Card Stock and then to the Rich Razzleberry card base.

Sytcamore Street DSP

Using the Stampin Up Madison Avenue Stamp Set and Pool Party and Summer Starfruit Classic Ink, stamp the images onto a scrap of Whisper White Card Stock.

 Madison Avenue Stamp Set

Cover the “Thinking of You” sentiment stamp image with Rich Razzleberry Classic Ink and stamp it below the flowers.

Stampin Up Madison Avenue

Mat the above with Pool Party Card Stock and Rich Razzleberry Card Stock.

Stampin Up Madison Avenue

Add Basic Rhinestones to the flowers and tie a small bow with the Sycamore Street Ribbon (Pool Party) and attach it to the lower-right corner.

Madison Ave Stamp Set

Adhere the matted sentiment to the center of the Sycamore Street DSP and enjoy!

 Stampin Up Madison Avenue

 Stamping With Guneaux Designs

God’s Blessings!
Stamping With Guneaux Designs
by
Beverly Polen

Stampin Up Madison Avenue and Sycamore Street DSP

A Cherry on Top Stamp Set, Floral District DSP, Labels Collection Framelits – Happy Birthday

Don’t you love making Stampin’ Up! greeting cards for people who are very special to you?  I sure do.  This card is just that ~ a happy birthday card for a very special friend.  It features the new Hostess Stamp Set, A Cherry On Top (125971).  Also featured are the beautiful Floral District Designer Series Paper (126919) and Labels Collection Framelits(125598).

INSTRUCTIONS:
  • Cut a 6″ x 12″ piece from a 12″ x 12″ piece of Rich Razzleberry Card Stock, folding it in a 6″ square so it opens from the bottom up.
  • Cut a 5-3/4″ square of Floral District DSP, round the edges with the  Stampin’ Up! Corner Punch(119871), and adhere to the card base.
  • Using the two largest Labels Collection Framelits, cut two frames; the largest with Rich Razzleberry Cardstock and second one with Lucky Limeade Card Stock.
  • Cover the cake dish top stamp image from the A Cherry On Top Stamp Set with VersaMark ink and stamp onto Whisper White Card Stock.
  • Emboss it with White Embossing Powder(109132).
  • Using Rich Razzleberry and Lucky Limeade inks, stamp the cake dish pedestal and cupcake bottom and top images on the Whisper White Card Stock in appropriate location (see pics).
  • Using Real Red ink, stamp the cherry on top of the cupcake.
  • Cover only the cake dish top with Crystal Effects (101055) and let dry.
  • Cut out the images as one piece and adhere it the Lucy Limeade Card Stock.
  • If desired, place a ribbon bow onto the pedestal.
  • Place foam dimensionals on the back of the Lucky Limeade frame.
  • Adhere it to the Rich Razzleberry frame.
  • Adhere that to the Floral District DSP.

The following pictures are of the recipient of this beautiful card!  Happy Birthday, Lin!

God’s Blessings!
 
Stamping With Guneaux Designs