Color On Color Emboss Resist Technique – Happy Father’s Day

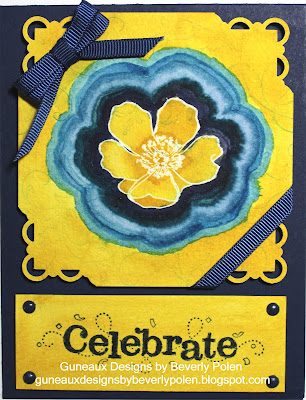
I love the art of blending inks. However, I had not tried before the Color on Color Emboss Resist Technique. After trying it, I now know that I really, really like it and will be using it in future art. The card share I have for you today features this technique for a Happy Father’s Day card.

Color on Color Emboss Resist Technique

SUPPLIES USED FOR THE COLOR ON COLOR RESIST TECHNIQUE, HAPPY FATHER’S DAY CARD (I am listing the supplies I used; however, the supplies you use do not need to be the same, as it is the technique itself that is the subject of this tutorial).

Stamp Sets: Stampin’ Up! Fine Feathers (126517) and an old hostess stamp set, Something to Celebrate (for sentiment)

Paper: Baked Brown Sugar Card Stock (131296), Bermuda Bay Card Stock (131197), and Whisper White Card Stock (100730)

Ink: You will need three light colors and one darker color – Pistachio Pudding Classic Ink (131177), More Mustard Classic Ink (retired), Coastal Cabana Classic Ink (131175), and Baked Brown Sugar Classic Ink (131174)

Accessories: Embossing Buddy (103083), Ovals Collections Framelits (129381), Bitty Banners Framelits (129267), Sponge Daubers (102892), VersaMark (102283), Clear Embossing Powder (109130), Linen Thread (104199), Stampin’ Dimensionals (104430)

Color on Color Emboss Resist Technique

INSTRUCTIONS FOR THE COLOR ON COLOR EMBOSS RESIST TECHNIQUE:

1. Cut card stock accordingly:

8-1/2″ x 5-1/2″ for card base

5-1/4″ x 4″ for 1st layer

5″ x 3-3/4″ of Whisper White Card Stock

2. Select a stamp that you want to be the main feature of the card. (I used the feather stamp; however, I think it would work best with a solid stamp with few designs within).

3. Select three colors of classic ink that are light shades.

4. Using a sponge dauber, swirl your first light color onto the Whisper White Card Stock.

Color on Color Emboss Resist Technique

5. Swirl your second light color onto the Whisper White Card Stock, and don’t worry about overlapping the colors.

Color on Color Emboss Resist Technique

6. Swirl your third light color onto the Whisper White Card Stock, and then look for places where you want to blend the colors and do that with the daubers. Don’t worry about the look too much as it will completely change when you add the darker color.

Color on Color Emboss Resist Technique

7. AFTER the ink dries, rub the embossing buddy over the complete piece of card stock.

8. Cover your selected stamp with VersaMark and stamp the image randomly on the card stock.

9. Cover with the clear embossing powder and heat set. Let it cool.

10. Swirl you dark color of ink all over the piece of card stock. You may need to do this a couple times or more.

11. Using a paper towel, rub the excess dark ink from the embossed images. Isn’t it cool how the clear embossing takes on the colors?

12. After reaching the desired colors on the colored piece of card stock, use the stamp image to create a center piece for the card.

Color on Color Emboss Resist Technique

13. Adhere the pieces together and add your desired embellishments.

14. Add your sentiment to the card.

Enjoy!!

God’s Blessings!
Stamping With Guneaux Designs
by
Beverly Polen

Color on Color Emboss Resist Technique COLOR ON COLOR EMBOSS RESIST TECHNIQUE – HAPPY FATHER’S DAY

Daydream Medallions

It is intended that the gorgeous Stampin Up Daydream Medallions Stamp Set (126467) be used with the wonderful Floral Frames Framelits (127012), right?  Being a person who tends to “think outside of the box”, I did not use the Floral Frames Framelits to frame the Daydream Medallions image in the picture below.  The picture is of an element that I am using to make a greeting card.

Looking closely, can you tell me how I made the frame around the Daydream Medallion stamp image?  If you have the Daydream Medallions stamp set, get it out and examine it closely and take a guess at how I framed the stamp image.  Leave your “guess” in the comments, and come back tomorrow to see the answer and the card that I made.

If I receive no guesses, I’ll assume there is no interest in learning a new method for framing the Daydream Medallions.

If you don’t have the Daydream Medallions stamp set, you can purchase it at my on-line shop.

Have a blessed day! Buy Stampin Up Products

God’s Blessings!
Stamping With Guneaux Designs
by
Beverly Polen

Think outside of the box when creating your artwork, especially when using the Daydream Medallions stamp set. 

Labels Collection Framelits

Labels Collection Framelits are one of Stampin Up Framelits sets that you can use for various rubber stamping techniques.  Today, I have for you a “thinking of you card” made with the Labels Collection Framelits and the card features stamping multiple card stock layersStampin Up Framelits

Before discussing the Labels Collection Framelits, let me share information about the  first layer for the card.  It reflects the hot waxing technique, which I’ve not used before but really enjoyed it.  I heated gold, silver, and red wax, one at a time, and spread it across the cardstock to create the background.   I used one of the Adorning Accents Edgelits (125595) to shape the top of the card stock. 

Now, on to the Labels Collections Framelits cut outs that make up the center piece of the card.  I used three of the Labels Collections Framelits.  Counting from the largest to the smallest with the largest numbered 5, I used the 4th, 3rd, and 2nd frames from the Labels Collections Framelits.   To begin the layering of the frames on which to stamp, I used a temporary adhesive on the back side of the frames and glued the 2nd frame to the 3rd and the 3rd to the 4th, as shown below.

Labels Collection Framelits

To decorate the Labels Collection Framelits cut outs and create the card, follow these steps:

1. Using the flower image from the Papaya Collage Stamp Set (126612), cover the stamp with Pretty In Pink Ink (126955) and randomly stamp the image.

Labels Collection Framelits

2.  Using the multiple floral stamp from the Betsy’s Blossoms Stamp Set (126006), cover the largest flower with VersaMark Ink and randomly stamp around the Labels Collection Framelits cut outs.

3.  Cover the VersaMark images with Gold Emboss Powder (109129) and set with heat. Labels Collection Framelits

 4.  Cover the leaf on the flower stamp from the Papaya Collage Stamp Set with the Gumball Green Stampin’ Write Marker and stamp the image in the spots shown in the below image.

Stampin Up Framelits

5.  Cut an 8-1/2″ x 5-1/2″ piece of Pretty in Pink Card Stock (100459) and fold in the center to create the card base.

6.  Emboss the top front of the card base with one of the Adorning Accents Folders (125601).

7.  Adhere your first layer (mine is the waxed background) to the card base.

8.  Adhere the decorated Labels Collection Framelits cut outs onto the first layer.

9. Stamp the sentiment, “thinking of you” onto a piece of Pretty in Pink Card Stock with VersaMark ink.  Cover with Gold Emboss Powder and heat set it.  Attach to the card.

Buy Stampin Up Products

God’s Blessings!

Stamping With Guneaux Designs

by

Beverly Polen

Enjoy your Labels Collection Framelits!

Rubber Stamping Technique – Sliced Rock – Guneaux Designs

I was playing around with my Stampin’ Up! rubber stamp supplies recently and developed a rubber stamping technique that I call the Sliced Rock Technique.  The rubber stamping technique is demonstrated in the video below.

I’m sure you’ve seen how beautiful sliced rock can be with various patterns and colors.  I think the most beautiful ones have a center pattern that is repeated in the outer layers in varying colors.  You can find images of sliced rock here, if interested.

Rubber Stamping Technique – Guneaux Designs Sliced Rock Technique

I call this rubber stamping technique , Unpolished Sliced Rock Technique.  I used one of the floral stamps from the Stampin’ Up! Fabulous Florets Stamp Set for my center image.  I covered the stamp with VersaMark and stamped it in the center of my piece of Watercolor Paper.  I then used White Embossing Powder over the image and set it with a heat gun.  Using my Aqua Painter and several blue inks, I water colored the floral pattern in layers around the center piece, the flower.  Here is the card I made with a similar image.
Rubber Stamping Technique - Guneaux Designs Sliced Rock Technique
The video (link) below demonstrates this rubber stamping technique, Guneaux Designs Unpolished Sliced Rock Technique.

COME BACK TO SEE THE SECOND VERSION OF THIS RUBBER STAMPING TECHNIQUE, THE POLISHED SLICED ROCK TECHNIQUE.
God’s Blessings!

Stamping With Guneaux Designs

by

Beverly Polen

I hope you try this rubber stamping technique!

Black Magic Technique – Easter Blossoms

Workshop hostesses are very special people to me, and I greatly appreciate them. I wanted to let my last workshop hostess know how much I appreciate her preparation efforts; therefore, I created this card for her using the black magic technique.
Easter Blossoms
The black magic technique involves Black Card Stock (couldn’t there be a better name?). I had not used this technique before but plan to use it again. The card stock was cut using the Oval Scallop Frame Bigz Die.

The card features Stampin’ Up! Easter Blossoms Stamp Set in the 2011 Occasions Mini Catalog. I stamped the blossoms onto the card stock with Whisper White Craft Ink. After allowing the ink to dry, I used the Stampin’ Up! Watercolor Pencils to color the blossoms. The blossoms are matted with a Petals-A-Plenty embossed piece of Pixie Pink Card Stock (retired). The Wild Wasabi Card Stock is also enbossed with the same Textured Impressions Embossing Folder.

The card front is embellished with the wonderful Subtles Glimmer Brads. If you haven’t purchased any of the Glimmer Brads, you should. You won’t regret having such beautiful embellishments.

Interesting in purchasing these products? Click on the product names to be taken directly to the product.

God’s Blessings!
Guneaux Designs by Beverly Polen
Stampin’ Up! Demonstrator in Florida
 
FIRM RELIANCE ON DEVINE PROVIDENCE!