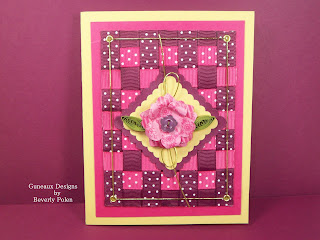
Gee, the Stampin’ Up! Sycamore Street Designer Series Paper goes away on March 22 at the end of Stampin’ Up!’s Sale-a-bration – how time flies! For me, the Sale-a-bration Sycamore Street Designer Series Paper has been a paper difficult to work with. Regardless, I have used it multiple times, and today’s card project features the Sycamore Street Designer Series Paper and two techniques, Ribbon Weaving and Guneaux Designs Sliced Rock Technique. (Just an FYI, the SU Stamp Set that matches the Sycamore Street Designer Series Paper is the Madison Avenue Stamp Set which is part of the SU Sale-a-bration.)

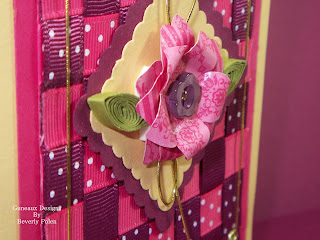
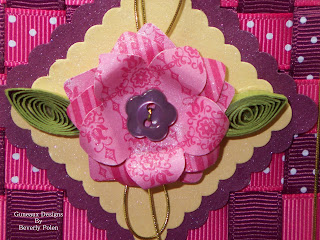
This is a closeup of the ribbon weaving and sliced rock techniques:

I selected two designs from the Sycamore Street Designer Series Paper (DSP) to create the card. The top portion is the Rich Razzleberry design with circles, and the stems and multiple colors of leaves is the bottom portion. I used the Stampin’ Up! Blossom Punch to punch a blossom into the center of the top piece. I cut 14 pieces of the Stampin’ Up! Stitched Satin Ribbon (all colors), with each piece long enough to cover the blossom. To ribbon weave, follow the instructions below.

After completing the ribbon weaving, I used Stampin’ Write Markers around the blossom, which is the Guneaux Designs Sliced Rock Technique. If you’ve not seen this technique, there is a video with instructions at the bottom of this post.
Finally, I adhered the ribbon weaved piece of DSP to the upper portion of a Summer Starfruit card base, and the second piece of the Sycamore Street Designer Series Paper to the bottom. A piece of Summer Starfruit Stitched Satin Ribbon was added. ![]()
SUPPLIES USED FOR THE CARD FEATURING THE SYCAMORE STREET DESIGNER SERIES
Paper: Sycamore Street Designer Series Paper (127540 – Sale-a-bration Product) and Summer Starfruit Card Stock (126991)
Ink: Jet Black StazOn (101406) and Stampin’ Write Markers (119806 -your choice)
Accessories: Stampin’ Up! Blossom Punch (125603), Stampin’ Up! Stitched Satin Ribbon (1026), and Adhesive ![]()
INSTRUCTIONS FOR RIBBON WEAVING
STEP 1. Determine how many pieces of ribbon are needed to cover the primary element of your project. Your size of this element will determine the length of each piece. For my blossom, I needed 14 pieces of approximately 5″ long.
STEP 2. With the primary element facing down (i.e., in my case, the negative of the punched out blossom DSP), place adhesive (e.g., Sticky Strip) along the top, left, and right of the blossom. Begin attaching the ribbons vertically, side by side (no space between). If you use a patterned ribbon, the patterned side of the ribbon should be facing down. Ensure the top portion of the ribbon pieces are well attached to the adhesive.

STEP 3. Move every other piece of the vertical ribbon up to the top of the piece of DSP.

STEP 4. Lay a piece of ribbon horizontally across the remaining vertical ribbons (this step begins the weaving process). Adhere one end of this piece of ribbon to the left of the vertical ribbons. Ensure the very top of the punched out piece in the DSP is covered with this first piece of ribbon. Adhere the other end to the right of the vertical ribbons.

STEP 5. Bring down the vertical ribbons across the horizontal piece of ribbon.

STEP 6. Lift up the vertical ribbons that weren’t lifted the first time.

STEP 7. Lay the second piece of ribbon horizontally across the vertical ribbons (adhere both ends). Make sure that this piece of ribbon is pushed up against the first horizontal piece of ribbon.

STEP 8. Bring down the vertical ribbon pieces across the second piece of horizontal ribbon.

STEP 9: Repeat this process until you’ve completed the weaving process.
STEP 10. Place adhesive along the bottom and adhere the vertical ribbons to the DSP. If necessary, trim the ends of the vertical ribbons flush with the DSP.
![]()