Ellen Hutson Courage – Breast Cancer Awareness

ELLEN HUTSON COURAGE – BREAST CANCER AWARENESS

I could not let October end without creating a Breast Cancer Awareness card.  For the card, I used the Ellen Hutson Courage Stamp and Die set, which was made especially to benefit breast cancer research.  Twenty-five dollars of each purchase of the stamp set will be sent to the Breast Cancer Research Foundation.  Being a breast cancer survivor, I was happy to contribute to the Foundation through my purchase.  Here is my card.


1 Corinthians 12:4-9

“There are different kinds of gifts, but the same Spirit.  There are different kinds of service, but the same Lord.  There are different kinds of working, but the same God works all of them in all men.  Now to each one the manifestation of the Spirit is given for the common good.  To one there is given through the Spirit the message of wisdom, to another the message of knowledge by means of the same spirit, to another faith by the same Spirit, to another gifts of healing by that one Spirit…”


Continue reading

Splitcoaststampers Techy Challenge

Do you consider yourself a “techy” kind of person?  If so, what is the technology you use the most?  Technology has grown by leaps and bounds, and it seems to change daily. Creating a techy card was a challenge for Monday’s Splitcoaststampers Techy Challenge.  This challenge was to “include some type of technology/electronic on a card, or use  technology to create a card”.  I submitted this “get well” card below for the Splitcoaststampers Techy Challenge.

I used Microsoft PowerPoint (PP) to create the desk, computer, and sentiment on the card. To create the desk and computer, I used the the PP “Insert” “Shapes” functions to create many lines to form the shapes.  I am happy with the outcome.

I  fussy cut the desk and computer and added black brads for the desk drawer knobs. Then I added designer paper from the newly released Heartfelt Creations Classic Petunia Paper Collection to the card base.  Afterwards, I used the Stampin’ Up! Hearth and Home Framelits to cut out a window from white card stock.  I attached another piece of the designer paper to the back of the window to create a scene outside of it.  I attached that to the card base.

Then I added foam tape to the desk and computer and attached them to the card.  I had so much fun creating this card, and I hope you enjoy it!


Butterfly_1_1God’s Blessings!
Stamping With Guneaux Designs By Beverly Polen
Firm Reliance on Divine Providence!


Matthew 6:1

Jesus said, “Be careful not to do your ‘acts of righteousness’ in front of others, to be seen by them.  If you do, you will have no reward from your Father in heaven.”

Honey Bee Little Pickup Stamp Set

HONEY BEE LITTLE PICKUP STAMP SET

Have you seen the Honey Bee Little Pickup Stamp Set?  I think it is adorable!  The stamp set has matching dies as well.  My card share today features three stamps from the set: 1) the pickup, 2) wooden rails for the truck bed, and 3) hearts.

Before explaining the card, let me share why I have not posted any artwork for several days.  My precious sister passed away on January 10th, and that has occupied my mind and time.  It has been a very emotional time for me so I decided I needed to create a card to get my mind refocused.  Thus, I created this card that I’m sharing.

Honey Bee Little Truck Stamp Set

The card does not include a sentiment; however, it will be a get well card / valentine card for my brother-in-law who just had major surgery and ended up in the ICU.  Yes, there has been a lot of emotional things going on in my life, but I am trying to get back to creating and posting.

On to the card.  I decided to create a scene for the pickup.  I used Neenah Solar White Card Stock on which I created the scene.  After stamping and coloring the truck with various Copic Sketch Markers (i.e., BG10, BG11, and GB23), I masked it to include the wooden rails in a brown ink.  I then masked the rails to include the hearts and colored them with Copic Sketch Markers (i.e., R27, R29, and RV25).  I added two pieces of card stock, one green and the other gray.  The green is for a grassy, sloped  berm, and the gray for a road on which the truck is traveling.  I used the Lawn Fawn Stitched Hillside Borders Dies for the two pieces.

Honey Bee Little Truck Stamp Set

I created the tree in the foreground with a tree stamp from the retired Stampin’ Up! (SU) Happy Scenes Stamp Set.  I used the same stamp set to create the pine trees in the background of the scene.  I hand drew the mountains in the background and colored them with grayish Copic Sketch Markers.

Honey Bee Little Truck Stamp Set

Creating this card featuring the Honey Bee Little Pickup Stamp Set was a lot of fun!  I hope you are inspired!  I am submitting the card for the Splitcoaststampers Featured Stamper Challenge.  Carolyn (snowmanqueen) on SCS is the featured stamper.  She has a wonderful gallery of cards.  You can check them out here.


Honey Bee Little Pickup Stamp Set  Honey Bee Little Truck Stamp Set   Honey Bee Little Pickup Stamp Set   Stampin Up Happy Scenes Stamp Set     Honey Bee Little Pickup Stamp Set


Butterfly_1_1God’s Blessings!
Stamping With Guneaux Designs By Beverly Polen
Firm Reliance on Divine Providence!


ROMANS 1:18-20 (NIV)

“The wrath of God is being revealed from heaven against all the godlessness and wickedness of men who suppress the truth by their wickedness since what may be known about God is plain to them, because God has made it plain to them.  For since the creation of the world God’s invisible qualities—his eternal power and divine nature—have been clearly seen, being understood from what has been made, so that men are without excuse.”

Papillon Potpourri Stamp Set – Stampin’ Up!

Papillon Potpourri Stamp Set – Stampin’ Up!

Today’s greeting card features the Papillon Potpourri Stamp Set – Stampin’ Up!(123759 – catalog item number – clear mount).  I love butterflies, so the Papillon Potpourri is one of my favorite stamp sets.

The card base is made with a piece of the new In-Color Strawberry Slush Card Stock.  Using VersaMark Ink (102283), I stamped a background stamp onto the card front.  It was  covered with White Embossing Powder  (109132 – catalog item number) and heat set. (I love any kind of embossing).

I think the butterflies in the above picture of the card appear to be hovering over the card with their shadow showing underneath.  I have to give the credit for the effect to my camera (lol).  Oh, wait….maybe it was the person behind the camera creating the effect.  Regardless, I think those wonderful Stampin’  Dimensionals (104430 – catalog item number) played a role as well!  Don’t you just love the 3-D effect on greeting cards?

Look closely at the layers on the card.  You also may want to look at the card front in the picture below.  It appears as though I cut out the pieces using a framelit from the Apothecary Accents Framelits (127003 – catalog item number).  Well, my framelit doesn’t have the two “bump outs” on it, does yours?

I did use the framelit from the Apothecary Accents, but I did not use it to cut out the paper that forms the layers.

How often do you start making a card with one intent and then the card ends up being completely different?  That’s what happened on my card.

I first stamped the butterflies from the Papillon Potpourri Stamp Set onto a 3-1/2″ x 4-3/4″ piece of Whisper White Card Stock.  I had planned to add some other elements to that piece of card stock, but then I wasn’t happy with it.

I wondered if I had a framelit that would fit around the butterflies, and if so, I would use that to cut out the piece.  Well, the framelits that I have are either too big or small.  As usual, I didn’t let that defeat me.  I wanted to use the Apothecary Accents framelit, so I decided to lay it around the butterflies and trace around the inside with a pencil.  I couldn’t trace across the two small butterflies, so I decided to go around them.  I “fussy cut” out the framelit, which resulted in the two bump outs.  You needed to know all of this, right?

I then traced the outside of the framelit onto a piece of Strawberry Slush Card Stock, allowing for the bump outs.  As for the bottom layer that is the Pool Party design from the Quatrefancy Specialty Designer Series Paper (130141), I free-handed it.

Notice the little flowers at the top right and bottom left of the Whisper White Card Stock.  They are from a stamp in the Hostess Morning Meadow Stamp Set.

I hope you enjoyed the card and my rambling.  You can leave a comment by clicking on the “chat bubble” at the right of the post’s title.  I love to get comments! 


God’s Blessings!
Stamping With Guneaux Designs
by
Beverly Polen

 PAPILLON POTPOURRI STAMP SET – STAMPIN’ UP!

Stampin’ Up! Get Well Card

I made this Stampin’ Up! get well card for a young lady who had a lung removed  recently as a result of a massive tumor.  Her name is Carrie, and if you are inclined, please say a healing prayer for her.

Look at the flowers on this Stampin’ Up! get well card and tell me what current stamp set the floral image is from.  I had not used this image before (or that I remember) and decided to do so on this card.  I wanted the card to be cheerful, and the floral image satisfied my need.

Loving butterflies as I do, I had to add a couple of them to the card.  The butterfly images are from the Stampin’ Up! Kindness Matters Stamp Set.  The “Get Well” sentiment is from the Stampin’ Up! Perfectly Penned Stamp Set.

The card base is made from Stampin’ Up! Daffodil Delight Card Stock.  The red piece of card stock on the left is a 2-3/8″ x 4-1/2″ piece of Real Red Card Stock.  The black piece of card stock on the right is a 2-1/2″ x 4-1/4″ piece of Basic Black Card Stock.  The white center piece is a 3-3/4″ x 4-1/2″ piece of Whisper White Card Stock.  Notice the matching envelope in the first photo.

Enjoy your day, and take time to leave a comment!  I love reading your comments.


Stampin’ Up! Supplies Used for this Stampin’ Up! Get Well Card:

Stamp Sets:  Kindness Matters (122902), Perfectly Penned (122892), and an additional set that you’ll guess for me

Paper:  All mentioned above

Ink:  Various Alcohol Ink Markers

Accessories:  Basic Black 1/2″ Scallop Dots Ribbon (124145), a retired Real Red 3/16″ Gingham Ribbon, and a retired Real Red Holly Berry Designer Button.


Butterfly_1_1

God’s Blessings!
Stamping With Guneaux Designs By Beverly Polen
Firm Reliance on Divine Providence!

STAMPIN’ UP! GET WELL CARD

Labels Collection Framelits – Thoughts and Prayers

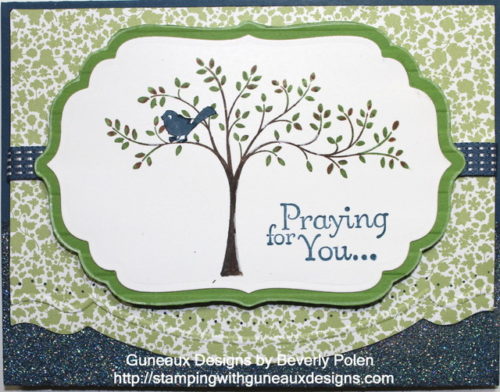
I could not do without the Stampin’ Up! Labels Collection Framelits, as well as all of the Stampin’ Up!’s framelits, as well as the Thoughts and Prayers stamp set.  To me, the Labels Collection Framelits and all of the other framelits are must-have tools for creating paper crafts. The Labels Collection Framelits may be designed to cut certain stamp cut images, but they certainly may be used for other purposes.

The card share for you today features the Labels Collection Framelits and Thoughts and Prayers Stamp Set.  To use the  Labels Collection Framelits, you will need the Big Shot, its multipurpose platform (Tab 1), and standard cutting pads.  Below are instructions for making this card.


STAMPIN UP PRODUCTS:

STAMPS:  Thoughts and Prayers (127805) ; PAPER:  Midnight Muse Card Stock (126843), Gumball Green Card Stock (126840), Whisper White Card Stock (100730), and Twitterpated Designer Series Paper (125406); INK: Soft Suede Stampin’ Write Marker (119703), Gumball Green Stampin’ Write Marker (126856), Midnight Muse Classic Stampin’ Pad (126860), and White Gel Pen (105021); ACCESSORIES: Labels Collection Framelits (125598), Strips Embossing Folder (123128), Adorning Accents Embossing Folders (125601), Adorning Accents Edgelits (125595), Essentials Paper Piercing Pack (126187), VersaMark Pad (102283), Dazzling Diamond Stampin’ Glitter(102023), Heat and Stick Powder (100625), Heat Tool (129053), Stampin’ Pierce Mat (126199), Paper-Piercing Tool (126189), and Midnight Muse 3/8″ Stitched Satin Ribbon (126847)

INSTRUCTIONS:

Card Base:

1.  Cut a 8-1/2″ x 5-1/2″ piece of Midnight Muse Card Stock and fold it in half.

2.  Stamp the VersaMark Pad onto the bottom 1″ of the front of the card base.

3.  Apply Heat and Stick Powder over the VersaMark Ink and heat set with the Heat Tool.

4.  Apply the Dazzling Diamond Stampin’ Glitter over the Heat and Stick Powder and heat set again.

First Layer:

5.  Cut a 4″ x 5-1/4″ piece of the green design (see picture) from the Twitterpated DSP.

6.  Assemble a sandwich to run through the Big Shot in this order:  a) multipurpose platform on Tab 1, b) Cutting Pad, c) DSP piece, d) Adorning Accents Edgelit, and e) Cutting Pad.  Run through  the Big Shot.

7. Place the piece of DSP inside the Adorning Accents Embossing Folder aligning it just above the cut created with the Adorning Accents Edgelit.  Create a Big Shot sandwich with the multipurpose platform on Tab 2 and run through the Big Shot.

8.  Place the DSP onto the Paper-Piercing Mat, lay the same design (i.e., that used with the embossing folder) from the Essentials Paper-Piercing Pack onto the DSP, and pierce the DSP with the Paper-Piercing Tool following the design grid.

Center Piece:

9.  Cover the tree stamp image from the Thoughts and Prayers with ink:  trunk and branches – Soft Suede; leaves – Gumball Green.  Stamp the tree image onto Whisper White Card Stock.

10.  Place the 3rd largest frame from the Frames Collection Framelits onto the Whisper White Card Stock ensuring it is centered over the tree image.  Create a Big Shot sandwich with these items and cut out the image.

11.  Using the Midnight Muse Classic Stampin’ Pad, stamp the sentiment, Praying for You, onto the bottom-right corner.

Center Piece Mat:

12.  Place a piece of Gumball Green Card Stock into the Strips Embossing Folder and run through the Big Shot (on Tab 2).

13.  Place the same frame from the Frames Collection Framelits onto the Gumball Green Card Stock.  Trace around the frame with a pencil.  Cut out the frame and use the White Gel Pen around the edge.  Adhere the Whisper White Card Stock with image onto the mat.

Assemble Card:

14.  Adhere a piece of the Midnight Muse Ribbon across the DSP.

15.  Adhere the DSP onto the card base front.

16.  Adhere the matted centerpiece to the DSP and enjoy your card.


God’s Blessings!

Stamping With Guneaux Designs

Beverly Polen