FF16naturecoastcrafter, Owl Punch

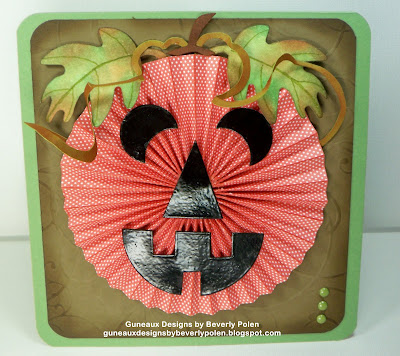
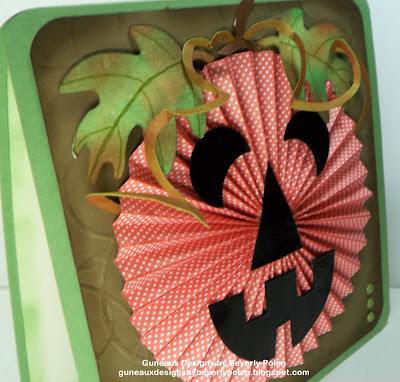
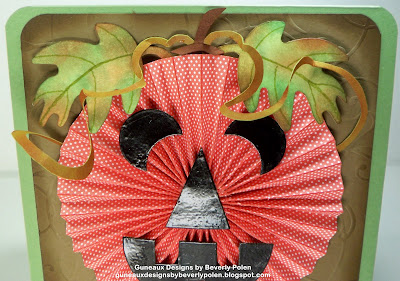
Since it’s Halloween, I’ll post a card I did for a Splitcoaststampers Falliday Fest Challenge, FF16naturecoastcrafter, Owl Punch.  Obviously, I am featuring the Stampin’ Up! (SU) Owl Punch, and my owl is decorated with a witch hat that I made with the old, retired SU Waffle Paper.  Remember that?

owl-and-bat_1

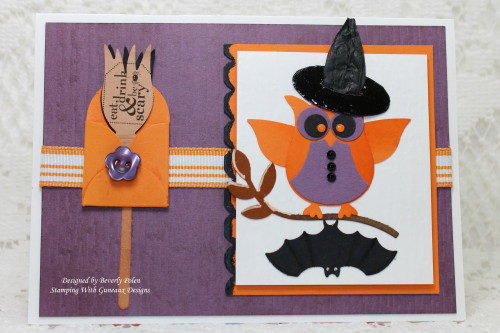
I had to compliment the Stampin’ Up! Owl by adding the SU Bat, hanging upside down. Can’t you imagine that combination in a real wildlife scenario?  Actually, some say they can co-exist peacefully, and others say not. Can you imagine an alert bat’s “radar” not picking up on an owl’s presence?  I’m sure it goes both ways.  Regardless, my Owl and Bat co-exist quite peacefully!

Stamps: SU Cute by the Inch and MDS Eat, Drink, and be Scary
Ink: Chocolate Chip, Pumpkin Pie, Going Gray, and White Gel Pen
Paper: Perfect Plum, Pumpkin Pie, Soft Suede, Basic Black, Whisper White, Creamy Caramel 
Accessories: SU Owl, Bitty Bat, Petal Card, Two-Step Bird, Scallop Edge Border, and Build A Bear Kooky Spooky Punch/Die; Crystal Effects (Owl’s eyes); Perfect Plum Designer Button; Adhesives; Black and Clear Embossing Powder; and Black Designer Jewels (buttons on owl’s vest).

Butterfly_1_1

God’s Blessings!

Stamping With Guneaux Designs By Beverly Polen

Firm Reliance on Divine Providence! 

Jesus went upon a mountainside and sat down.  His disciples came to Him, and He began to teach them.  He said:   “Enter through the narrow gate. For wide is the gate and broad is the road that leads to destruction, and many enter through it. But small is the gate and narrow the road that leads to life, and only a few find it.”  Matthew 7:13-14

Stampin Up Frightful Sight DSP – Halloween Card

My card for you today is made primarily with Stampin’ Up!’s My Digital Studio (MDS) and the Stampin Up Frightful Sight DSP Digital download. The Designer Series Paper (DSP) used for this card is the Digital Frightful Sight DSP (the non-digital Frightful Sight DSP is on pages 22 & 185 of the Stampin’ Up! Idea Book and Catalog 2011-2012).

I chose the spider design from the Stampin Up Frightful Sight DSP for the first card layer, and I enlarged it through MDS to get larger spiders on the DSP. That’s one of many things I love about MDS – you can manipulate the items to fit your needs!


Stampin Up Frightful Sight DSP

The second card layer is a spider web that I drew by hand. The spider hanging from the “trick or treat” greeting is one that I cut out of the DSP and embellished it with Crystal Effects.

The frightful cat (lol) is from the MDS Cute Cats Stamp Brush Set, which is unavailable. (That is one of the great things about Stampin’ Up!’s MDS – once you’ve downloaded a item, it’s available for use forever – it NEVER retires!) And, that little bell around the cat’s neck – isn’t is so darling? It is a Stampin’ Up! Mini Jingle Bell from the current Holiday Mini Catalog. (I think most stampers think of only using the bells on Christmas items.) I attached the bell with Stampin’ Up!’s White Baker’s Twine that I rolled on my Basic Black Stampin’ Pad to turn it black. Isn’t it so cute? I also used the twine for the string that the spider is hanging from.

The cat’s hat is from MDS Jack of all Trades Stamp Brush Set, which I enlarged slightly and embellished it also with Crystal Effects.

Last, but not least, the greeting is from MDS Spooky Things Stamp Brush Set (unavailable) that I also manipulated to the size I wanted and punched it out with the Modern Label Punch and matted it with the a cut-out from the Stampin’ Up! Movers & Shapers, Punch Windows.

  
Stampin Up Frightful Sight DSPThis picture provides you with a closeup of the frightful cat. I really love my cat! *** As usual, don’t waste time searching for catalog numbers to purchase items for this or any other project. Click on the product links above and you’ll be taken directly to my 24/7 on-line store for buying Stampin’ Up! goodies!
 
If you haven’t purchased Stampin’ Up!’s My Digital Studio, you are missing out on a product that makes stamping and scrapbooking so very easy. Buy it today! I promise you’ll love it!
 

God’s Blessings!

Guneaux Designs by Beverly Polen

Stampin’ Up! Demonstrator in Florida


Firm Reliance on Divine Providence!
 
ENJOY MAKING STAMPIN’ UP! PAPER CRAFT PROJECTS!

Stampin Up Simply Scored Tool

STAMPIN UP SIMPLY SCORED TOOL.  Thanks for stopping by to see my Stampin’ Up! Greeting Card feature for today!  It is a Happy Halloween greeting card that highlights the new Stampin Up Simply Scored Tool.  I had fun making the card and I think it is so cute!  What do you think?

Stampin Up Simply Scored Tool

FRONT VIEW

The card’s base is Wild Wasabi Cardstock, topped with Soft Suede Cardstock that I ran through the Big Shot, using one of theStampin’ Up! Backgrounds1 Texturz Plates.

The primary element on the card is the pumpkin that I made using the new and MUST HAVE Stampin Up Simply Scored Tool and a Calypso Coral design from the Stampin Up Berry  Blossoms Designer Series Paper (DSP).  Cutting two 2″ x 9″ strips of the DSP, I used the scoring tool to score the DSP at every 1/2″ on one side.  I then turned the DSP over and scored  at every 1/2″, starting 1/4″ from the first score line on the front side (do this for both pieces).  After scoring, the scores lines will be 1/4″ apart.  I folded the score lines in an accordion fashion and glued the ends of both pieces together to form the pumpkin.

The pumpkin’s face is made with Black Cardstock that I embossed with Stampin Up Black Embossing Powder to give it a shine.   I used the 1-1/4″ Circle Punch to make the pumpkin’s eyes, cutting a portion from them.  The nose was made with the Petite Pennants Punch, and the mouth with the 2-1/2″ Circle Punch (I cut the circle in half and cut sections for the teeth).  What do you think of the face?

Stampin Up Simply Scored Tool

SIDE VIEW

I share the side view to provide a better view of the 3-D parts of the card.

The inside of the card includes the sentiment,“Happy Halloween” from the new Stampin’ Up! Hand-Penned Holidays Stamp Set.

Stampin Up Simply Scored Tool

CLOSE UP OF LEAVES AND VINES

I cut the leaves with Whisper Whitecardstock and theStampin’ Up! Leaves #2 Originals Die.  Using  Stampin’ Up! Sponge Daubers, I colored the leaves with Certainly Celery, Pear Pizzazz, and Garden Green Ink.  Then I used Cajun Craze Ink on selected spots of the leaves.

For the vines, I used the 1-1/4″ Circle Punch to cut a circle from Wild Wasabi cardstock.  I covered it with Cajun Craze ink.  Starting from the outside of the circle and moving toward the middle, cutting in a circle motion.  I then pulled the circle apart to create the pumpkin vines.

If you haven’t seen the Stampin Up Simply Score Tool yet, here is a picture.  If you haven’t already, you should buy this product as it works very efficiently.  It’s the best scoring tool that I have used.  And the three place markers that are included with the tool make it so easy to make repetitive scores as you use them to mark your correct score lines.  No mistakes made with this tool!!  Buy it; you’ll love it too.

Stampin Up Simply Scored Tool
It is quite simple to purchase the products used for this project.  Just place your cursor over the product names in my post and  left double click.  The products will come up for purchase at my 24/7 Stampin’ Up store.

God’s Blessings!
Guneaux Designs by Beverly Polen
Stampin’ Up! Demonstrator in FL
Beverly@stampingwithguneauxdesigns.com
http://stampingwithguneauxdesigns.com
FIRM RELIANCE ON DIVINE PROVIDENCE!
HAVE GREAT FUN MAKING STAMPIN’ UP GREETING CARDS AND PAPER CRAFTS!

Stampin Up Waffle Paper Halloween Card

While attempting to utilize Stampin Up waffle paper, I discovered that it works great for the technique, Iris Folding. I used an Iris Folding pattern to create the large bat on my card, and filled it in with Stampin Up waffle paper, the Basic Black and Metallic Silver. Stampin Up Waffle Paper

I used the fantastic Stampin’ Up! Silver Glass Glitter in the center of the Iris Folding, which creates the “iris”. I love this stuff! Hopefully, you can see it well.
Stampin Up Waffle Paper
Now, let’s peek inside and see what pops up! Be careful that you don’t get scared when you flip the card open!
Stampin Up Waffle Paper

BOO!!!

Stampin Up Waffle Paper
Can’t you hear the little ghosts giggling because they scared you!! (hehe)
Let’s take a closer look at them!
Stampin Up Waffle Paper
OK, maybe you didn’t hear my ghost yelling, “Boo”, but I sure did when I was making the card ;-))
I hope you are inspired by the fun that Stampin’ Up! provides us if we allow our creativity to flow naturally!

PROJECT RECIPE FOR STAMPIN UP WAFFLE PAPER HOLLOWEEN CARD:

PAPER: Stampin’ Up! Wicked Fun Specialty Designer Series Paper, Basic Black Cardstock, and Pumpkin Pie Cardstock
STAMP SET: Grateful Thoughts
INK: Basic Gray (very lightly on the ghosts)
ACCESSORIES: Iris Folding Pattern, Stampin’ Up! Basic Black and Metallic Silver Waffle Paper, Stampin’ Up! Silver Glass Glitter, Basic Black Taffeta Ribbon, Stampin’ Up! Metallic Silver Eyelets, Stampin’ Up! Movers & Shakers Bigz xl Die – Modern Label Punch Window, VersaMark, White Stampin’ Emboss Powder, Glimmer Brads – Basics, My Digital Studio to create the word “Boo”, The Big Shot, and Original Big Shot Dies
God Bless! Guneaux Designs by Beverly Polen
Stampin’ Up Demonstrator
Firm Reliance on Devine Providence!