Breast Cancer Awareness-Guneaux Designs Sliced Rock Technique

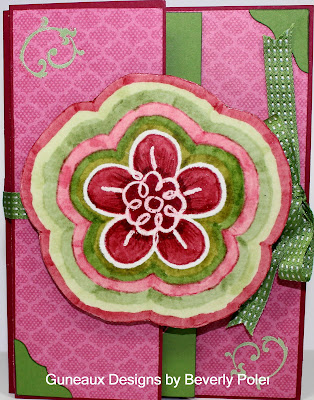
In honor of Breast Cancer Awareness Month, I decided to create a card that features Guneaux Designs Sliced Rock Technique.  I think the card is quite cheerful, which is what a breast cancer patient would need in the way of a card.  When I was recovering from breast cancer, I thoroughly enjoyed receiving cheerful cards.  They lifted my spirits.

Brest-Cancer-Awareness-Guneaux-Designs-Sliced-Rock-Technique

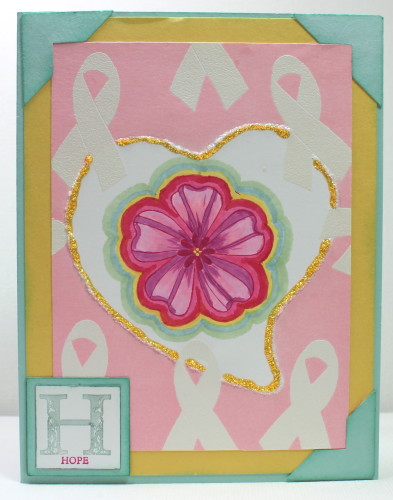
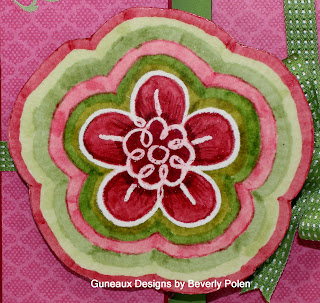
Using my Guneaux Designs Sliced Rock Technique, I started making the card by stamping a floral image on a small piece of Stampin’ Up! Whisper White card stock. The floral image is from the Stampin’ Up! Flower Shop stamp set.  Using various shades of pink, I colored the flower and began implementing the Guneaux Designs Sliced Rock Technique.  You can see that I started creating the “rings” around the flower with two shades of pink and ended with shades of yellow and green.

Brest-Cancer-Awareness-Guneaux-Designs-Sliced-Rock-Technique

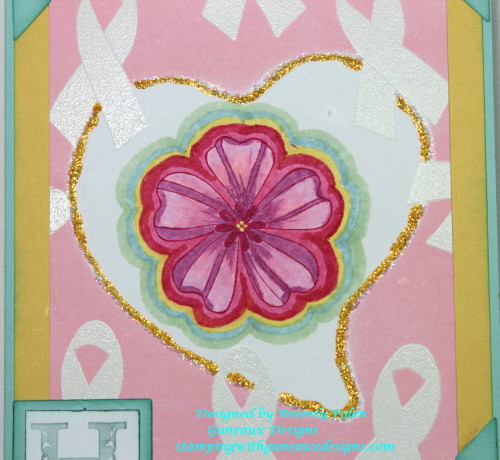
I stopped with the technique when I reached five rings around the flower.  I did this so I would have room for my heart design around the sliced rock floral design and to be able to stamp the Ribbon of Hope stamp around the flower.  I used Versamark Ink and White Embossing Powder for the ribbon.

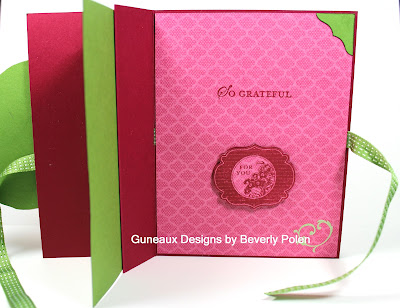
To form the heart around the floral design, I placed a heart-shaped Post-It note over the flower.  Afterwards, I used a brayer to apply Pink Pirouette Classic Ink across the Whisper White card stock. Then I formed the shape of the heart with Ranger Yellow Stickles.  I think the yellow stickle helps the floral design to pop on the card.

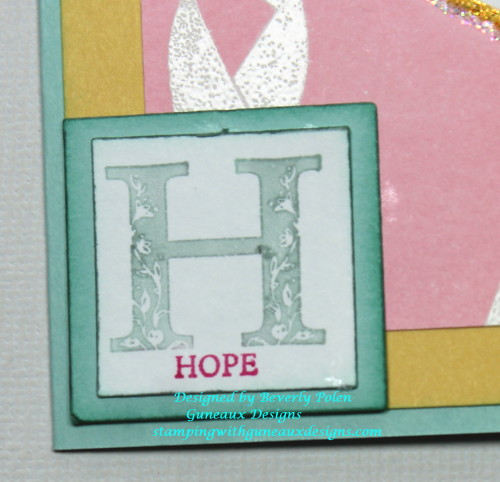
For the sentiment on the Breast Cancer Awareness card, I used the HOPE stamp from the retired Stampin’ Up! Strength & Hope stamp set.

Breast-Cancer-Awareness-Guneaux-Designs-Sliced-Rock-Techniqu

PRODUCTS USED FOR THE BREAST CANCER AWARENESS CARD

Stamps:  Stampin’ Up! Stamps – Flower Shop (130942), With All My Heart (retired – card inside), Strength & Hope (retired), and Ribbon of Hope (retired)

Breast Cancer Awareness-Guneaux Designs Sliced Rock Technique

Stampin’ Up! Flower Shop (130942)

Breast Cancer Awareness - Guneaux Designs Sliced Rock Technique

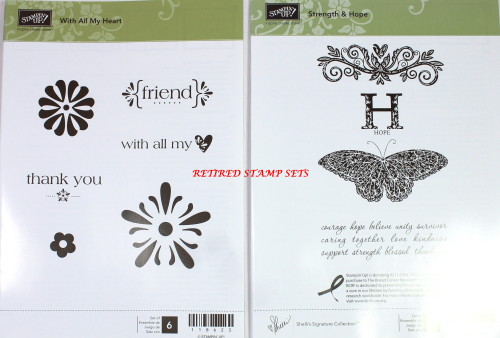
With All My Heart and Strength & Hope

Paper:  Stampin’ Up! Card Stock – Whisper White, Pool Party, and Daffodil Delight

Ink:  Stampin’ Up! Pink Pirouette and Pool Party, and various other inks

Accessories:  Brayer, White Embossing Powder, Photo Corner Punch, Post-It Notes, Stickles, and Spellbinders Die (inside of card).

 God’s Blessings!
Stamping With Guneaux Designs
By
Beverly Polen

Breast-Cancer-Awareness-Guneaux-Designs-Sliced-Rock-Technique

BREAST CANCER AWARENESS – GUNEAUX DESIGNS SLICED ROCK TECHNIQUE

Sycamore Street Designer Series Paper, Ribbon Weaving, and Sliced Rock

Gee, the Stampin’ Up! Sycamore Street Designer Series Paper goes away on March 22 at the end of Stampin’ Up!’s Sale-a-bration – how time flies!  For me, the Sale-a-bration Sycamore Street Designer Series Paper has been a paper difficult to work with.  Regardless, I have used it multiple times, and today’s card project features the Sycamore Street Designer Series Paper and two techniques, Ribbon Weaving and Guneaux Designs Sliced Rock Technique.  (Just an FYI, the SU Stamp Set that matches the Sycamore Street Designer Series Paper is the Madison Avenue Stamp Set which is part of the SU Sale-a-bration.)

Sycamore Street Designer Series Paper

This is a closeup of the ribbon weaving and sliced rock techniques:

Sycamore Street Designer Series Paper

I selected two designs from the Sycamore Street Designer Series Paper (DSP) to create the card.  The top portion is the Rich Razzleberry design with circles, and the stems and multiple colors of leaves is the bottom portion.  I used the Stampin’ Up! Blossom Punch to punch a blossom into the center of the top piece.  I cut 14 pieces of the Stampin’ Up! Stitched Satin Ribbon (all colors), with each piece long enough to cover the blossom.  To ribbon weave, follow the instructions below.

Sycamore Street Designer Series Paper - Ribbon Weaving

After completing the ribbon weaving, I used Stampin’ Write Markers around the blossom, which is the Guneaux Designs Sliced Rock Technique.  If you’ve not seen this technique, there is a video with instructions at the bottom of this post.

Finally, I adhered the ribbon weaved piece of DSP to the upper portion of a Summer Starfruit card base, and the second piece of the Sycamore Street Designer Series Paper to the bottom.  A piece of Summer Starfruit Stitched Satin Ribbon was added.  

SUPPLIES USED FOR THE CARD FEATURING THE SYCAMORE STREET DESIGNER SERIES

Paper:  Sycamore Street Designer Series Paper (127540 – Sale-a-bration Product) and Summer Starfruit Card Stock (126991)

Ink:  Jet Black StazOn (101406) and Stampin’ Write Markers (119806 -your choice)

Accessories:  Stampin’ Up! Blossom Punch (125603), Stampin’ Up! Stitched Satin Ribbon (1026), and Adhesive  

INSTRUCTIONS FOR RIBBON WEAVING

STEP 1.  Determine how many pieces of ribbon are needed to cover the primary element of your project.  Your size of this element will determine the length of each piece.  For my blossom, I needed 14 pieces of approximately 5″ long.

STEP 2.  With the primary element facing down (i.e., in my case, the negative of the punched out blossom DSP), place adhesive (e.g., Sticky Strip) along the top, left, and right of the blossom.  Begin attaching the ribbons vertically, side by side (no space between). If you use a patterned ribbon, the patterned side of the ribbon should be facing down. Ensure the top portion of the ribbon pieces are well attached to the adhesive.

Sycamore Street Designer Series Paper

 STEP 3.  Move every other piece of the vertical ribbon up to the top of the piece of DSP.

Sycamore Street Designer Series Paper

STEP 4.  Lay a piece of ribbon horizontally across the remaining vertical ribbons (this step begins the weaving process).  Adhere one end of this piece of ribbon to the left of the vertical ribbons.  Ensure the very top of the punched out piece in the DSP is covered with this first piece of ribbon.  Adhere the other end to the right of the vertical ribbons.

 Sycamore Street Designer Series Paper

STEP 5.  Bring down the vertical ribbons across the horizontal piece of ribbon.

 Sycamore Street Designer Series Paper

STEP 6.  Lift up the vertical ribbons that weren’t lifted the first time.

 Sycamore Street Designer Series Paper

STEP 7.  Lay the second piece of ribbon horizontally across the vertical ribbons (adhere both ends).  Make sure that this piece of ribbon is pushed up against the first horizontal piece of ribbon.

 Ribbon Weaving

STEP 8.  Bring down the vertical ribbon pieces across the second piece of horizontal ribbon.

 Ribbon Weaving

STEP 9:  Repeat this process until you’ve completed the weaving process.

STEP 10.  Place adhesive along the bottom and adhere the vertical ribbons to the DSP.  If necessary, trim the ends of the vertical ribbons flush with the DSP.

 Sycamore Street Designer Series Paper and Ribbon Weaving

God’s Blessings!
Stamping With Guneaux Designs
by
Beverly Polen

Guneaux Designs Sliced Rock Technique – Polished

Last week I posted a video featuring the first version of my new Guneaux Designs Sliced Rock Technique.  That version, discussed in this previous post, is called "Guneaux Designs Sliced Rock Technique - Unpolished".  Today's version is called "Guneaux Designs Sliced Rock Technique - Polished".  The YouTube video LINK for this technique is posted below.  

This beautiful card below has a fold that I created and is different from any I have seen.  It may be “out there”; I just have not seen it.

Guneaux Designs Sliced Rock Technique - Polished

Note the ribbon that ties the card closed.  The ribbon is the new Gumball Green 3/8″ Stitched Satin Ribbon, and it is great to work with!  I looooove the feel of the new Satin Ribbons!

This picture below is a closeup of the card’s element (the flower) that I created with my new technique.  In the video below, you can see better how the element is “polished”.

Guneaux Designs Sliced Rock Technique - Polished   

 This is the first portion of the card’s inside:

 Guneaux Designs Sliced Rock Technique - Polished

 This is the second portion of the card’s inside:

 Guneaux Designs Sliced Rock Technique - Polished

Enjoy the video featuring my new technique!


 God’s Blessings!

 Stamping With Guneaux Designs by Beverly Polen

Guneaux Designs Sliced Rock Technique – Polished

Rubber Stamping Technique – Sliced Rock – Guneaux Designs

I was playing around with my Stampin’ Up! rubber stamp supplies recently and developed a rubber stamping technique that I call the Sliced Rock Technique.  The rubber stamping technique is demonstrated in the video below.

I’m sure you’ve seen how beautiful sliced rock can be with various patterns and colors.  I think the most beautiful ones have a center pattern that is repeated in the outer layers in varying colors.  You can find images of sliced rock here, if interested.

Rubber Stamping Technique – Guneaux Designs Sliced Rock Technique

I call this rubber stamping technique , Unpolished Sliced Rock Technique.  I used one of the floral stamps from the Stampin’ Up! Fabulous Florets Stamp Set for my center image.  I covered the stamp with VersaMark and stamped it in the center of my piece of Watercolor Paper.  I then used White Embossing Powder over the image and set it with a heat gun.  Using my Aqua Painter and several blue inks, I water colored the floral pattern in layers around the center piece, the flower.  Here is the card I made with a similar image.
Rubber Stamping Technique - Guneaux Designs Sliced Rock Technique
The video (link) below demonstrates this rubber stamping technique, Guneaux Designs Unpolished Sliced Rock Technique.

COME BACK TO SEE THE SECOND VERSION OF THIS RUBBER STAMPING TECHNIQUE, THE POLISHED SLICED ROCK TECHNIQUE.
God’s Blessings!

Stamping With Guneaux Designs

by

Beverly Polen

I hope you try this rubber stamping technique!