Stampin Up Purse Card Design – Happy Birthday – Stamping With Guneaux Designs

How does a new Stampin Up Purse Card Design sound to you?  Well, I have one for you.  Listening to my readers and customers who have stated they want new card designs, I have created for you a Stampin Up Purse Card Design.  This purse card can be made with any color of card stock or designer series paper.  My instructions below for making the card describe the card stock and designer series paper that I used. 

Also, the purse card has a new flower design for you!

Stampin Up Purse Card Design

 STAMPIN UP SUPPLIES NEEDED FOR THE STAMPIN UP PURSE CARD DESIGN: (if you chose to make the purse card identical to mine):

Stamp Set:  Itty Bitty Banners (126257)

Paper:  Basic Black Card Stock (121045 – one 8-1/2″ x 11″ and a 4″ x 7″ scrap piece), Cherry Cobbler Card Stock (119685), Very Vanilla Card Stock (101650), and Mocha Morning Designer Series Paper (retired)

Ink: Cherry Cobbler Classic (126966)

Accessories:  Big Shot Die-Cutting Machine (113439), Simply Scored Stylus (125624), Sticky Strip (104294), Crystal Effects (101055), Paper Snips (103579), Bigz Clear Large Scallop Square Die (115950), VersaMarker Watercolor Pen (non-SU), Black Embossing Powder (109133), Elegant Bouquet Embossing Folder (115964), Heat Gun of your choice, Cherry Cobbler 3-1/2″ Scalloped Tulle Ribbon (127841), Bigz L Perfect Pennants Die (123126), Bitty Banners Framelits (129267), Antique Brad (117273), and Cherry Cobbler Baker’s Twine (123125). 

INSTRUCTIONS FOR MAKING THE STAMPIN UP PURSE CARD DESIGN:

  • Click HERE for the “Purse Card Template” 

If you have difficulty retrieving the template, here’s a picture that you can work from:

Picture of the Purse Card Template

 CARD BASE

  • Score the center of an 8-1/2″ x 11″ piece of Basic Black Card Stock and fold it.
  • Place the template over the folded card stock with the fold at the bottom (use a temporary adhesive to prevent the template from moving).  Using the Simply Scored Stylus and with pressure, trace the purse from below the handles (at the 5″ mark) to the bottom including the sides.

Stampin Up Purse Card Design

  •  Remove the template and cut along the traced lines.

Stampin Up Purse Card DesignStampin Up Purse Card Design

CARD HANDLES:

  • Fold a piece of 4″ x 7″ scrap Basic Black Card Stock and place the handle portion of the template over it with the folded part at the top (you’ll cut out two handles and you don’t want them connected).  So you have 1/4″ extra on the ends of the handles to adhere to the purse card base, lay the template about 1/4″ above the bottom of the folded card stock.
  • Using the Simply Scored Stylus and with pressure, trace around the handle of the template.
  • Cut out the handles following the traced lines.

Purse HandlesPurse Handles

  • Cover one side of the handles with Crystal Effects and let dry.
  • After drying, cover the other side of the handles with Crystal Effects and let dry.
  • Attached the handles to the inside of the purse card base with Sticky Strip after completing the following.

CARD EMBELLISHMENTS:

  • Lay the template onto the Mocha Morning Designer Series Paper (again, this project is organic, so other DSP can be used) and trace the inside lines around the purse card.  Cut around the traced lines.  Use the cut out for your template to cut a second piece of the Mocha Morning Designer Series Paper.  You will have one piece for the front of the purse card and one for the back.  Ensure the pieces are about 1/8″ smaller than the purse card base.
  • Cut 1/4″ off the top of these two pieces.

Purse Front and Back Pieces

  • Using the Bigz Clear Large Scallop Square Die, cut out two Cherry Cobbler large scallops.
  • Insert each scallop into the Elegant Bouquet Embossing Folder and run through the Big Shot Die-Cutting Machine.
  • OPTIONAL:  Swipe one scallop with the embossing buddy and, with a VersaMarker Watermarker Pen, carefully apply VersaMark on the raised portions of the scallop.  Apply Black Embossing Powder and set with a heat gun.  It’s best to do a small section of the raised portions at a time. (This isn’t an easy task and it’s difficult to not get specks of powder where you don’t want it.)

Card Embellishment

  • Lay the Mocha Morning Designer Series Paper purse front over back side of the embossed scallop, line it up just below the center of the top embossed flower, and draw a line with a pencil across the scallop.  Trace with the pencil about 1″ down the two sides of the purse front.  Cut along these penciled lines.  Repeat for the purse back.

Purse Embellishmen tPurse Embellishment

  • Trace the purse back DSP piece onto Very Vanilla Card Stock, trace around the piece, and cut it out.

Stampin Up Purse Card Design

  • Cover with Cherry Cobbler ink the sentiment “Happy Birthday” from the Itty Bitty Banners stamp set onto a piece of Very Vanilla Card Stock.
  • Use the appropriate Bitty Banners Framelit to cut out the sentiment.  Sit to the side.

CARD FLOWER:


CARD ASSEMBLY:

  • FRONT AND BACK DSP PIECES:  Adhere with Sticky Strip the DSP front piece to the front of the card base, placing it 1/4″ down from top card base showing.  Repeat for the back side of the card base.

Stampin Up Purse Card Design

  • HANDLES:  Draw a light pencil line on the left inside of the card base, 1/2″ from the top.  Place sticky strip on the card base from the top down to the 1/2″ pencil line, ensuring that the tape is no wider than the bottom of the handle ends.  Remove the red liner and adhere the handle to the card base.  Erase the pencil line.  Repeat this to adhere the other handle to the right inside of the card base.

  • This picture shows how it should look:
  • INSIDE CARD:  Adhere the Very Vanilla Card Stock inside the card on the right side, placing it over the handle.

Stampin Up Purse Card Design

  • At this point the card will look like this:

Stampin Up Purse Card Design

  • OUTSIDE CARD EMBELLISHMENTS:
  • Punch a hole at the top of the “happy birthday” sentiment.
  • Thread a piece of Cherry Cobbler Baker’s Twine throw the hole.
  • Wrap the twine around the prongs of the antique brad that was used for the tulle ribbon flower.
  • Punch a hole 1-1/2″ down from the top center of the Cherry Cobbler Black Embossed Large Scallop piece.

Stampin Up Purse Card Design

  • Insert the brad that is holding the tulle ribbon flower and baker’s twine into the hole and spread the prongs.

Stampin Up Purse Card Design

  • Attach this to the top of the card front. (You may want to use a glue dot to attach the end of the sentiment to the card front.)

Stampin Up Purse Card Design

  •  Attach the second Cherry Cobbler Embossed Large Scallop piece to the back side of the card.

Stampin Up Purse Card Design

If you followed these instructions and made the card, you now have a beautiful Stampin Up Purse Card that is worthy of a very special recipient!

Stampin Up Purse Card Design

Share your comments with me please on the Stampin Up Purse Card Design!

God’s Blessings!
Stampin With Guneaux Designs
by
Beverly Polen

Guneaux Designs Sliced Rock Technique – Polished

Last week I posted a video featuring the first version of my new Guneaux Designs Sliced Rock Technique.  That version, discussed in this previous post, is called "Guneaux Designs Sliced Rock Technique - Unpolished".  Today's version is called "Guneaux Designs Sliced Rock Technique - Polished".  The YouTube video LINK for this technique is posted below.  

This beautiful card below has a fold that I created and is different from any I have seen.  It may be “out there”; I just have not seen it.

Guneaux Designs Sliced Rock Technique - Polished

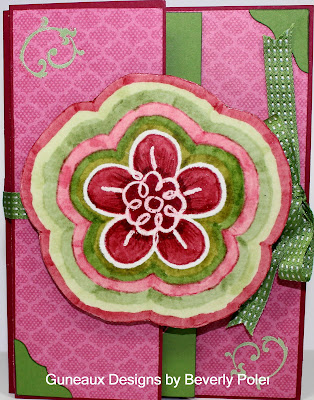
Note the ribbon that ties the card closed.  The ribbon is the new Gumball Green 3/8″ Stitched Satin Ribbon, and it is great to work with!  I looooove the feel of the new Satin Ribbons!

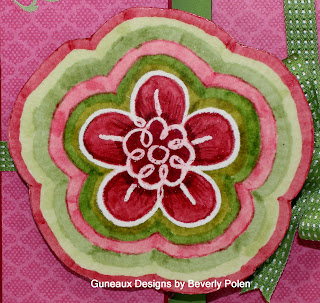
This picture below is a closeup of the card’s element (the flower) that I created with my new technique.  In the video below, you can see better how the element is “polished”.

Guneaux Designs Sliced Rock Technique - Polished   

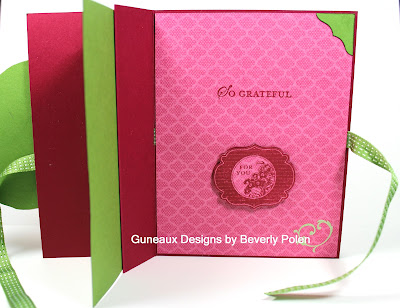
 This is the first portion of the card’s inside:

 Guneaux Designs Sliced Rock Technique - Polished

 This is the second portion of the card’s inside:

 Guneaux Designs Sliced Rock Technique - Polished

Enjoy the video featuring my new technique!


 God’s Blessings!

 Stamping With Guneaux Designs by Beverly Polen

Guneaux Designs Sliced Rock Technique – Polished

Rubber Stamping Technique – Sliced Rock – Guneaux Designs

I was playing around with my Stampin’ Up! rubber stamp supplies recently and developed a rubber stamping technique that I call the Sliced Rock Technique.  The rubber stamping technique is demonstrated in the video below.

I’m sure you’ve seen how beautiful sliced rock can be with various patterns and colors.  I think the most beautiful ones have a center pattern that is repeated in the outer layers in varying colors.  You can find images of sliced rock here, if interested.

Rubber Stamping Technique – Guneaux Designs Sliced Rock Technique

I call this rubber stamping technique , Unpolished Sliced Rock Technique.  I used one of the floral stamps from the Stampin’ Up! Fabulous Florets Stamp Set for my center image.  I covered the stamp with VersaMark and stamped it in the center of my piece of Watercolor Paper.  I then used White Embossing Powder over the image and set it with a heat gun.  Using my Aqua Painter and several blue inks, I water colored the floral pattern in layers around the center piece, the flower.  Here is the card I made with a similar image.
Rubber Stamping Technique - Guneaux Designs Sliced Rock Technique
The video (link) below demonstrates this rubber stamping technique, Guneaux Designs Unpolished Sliced Rock Technique.

COME BACK TO SEE THE SECOND VERSION OF THIS RUBBER STAMPING TECHNIQUE, THE POLISHED SLICED ROCK TECHNIQUE.
God’s Blessings!

Stamping With Guneaux Designs

by

Beverly Polen

I hope you try this rubber stamping technique!