Stampin Up Watercolor Winter

As the calendar turns to October, I begin to think about holiday cards like this one that features the Stampin Up Watercolor Winter Stamp SetThe card is actually a birthday card for a special person who has a birthday during December.    Stampin Up Watercolor Winter

This view of the card shows the dimensions of the key elements from the Stampin Up Watercolor Winter stamp set:

Stampin Up Watercolor Winter

I love the pine needles and cones from the Stamping Up Watercolor Winter set.  In the past I have resorted to making my own pine needles for cards.  So this set will go a long way in speeding up my stamping of pine-related elements on cards.

Stampin Up Watercolor Winter

Don’t you just love the new Vintage Faceted Designer Buttons as shown here?

Let’s make this card together.  Go to your craft room and get out the following supplies:


Stampin Up Supplies:

Stamp Sets (clear mount):  Stampin Up Watercolor Winter (129727) and Bring On The Cake (for the sentiment) – (121958)

Paper:  Crumb Cake Card Stock (120953), Cherry Cobbler Card Stock (119685), Gumball Green Card Stock (126840), Whisper White Card Stock (100730), and Be of Good Cheer Designer Series Paper (126896)

Ink (Classic):  Real Red (126949), Cherry Cobbler (126966), Gumball Green (126861),  (Markers) Soft Suede and Chocolate Chip (119703)

Accessories:  Big Shot Die-Cutting Machine (113439), Petals-A-Plenty Textured Impressions Embossing Folder (116824), Cherry Cobbler Dazzling Details (125585), Dazzling Details (124117), Vintage Faceted Designer Buttons (127555), and Brights Collection 3/16″ Brads (119740)


Buy Stampin Up Products

INSTRUCTIONS FOR MAKING THIS CARD FEATURING THE STAMPIN UP WATERCOLOR WINTER STAMP SET

  • Fold an 8-1/2″ x 5-1/2″ piece of Crumb Cake Card Stock in the middle to for a card base.
  • Cut a  5-1/4″ x 4″ piece of Cherry Cobbler Card Stock.
  • Place the Cherry Cobbler Card Stock into the Petals-A-Plenty Embossing Folder and run through the Big Shot.
  • Cut a 4-3/4″ x 2-1/4″ piece of Whisper White Card Stock. 
  • Cover the outline poinsettia stamp with Real Red Ink and stamp onto the center of the Whisper White Card Stock.
  • Cover the solid poinsettia stamp with Cherry Cobbler and stamp over the outline poinsettia stamp image (recommend using a Stamp-A-Ma-Jig – 101049).
  • Cover the pine needles stamp with Gumball Green Ink and stamp the image in the two places shown in the picture of the card.
  • Cover the outline pine cone stamp with a Soft Suede Stampin Write Marker and stamp the image in the two places shown in the picture.
  • Cover the solid pine cone stamp with a Chocolate Chip Stampin Write Marker and stamp the image over the outline pine cone image (recommend using a Stamp-A-Ma-Jig).
  • Apply Cherry Cobbler Dazzling Details onto the poinsettia as desired.
  • Apply Dazzling Details (white) onto the pine needles and cones as desired.
  • Take two Cherry Cobbler Designer Brads and cut off the prongs.
  • Adhere the brads into the center of two small Vintage Faceted Designer Buttons (I used Crystal Effects).
  • Adhere the buttons to the Whisper White card stock as shown in pictures.
  • Cover with Soft Suede the Birthday Wishes stamp from the Bring On The Cake Stamp Set and stamp as shown in the pictures. You want to ink the word “Birthday” first and stamp it and then the word “Wishes”.
  • Cut a 4-15/16″ x 2-7/16″ piece of Crumb Cake Card Stock and adhere the decorated Whisper White Card Stock to it to form a mat.
  • Cut two 2″ squares of design from the Be of Good Cheer Designer Series Paper (see pictures).
  • Cut two 2-1/4″ squares of Gumball Green Card Stock.
  • Adhere the two square pieces of the designer series paper to the two squares of Gumball Green Card Stock.
  • Adhere the Cherry Cobbler Embossed Card Stock to the front of the card base.
  • Adhere the designer series paper and mat squares to the Cherry Cobbler Embossed Card Stock (see pictures).
  • Place dimensionals on the back of the  Crumb Cake mat with the decorated Whisper White Card Stock.
  • Remove the backing from the dimensionals and adhere to the card front (see pictures).
  • Using a Gold Gel Pen, cover the center of the flowers that are embossed onto the Cherry Cobbler Card Stock.

Buy Stampin Up Products

God’s Blessings!
Stamping With Guneaux Designs
by
Beverly Polen
Enjoy the Stampin Up Watercolor Winter Stamp Set!

Stampin Up Flowering Flourishes – Thank You Card

Don’t you just love the Flowering Flourishes Stamp Set on page 121 of the Stampin’ Up! Annual Catalog?  Today’s card share is a quick and easy one that features the Flowering Flourishes Stamp Set.  The large stamp from from the set was used on the upper-left corner of the card, and the smallest stamp from the set was used on the lower-right of the card.

Notice that I used a Designer Series Fabric on the left side of the card.  I encourage you to think outside of the box and put fabric on your cards and scrapbook pages. Flowering Flourishes

 Flowering Flourishes


 Flowering Flourishes


 Stampin’ Up! Products:

Stamp Sets:  Flowering Flourishes (126367 – c) and Curly Cute (120510 – c)

Paper:  Whisper White Card Stock (100730) and Tempting Turquoise (102067)

Ink:  Wisteria Wonder Classic Pad (126985), Wisteria Wonder Stampin’ Write Marker (123002), Tempting Turquoise Classic Pad (126952), and Tempting Turquoise Stampin’ Write Marker (119702)

Accessories:  Wisteria Wonder Flirtatious Designer Fabric (122335), Wisteria Wonder 3/8″ Ruffled Ribbon (122973), Tempting Turquoise Brights Designer Button (119747), White Baker’s Twine (124262), 3/16″ Corner Punch (119871), and Stamp-A-Ma-Jig (101049)

Buy Stampin Up Products

Instructions:

  • Cut an 8-1/2″ x 5-1/2″ piece of Tempting Turquoise Card Stock and fold in the middle to create the card base.
  • Cut a 5-1/4″ x 4″ piece of Whisper White Card Stock. 
  • Cover with Wisteria Wonder Ink the large floral stamp in the stamp set.
  • Stamp the image on the upper-left corner of the 5-1/4″ side of the Whisper White Card Stock.
  • Cover with Wisteria Wonder Ink the flower at the top of the smallest stamp in the stamp set.
  • Stamp the image on the lower-right corner of the Whisper White Card Stock.
  • Cut a 1″ x 4″ piece of the Wisteria Wonder Flirtatious Designer Fabric.
  • Unravel both sides of the fabric piece along the 4″ side.Flirtatious Fabric
  • Add adhesive to the fabric and adhere it to the left side of the Whisper White Card Stock.
  • Cut a 2-3/4″ piece of the Wisteria Wonder 3/8″ Ruffled Ribbon, cut a “V” at one end, and attach it down the side of the fabric.
  • Thread and knot a piece of White Baker’s Twine into the Tempting Turquoise Designer Button and attach on top of the ribbon.
  • Cover the “Thank You” stamp from the Curly Cute stamp set with Tempting Turquoise ink and stamp the image on the lower right side of the Whisper White Card Stock.
  • Reink the stamp and stamp the image onto the smooth side of the plastic that comes with the Stamp-A-Ma-Jig.
  • Turn the plastic with the image upside down, line it up with the previously “Thank You” image, and lay it onto the cardstock and rub the back side to transfer the ink.
  • Using a ruler and the Wisteria Wonder Stampin’ Write Marker, draw a line between the two “Thank You” images. (see picture)
  • At the end of the line, add three, small Tempting Turquoise circles.
  • Using the 3/16 Corner Punch, cut the top and bottom corners on the right side of the Whisper White Card Stock
  • Attach the decorated Whisper White Card Stock to the card base. 
God’s Blessings!
Stamping With Guneaux Designs
by
Beverly Polen

Enjoy your Flowering Flourishes Stamp Set!

How to Make Paper Poinsettias

I have for you today a beautiful card featuring paper poinsettias.  In this post, I’ll share how to make paper poinsettias, but first I’ll provide information on the card. 

Paper Poinsettias

The card base is a piece of 8-1/2″ x 5-1/2″ Cherry Cobbler Card Stock (119685), folded in half.  I used the snowflake design from the Be of Good Cheer Designer Series Paper (DSP) (126896) for the first layer on the card. 

Be of Good Cheer Designer Series Paper

The second and third layers were made with the Labels Collection Framelits (125598), Cherry Cobbler Card Stock, and Gumball Green Card Stock (126840).  Each “label” was embossed with the Snow Burst Embossing Folder (retired), which goes so well with the snowflake design in the DSP.

  Paper Poinsettias

paper poinsettias

 HOW TO MAKE PAPER POINSETTIAS TUTORIAL

Supplies Needed:  Blossom Petals Builder Punch (121808), Boho Blossoms Punch (119858), Cherry Cobbler Card Stock (119685), Gumball Green Card Stock (126840), Tombow Multipurpose Liquid Glue(110755), Vanilla Shimmer Smooch Spritz (118772), and Dazzling Diamonds Glitter (102023)

A.  Cutting Petals, Leaves, and Flowers

1.  Punch out six Cherry Cobbler large petals and six of the smaller petals with the Blossom Petals Builder Punch.  

2.  Punch out two Cherry Cobbler flowers from the Boho Blossoms Punch. (See the below picture for which petals and flower to punch – picture doesn’t show the second flower from the Boho Blossoms Punch). 

Paper Poinsettias

3.  Punch out three Gumball Green large petals and three of the smaller petal from the Blossom Petals Builder Punch, and two of the flower (same as above) from the Boho Blossoms Punch.

Paper Poinsettias

4.  Cut out two Summer Starfruit flowers (see picture) with the Boho Blossoms Punch.

Paper Poinsettias

5.  Use a stylus to create veins in the leaves and petals.  

B.  Shaping the Petals, Leaves, and Flowers

1.  Use a rounded top tool (e.g., tip of an artist paint brush handle, top of a piercing tool, etc.) and a  piercing mat or mouse pad to create “cupping” of the leaves, petals, and flowers.  To do this, place a leaf, petal, or flower (henceforth, cutout(s)) onto the mat/pad, press down on the cutout with the rounded top tool while moving the tool in a circular motion around the cutout.  This will cause the cutout to cup upwards.  Repeat this for all pieces.  (See the two pictures below).

paper poinsettias

 Paper Poinsettias

Paper Poinsettias

2.  Use a small paint brush handle or other small round tool to turn down the two sides of each petal and leaf and turn up the pointed end of each.  Pinch the bottom together of each.  (I really like how these items get a shine to them from this process.)

Paper Poinsettias

3.  Leave the flowers cupped upward.  The Summer Starfruit flowers need to be cupped more so than the others.

Paper Poinsettias

Paper Poinsettias


C.  Assemble the Paper Poinsettia Leaves

1.  Apply Tombow glue to one petal of the Boho Blossoms flower and attach one poinsettia petal.

Paper Poinsettias

2.  Turn the glued cutouts over and ensure the petal is lined up with the tip of the flower’s petal. Paper Poinsettias

3. Add glue to another petal of the Boho Blossoms flower and attach the smaller poinsettia petal.

4.  Continue Step 3, alternating the sizes of the poinsettia petals, until there are three large and three small petals adhered to the Boho Blossoms flower.

5.  Follow Steps 3 and 4 until you have two Cherry Cobbler flowers and one Gumball Green leaves. Paper Poinsettias

 6.  Using Tombow glue, adhere one Cherry Cobbler flower on top of the Gumball Green leaves, aligning a large petal over a small leaf.

Paper Poinsettias

7.  Adhere on top of the Cherry Cobbler flower the second Cherry Cobbler flower.

8.  Adhere the second Gumball Green Boho Blossom flower on top of the Cherry Cobbler flower.

Paper Poinsettias

9.  Spritz the paper poinsettia with Vanilla Shimmer Smooch Spritz.

10.  Squeez the two Summer Starfruit flowers together and glue one on top of the other.

11.  Glue the Summer Starfruit flowers on top of the Gumball Green flower.

12. Touch the petals of the Summer Starfruit flowers with glue and sprinkle on Dazzling Diamonds Glitter.

Paper Poinsettias

Enjoy making paper poinsettias!

Buy Stampin Up Products

 
God’s Blessings!
Stamping With Guneaux Designs
by
Beverly Polen

Daydream Medallions & Tool Tip

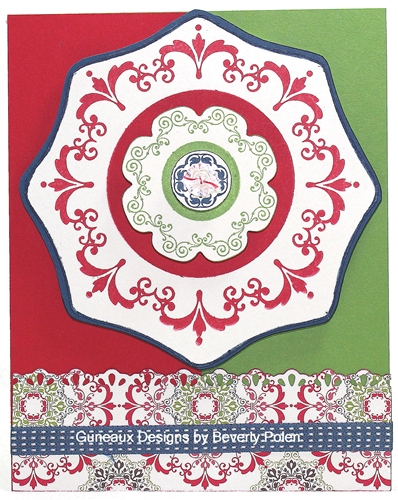
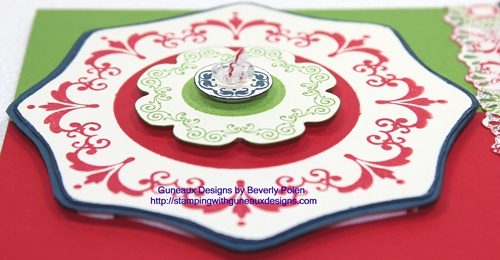
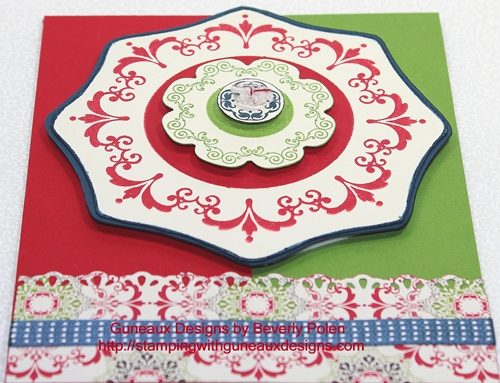
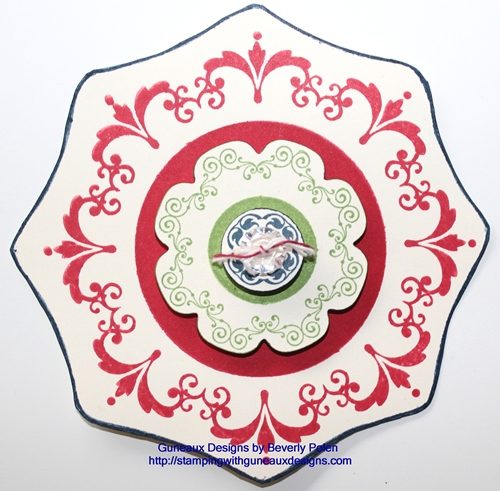
Today I am sharing a card that features the item I discussed in my last post — the stamp image from the Daydream Medallions (126467) stamp set.  Daydream Medallions is a stamp set intended to be used with the Floral Frames Framelits (127012); however, I did not use them for this card, as you can see.


For my previous post, no one attempted a guess on how I created the frame around the Daydream Medallions stamp image shown on the card.  Thus, let me reveal to you how to create this frame.  As stated in my last post, if you closely examine the stamp set, you will see the frame.  However, the following provides the tip.

TOOL TIP FOR DAYDREAM MEDALLIONS

For background purposes, let me share first that I keep the foam-backed rubber pieces that are left after removing Stampin’ Up! die-cut stamps.  I remove the paper from the back of the rubber pieces, place them back inside the stamp set cases, and insert the stamps back into the appropriate pieces after using them.  With the paper removed from the rubber, the pieces will stick to the plastic cases, as well as the clear blocks for clear-mounted stamps.  I refer to the left-over rubber pieces as the outlines of the die-cut stamps.

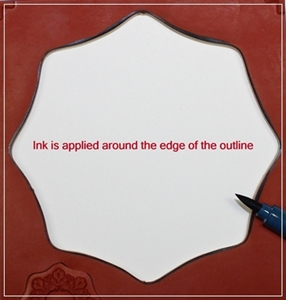
Some of the outline rubber pieces can be used as actual stamps when the design of the outline affords that opportunity!  That is how I created the frame around the large, stamped medallion from the Daydream Medallions stamp set.  I positioned the large medallion outline onto the Stampin Up Clear Block F (118483), used a Stampin’ Write Marker to apply ink around the outline of the medallion, and stamped the outline onto a piece of Very Vanilla card stock.  I then stamped the medallion within the frame.  That’s it!!  Try it; you’ll like it!

Stampin Up Products:

Stamp Set:  Daydream Medallions (c – 126467)

Paper:  Very Vanilla Card Stock, Gumball Green Card Stock, Real Red Card Stock, Midnight Muse Card Stock, and Candlelight Christmas Specialty Designer Series Paper (126901)

Ink:  Midnight Muse Stampin Write Marker, Real Red Classic, Gumball Green Classic, and Midnight Muse Classic

Accessories: Finishing Touches Edgelits Die (127010), Midnight Muse 3/8″ Stitched Satin Ribbon, and Vintage Faceted Designer Button

God’s Blessings!

Stamping With Guneaux Designs

Daydream Medallions

It is intended that the gorgeous Stampin Up Daydream Medallions Stamp Set (126467) be used with the wonderful Floral Frames Framelits (127012), right?  Being a person who tends to “think outside of the box”, I did not use the Floral Frames Framelits to frame the Daydream Medallions image in the picture below.  The picture is of an element that I am using to make a greeting card.

Looking closely, can you tell me how I made the frame around the Daydream Medallion stamp image?  If you have the Daydream Medallions stamp set, get it out and examine it closely and take a guess at how I framed the stamp image.  Leave your “guess” in the comments, and come back tomorrow to see the answer and the card that I made.

If I receive no guesses, I’ll assume there is no interest in learning a new method for framing the Daydream Medallions.

If you don’t have the Daydream Medallions stamp set, you can purchase it at my on-line shop.

Have a blessed day! Buy Stampin Up Products

God’s Blessings!
Stamping With Guneaux Designs
by
Beverly Polen

Think outside of the box when creating your artwork, especially when using the Daydream Medallions stamp set. 

Stampin Up Paper Flowers – Thinking of You

Recall recently that I shared a post on how to make Stampin Up Paper Flowers?  Well, today I am sharing a card I made with the paper flowers that I featured in that post.  

Stampin Up Paper Flowers Card

Stampin Up Paper Flowers

Stampin Up Paper Flowers

(I’m not sure, but I’m thinking that this card featuring Stampin Up Paper Flowers is too busy.  What do you think?) 


STAMPIN UP PRODUCTS (see previous post for products used for making the Stampin Up Paper Flowers):

Stamps Sets:  Four Frames (123442) and Silhouette Sentiments (retired)
Paper (card stock):  Midnight Muse (126843), Summer Starfruit (126839), Whisper White (100730), Raspberry Ripple (126842), and Gumball Green (126840)
Ink:  Midnight Muse Classic Pad (126860), Raspberry Ripple Classic Pad (126859), and Blue Permanent Marker
Accessories:  Fancy Fan Embossing Folder (127751), Flourish Designer Frames (127835), Finishing Touches Edgelits (127010), Big Shot Die-Cutting Machine, Raspberry Ripple 3/8″ Stitched Satin Ribbon, and Bird W/Leaves & Flower Bigz Die (retired)


INSTRUCTIONS:  (The instructions do not include how to make the Stampin Up Paper Flowers.  Refer to this post for that information.)

1.  Cut an 8-1/2″ x 5-1/2″ piece of Midnight Muse card stock and fold in half to create card base.

2.  Cut a 4″ x 5-1/4″ piece of Summer Starfruit card stock, place it inside the Fancy Fan Embossing Folder, and run through the Big Shot.

3.  Finish the right side of the Fancy Fun embossed Summer Starfruit card stock with the Finishing Touches Edgelit (see picture).

 4.  Cut out stems and leaves with a Stampin Up die or punch.  I used the retired Bird W/Leaves and Flowers Bigz Die.

 5.  Stamp the image from the Four Frames Stamp Set onto Whisper White card stock using Raspberry Ripple ink.

6.  Stamp a sentiment in the center of the Frame.

7.  Color a Flourish Designer Frame blue (or shade thereof) with a permanent marker.

8.  Tie a piece of Raspberry Ripple Stitched Satin Ribbon into a bow.

9.  Assemble the card according to the picture.

10.  Enjoy your masterpiece!

 Buy Stampin Up Products

God’s Blessings!
Stamping With Guneaux Designs
by
Beverly Polen