Candlelight Christmas DSP

The Stampin’ Up! Candlelight Christmas DSP has, for the most part, beautiful designs with which you can make gorgeous paper crafts.  However, personally the brown designs seem less like Christmas to me.  Despite my perception, there are certainly ways to use the brown designs to create very attractive cards. 

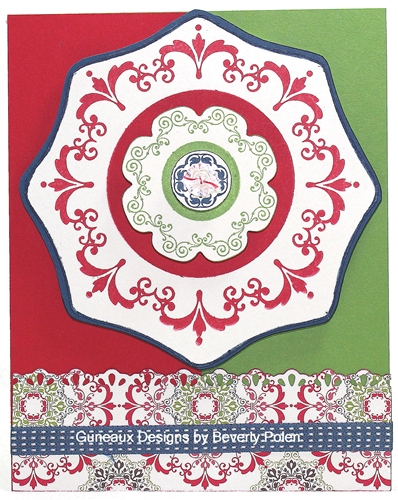
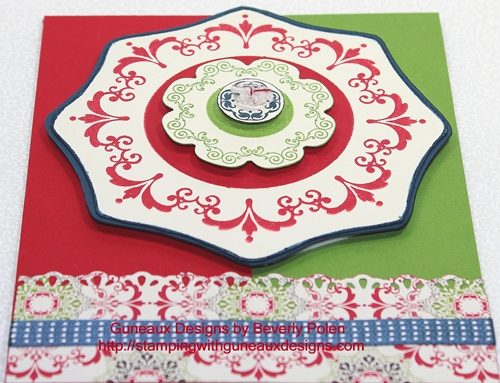
So what is a good way to use the browns from the Candlelight Christmas DSP to create an attractive card?  As I shared in my  October 25 post, use such designs as secondary elements on your project.  For example, the card below features one of the brown designs from the Candlelight Christmas DSP, however, the design is in the background.  If it were in the foreground, the card would seem less attractive to me.  But, again, it’s a personal choice.  

Candlelight Christmas DSP

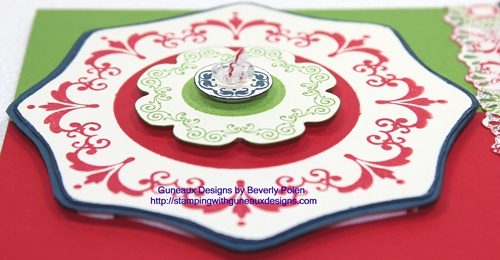
This card features a poinsettia stamp that I’ve had for years.  I decided to use the stamp to create my primary focus on the card.

Candelight Christmas DSP

 Here is a closeup of the poinsettia.  I just have not found a poinsettia stamp that I like as much as I do this one.  I used a permanent marker to color yellow one Large Basic Pearl (125577) and eight Basic Pearls (119247) for the center of the poinsettia.  I also used glitter glue to embellish the flower.

Candlelight Christmas DSP

This picture is a closeup of the sentiment from the Stampin’ Up Greetings of the Season stamp set (128033) that I stamped on Very Vanilla Card Stock (101650) in Early Espresso (119680) and Real Red (100052) inks (Stampin’ Write Markers).  I used one of the Apothecary Accents Framelits (127003) to cut out the sentiment and matted it with Early Expresso Card Stock (119686).  The sentiment is embellished with a Basic Pearl which I colored brown with a permanent marker.

Candlelight Christmas DSP

Click to check out more Guneaux Designs projects using the Candlelight Christmas DSP:

Click to check out many other paper crafts designed with the Candlelight Christmas DSP!

God’s Blessings!
Stamping With Guneaux Designs
by
Beverly Polen

Daydream Medallions & Tool Tip

Today I am sharing a card that features the item I discussed in my last post — the stamp image from the Daydream Medallions (126467) stamp set.  Daydream Medallions is a stamp set intended to be used with the Floral Frames Framelits (127012); however, I did not use them for this card, as you can see.


For my previous post, no one attempted a guess on how I created the frame around the Daydream Medallions stamp image shown on the card.  Thus, let me reveal to you how to create this frame.  As stated in my last post, if you closely examine the stamp set, you will see the frame.  However, the following provides the tip.

TOOL TIP FOR DAYDREAM MEDALLIONS

For background purposes, let me share first that I keep the foam-backed rubber pieces that are left after removing Stampin’ Up! die-cut stamps.  I remove the paper from the back of the rubber pieces, place them back inside the stamp set cases, and insert the stamps back into the appropriate pieces after using them.  With the paper removed from the rubber, the pieces will stick to the plastic cases, as well as the clear blocks for clear-mounted stamps.  I refer to the left-over rubber pieces as the outlines of the die-cut stamps.

Some of the outline rubber pieces can be used as actual stamps when the design of the outline affords that opportunity!  That is how I created the frame around the large, stamped medallion from the Daydream Medallions stamp set.  I positioned the large medallion outline onto the Stampin Up Clear Block F (118483), used a Stampin’ Write Marker to apply ink around the outline of the medallion, and stamped the outline onto a piece of Very Vanilla card stock.  I then stamped the medallion within the frame.  That’s it!!  Try it; you’ll like it!

Stampin Up Products:

Stamp Set:  Daydream Medallions (c – 126467)

Paper:  Very Vanilla Card Stock, Gumball Green Card Stock, Real Red Card Stock, Midnight Muse Card Stock, and Candlelight Christmas Specialty Designer Series Paper (126901)

Ink:  Midnight Muse Stampin Write Marker, Real Red Classic, Gumball Green Classic, and Midnight Muse Classic

Accessories: Finishing Touches Edgelits Die (127010), Midnight Muse 3/8″ Stitched Satin Ribbon, and Vintage Faceted Designer Button

God’s Blessings!

Stamping With Guneaux Designs