Stampin Up Watercolor Winter – Cascading Poinsettia Christmas Card

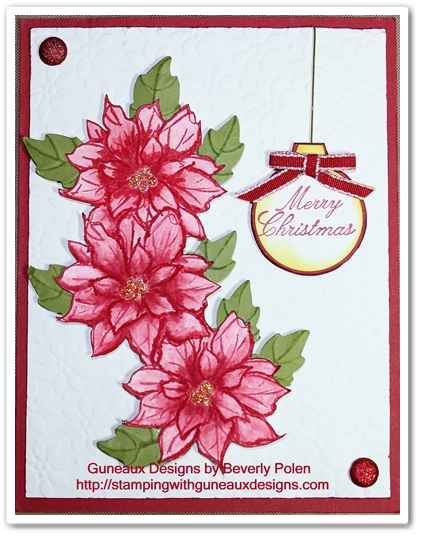
Today I am using the Stampin Up Watercolor Winter Stamp Set to instruct you on a technique called Cascading Images.  This technique is wonderful for adding a series of connecting images over the top of a background to create a focal point.  The poinsettia stamp in the Stampin Up Watercolor Winter Stamp Set is great for this technique.

Stampin Up Supplies (and catalog item numbers) used for the Stampin Up Watercolor Winter card:

Stamps:  Stampin Up Watercolor Winter Stamp Set (129727) and Come to Bethlehem Stamp Set (120591)

Paper:  Riding Hood Red Card Stock (111348), Whisper White Card Stock (100730), and Lucky Limeade Card Stock (122926)

Ink:  Real Red Classic Ink (126949), Real Red Stampin Write Marker (199952), and Riding Hood Red Write Marker (119701)

Accessories:  Big Shot Die-Cutting Machine (113439), Blender Pen (102845), Petals-A-Plenty Embossing Folder (116824), Dimensionals (104430), and Post-it Note

Instructions for creating the cascading poinsettia:

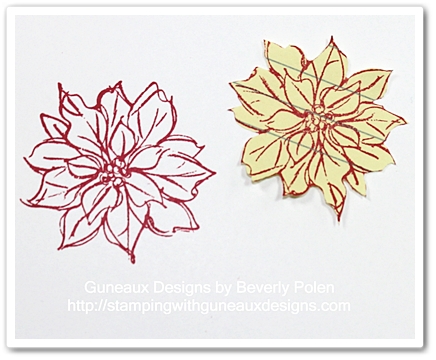
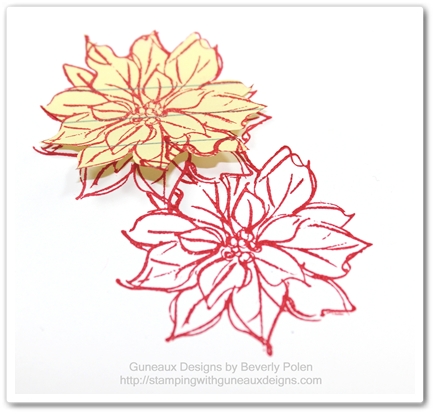
  • Cover in Real Red Classic Ink the poinsettia outline stamp and stamp onto a Post-it Note (henceforth called sticky note) and a 4″ x 5-1/4″ piece of Whisper White Card Stock (when stamping on the sticky note, ensure you stamp on the portion that contains the stickiness on the back side), 
  • Cut out the poinsettia on the sticky note, cutting right on or just inside the lines,

  • Place the sticky note over the stamped poinsettia on the Whisper White Card Stock,
  • Ensure the sticky note does not cover any outside lines of the poinsettia,
  • Cover the poinsettia stamp with Real Red Classic Ink and stamp the image just below the first poinsettia, ensuring you stamp on the bottom of the sticky note,
  • When stamping the second poinsetta, stamp it slightly to the right of the first one,

  • Cover the poinsettia stamp again with Real Red Classic Ink and, leaving the sticky note in place, stamp the poinsettia above the center one in the same manner as that done for the second poinsettia, and
  • Remove the sticky note.

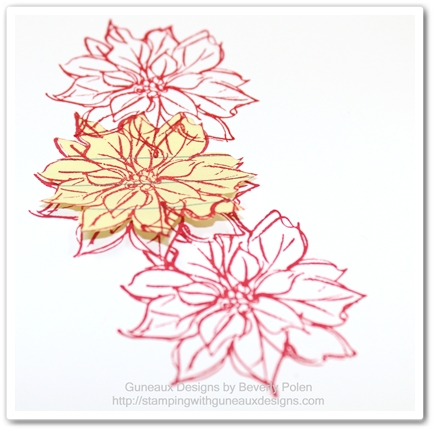
  • If you got out your crafting tools and followed along in creating this image, you have just learned about and created a Cascading Image.

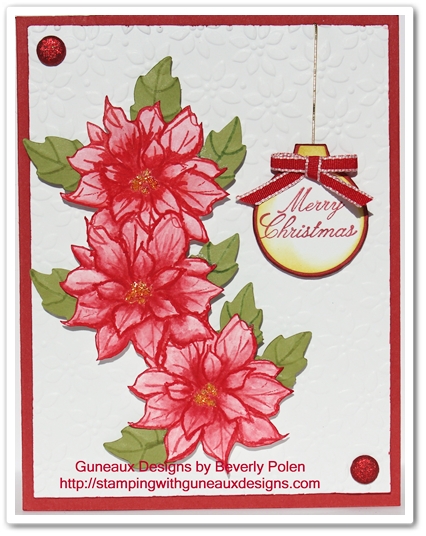
Let’s move on to finishing the Stampin Up Watercolor Winter Christmas card.

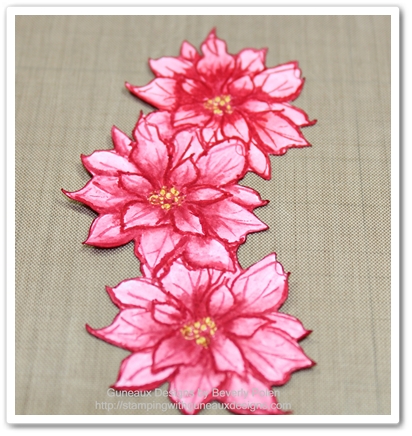
  • Color the poinsettias using a Real Red Stampin Marker and Stampin Up Blender Pen (use the marker around the center of each poinsettia and then spread the ink with the Blender Pen),
  • Add some yellow glitter glue in the center of the flowers and let dry,
  • Cut out the cascading poinsettias, 

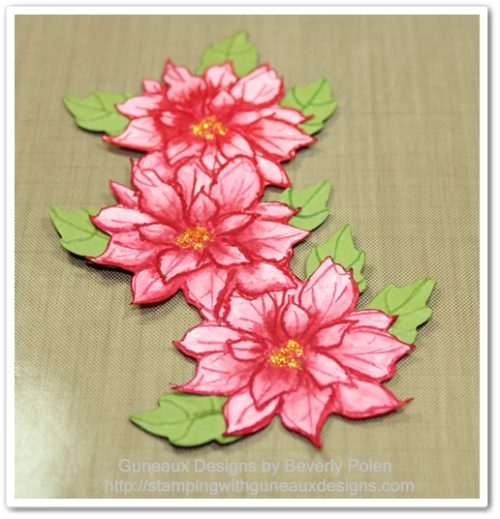
  • (OPTIONAL) Punch or die cut leaves to adhere to the underside of the poinsettias,
  • Attach dimensions (double layer) on the back of the piece,
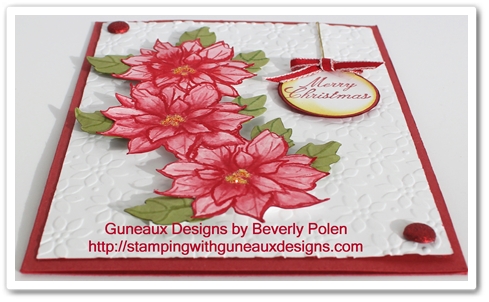
  • Place a 4″ x 5-1/4″ piece of Whisper White Card Stock inside the Petals-A-Plenty Embossing Folder and run through the Big Shot,
  • Cut an 8-1/2″ x 5-1/2″ piece of Riding Hood Red Card Stock and fold (or score) in half to create a card base,
  • Attach the embossed Whisper White Card Stock to the card base,
  • Attach the cascading poinsettias onto the left side of the Whisper White Card Stock (see picture),
  • Add a sentiment (I used the “Merry Christmas” sentiment from the Come to Bethlehem stamp set),
  • Finish decorating as desired.

 God’s Blessings!
Stamping With Guneaux Designs
by
Beverly Polen

Enjoy using your Stampin Up Watercolor Winter Stamp Set!

Stampin Up Watercolor Winter

As the calendar turns to October, I begin to think about holiday cards like this one that features the Stampin Up Watercolor Winter Stamp SetThe card is actually a birthday card for a special person who has a birthday during December.    Stampin Up Watercolor Winter

This view of the card shows the dimensions of the key elements from the Stampin Up Watercolor Winter stamp set:

Stampin Up Watercolor Winter

I love the pine needles and cones from the Stamping Up Watercolor Winter set.  In the past I have resorted to making my own pine needles for cards.  So this set will go a long way in speeding up my stamping of pine-related elements on cards.

Stampin Up Watercolor Winter

Don’t you just love the new Vintage Faceted Designer Buttons as shown here?

Let’s make this card together.  Go to your craft room and get out the following supplies:


Stampin Up Supplies:

Stamp Sets (clear mount):  Stampin Up Watercolor Winter (129727) and Bring On The Cake (for the sentiment) – (121958)

Paper:  Crumb Cake Card Stock (120953), Cherry Cobbler Card Stock (119685), Gumball Green Card Stock (126840), Whisper White Card Stock (100730), and Be of Good Cheer Designer Series Paper (126896)

Ink (Classic):  Real Red (126949), Cherry Cobbler (126966), Gumball Green (126861),  (Markers) Soft Suede and Chocolate Chip (119703)

Accessories:  Big Shot Die-Cutting Machine (113439), Petals-A-Plenty Textured Impressions Embossing Folder (116824), Cherry Cobbler Dazzling Details (125585), Dazzling Details (124117), Vintage Faceted Designer Buttons (127555), and Brights Collection 3/16″ Brads (119740)


Buy Stampin Up Products

INSTRUCTIONS FOR MAKING THIS CARD FEATURING THE STAMPIN UP WATERCOLOR WINTER STAMP SET

  • Fold an 8-1/2″ x 5-1/2″ piece of Crumb Cake Card Stock in the middle to for a card base.
  • Cut a  5-1/4″ x 4″ piece of Cherry Cobbler Card Stock.
  • Place the Cherry Cobbler Card Stock into the Petals-A-Plenty Embossing Folder and run through the Big Shot.
  • Cut a 4-3/4″ x 2-1/4″ piece of Whisper White Card Stock. 
  • Cover the outline poinsettia stamp with Real Red Ink and stamp onto the center of the Whisper White Card Stock.
  • Cover the solid poinsettia stamp with Cherry Cobbler and stamp over the outline poinsettia stamp image (recommend using a Stamp-A-Ma-Jig – 101049).
  • Cover the pine needles stamp with Gumball Green Ink and stamp the image in the two places shown in the picture of the card.
  • Cover the outline pine cone stamp with a Soft Suede Stampin Write Marker and stamp the image in the two places shown in the picture.
  • Cover the solid pine cone stamp with a Chocolate Chip Stampin Write Marker and stamp the image over the outline pine cone image (recommend using a Stamp-A-Ma-Jig).
  • Apply Cherry Cobbler Dazzling Details onto the poinsettia as desired.
  • Apply Dazzling Details (white) onto the pine needles and cones as desired.
  • Take two Cherry Cobbler Designer Brads and cut off the prongs.
  • Adhere the brads into the center of two small Vintage Faceted Designer Buttons (I used Crystal Effects).
  • Adhere the buttons to the Whisper White card stock as shown in pictures.
  • Cover with Soft Suede the Birthday Wishes stamp from the Bring On The Cake Stamp Set and stamp as shown in the pictures. You want to ink the word “Birthday” first and stamp it and then the word “Wishes”.
  • Cut a 4-15/16″ x 2-7/16″ piece of Crumb Cake Card Stock and adhere the decorated Whisper White Card Stock to it to form a mat.
  • Cut two 2″ squares of design from the Be of Good Cheer Designer Series Paper (see pictures).
  • Cut two 2-1/4″ squares of Gumball Green Card Stock.
  • Adhere the two square pieces of the designer series paper to the two squares of Gumball Green Card Stock.
  • Adhere the Cherry Cobbler Embossed Card Stock to the front of the card base.
  • Adhere the designer series paper and mat squares to the Cherry Cobbler Embossed Card Stock (see pictures).
  • Place dimensionals on the back of the  Crumb Cake mat with the decorated Whisper White Card Stock.
  • Remove the backing from the dimensionals and adhere to the card front (see pictures).
  • Using a Gold Gel Pen, cover the center of the flowers that are embossed onto the Cherry Cobbler Card Stock.

Buy Stampin Up Products

God’s Blessings!
Stamping With Guneaux Designs
by
Beverly Polen
Enjoy the Stampin Up Watercolor Winter Stamp Set!