Paper Flowers – Stampin Up

Making paper flowers to enhance your paper crafts is such a hot trend, and it’s so much fun to do.  There are many techniques for making paper flowers and various mediums from which to make them (i.e., card stock, crepe paper, fabric, metal, tissue paper, etc.).  Have you made any paper flowers for your paper crafts?  If you haven’t, this post will provide you with instructions on how to make them from card stock.  I’m sure you’ll enjoy having elegant paper flowers on your greeting cards and other crafts.
The technique that I discuss below is simple and I call it “scrunching”.  Follow these steps to make “scrunched” paper flowers:

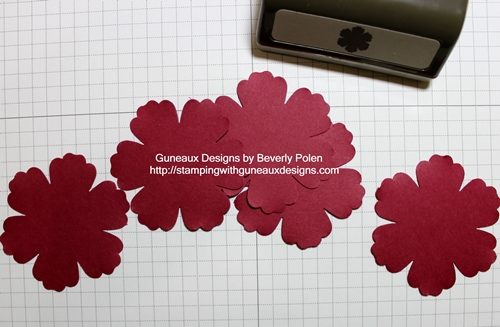
STEP 1: Punch five flowers from card stock (of any color) using the Blossom Punch (125603), or a floral punch or floral die cut of your choice.

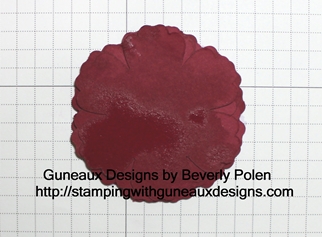
STEP 2:  Spritz each flower with water,  Vanilla Shimmer Smooch Spritz (118772), or other liquid of your choice.  This is important for getting the right texture when you scrunch the petals.

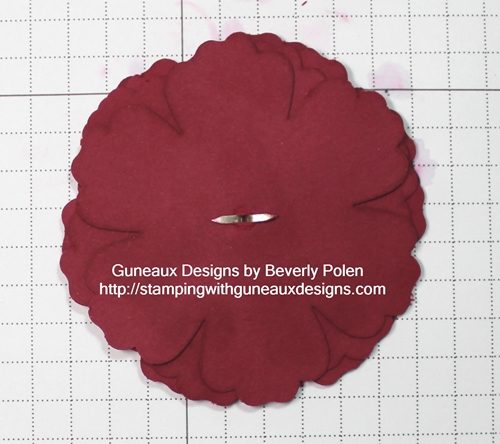
STEP 3:  After spritzing them, layer the five flowers one on top of another (you can offset them as well).
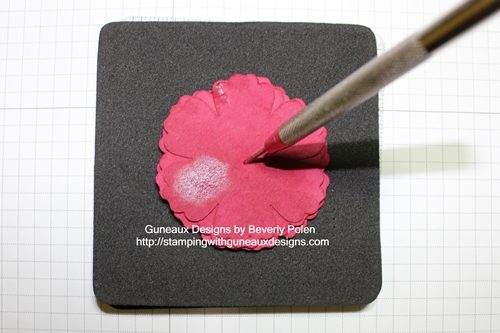
STEP 4:  Using a Paper-Piercing Tool (126189) and Mat (126199), poke a hole in the center of the layered flowers.
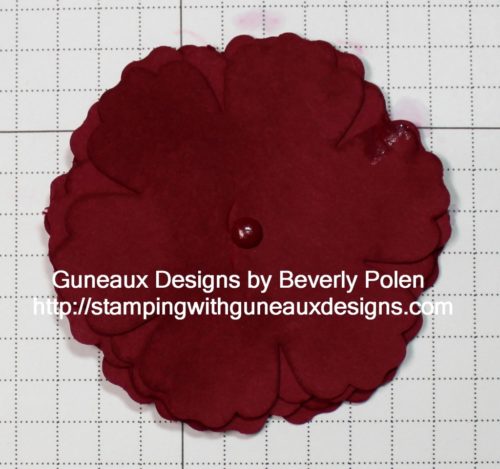
 STEP 5:  Insert a brad into the hole and spread the prongs.
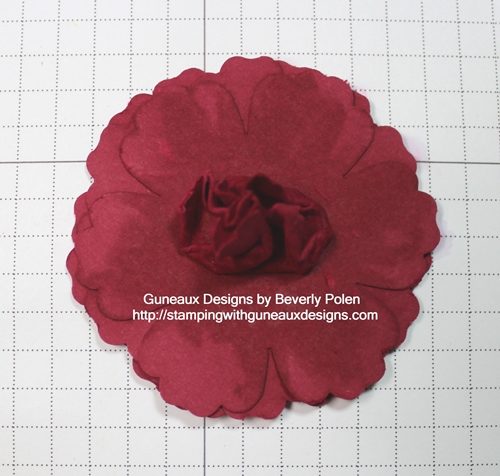
STEP 6:  Beginning with the top flower, scrunch it tightly while wet.
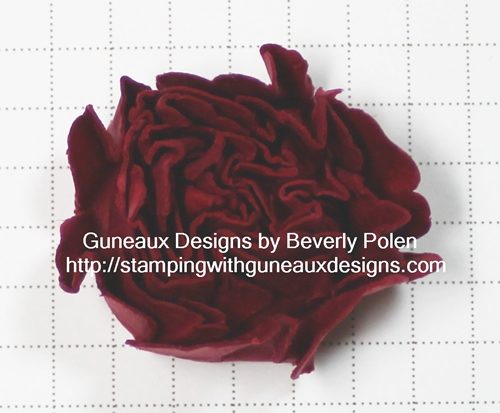
 STEP 7:  Continue scrunching the remaining layers.

STEP 8:  While the layers are wet (if not, spritz again), reshape the flower to your desire and let it completely dry.

(now that the flower is dry, the color of the card stock is true.)

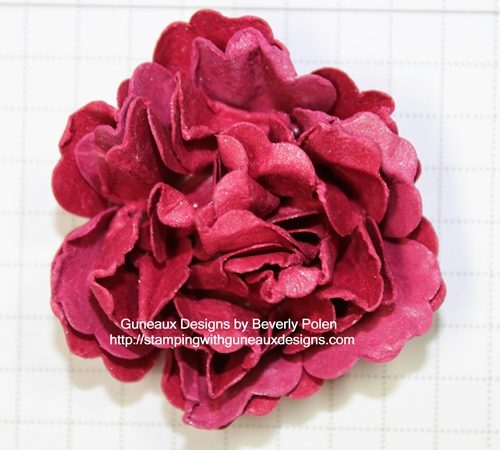
STEP 9:  Use your beautiful flower on a card, scrapbook page, or 3-D paper craft.

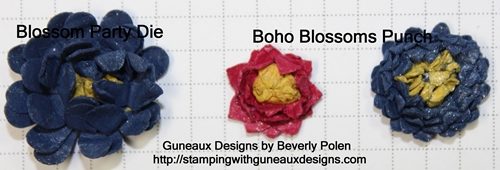
The following picture shows other flowers I made with the Blossom Party Die (115971) and Boho Blossoms Punch (119858).  Add a piece of Daffodil Delight or Summer Starfruit card stock as the top flower to create the appearance of a stamen.

Enjoy making paper flowers!


God’s Blessings!

Stamping With Guneaux Designs

by

Beverly Polen

Floral Frames Framelits

The Floral Frames Framelits from Stampin’ Up! rank at the top of my favorite framelits.  When it debuted the framelits in January 2012, Stampin’ Up! also developed rubber stamps that coordinated with the framelits.  The Floral Frames Framelits have a coordinating stamp set; however, my card share today does not feature that stamp set.  It features the Floral Frames Framelits

Floral Frames Framelits

I’ve heard a lot of stampers express their displeasure with one of Stampin’ Up!’s new “In Colors” called Summer Starfruit.  I think it is a cool color and if you combine it with the right color(s), it looks great.  I think this card looks great with the Summer Starfruit Card Stock and Primrose Petals Card Stock, which is also a new In Color.

Below are the Stampin’ Up! Supplies used for this card as well as the instructions.

Stampin Up Supplies:

Paper:  Summer Starfruit Card Stock (126839), Primrose Petals Card Stock (126841), Gumball Green Card Stock (126840), and Whisper White Card Stock (1007300)

Stamp Set:  Full of Blessings (128081)

Ink (Classic):  Summer Starfruit (126991), Primrose Petals (126858), Gumball Green (126861), and Basic Black (126980)

Accessories: Betsy’s Blooms Stampin’ Around Standard Wheel (126943), Floral Frames Framelits (127012), Chevron Embossing Folder (127749), Big Shot Die-Cutting Machine (113439), Gumball Green 3/8″ Stitched Satin Ribbon (126848), and Primrose Petals 3/8″ Stitched Satin Ribbon (126844)

Instructions:

  • Cut an 8-1/2″ x 5-1/2″ piece of Primrose Petals Card Stock, score down the middle, and fold to create your card base.
  • Cut a 5-1/4″ x 4″ piece of Summer Starfruit Card Stock, insert it into the Chevron Embossing Folder, and run through the Big Shot (Tab 1).
  • Cut a 4″ square of Whisper White Card Stock.
  • Cover the Betsy’s Blooms Wheel with Primrose Petals Ink and roll it acriss the top of the Whisper White Card Stock.
  • Cover the Betsy’s Blooms Wheel with Gumball Green Ink and roll it across the middle of the Whisper White Card Stock.
  • Cover the Betsy’s Blooms Wheel with Summer Starfruit Ink and roll it across the bottom of the Whisper White Card Stock.
  • Lay the third largest Floral Frames Framelit onto the floral piece and run it through the Big Shot (Tab 2).
  • Lay the second smallest Floral Frames Framelit onto a piece of Gumball Green Card Stock and run it through the Big Shot (Tab 2).
  • Lay the smallest Floral Frames Framelit onto a piece of Whisper White Card Stock and run it through the Big Shot (Tab 2).
  • Cut out the impression left on the Whisper White Card Stock.
  • Stamp the sentiment, “Give Thanks”, from the Full of Blessings Stamp Set onto the Whisper White Floral Frame cutout.
  • Make a bow with a small piece of the Gumball Green Ribbon.
  • Assemble the card according to the above picture.

 Buy Stampin Up Products

God’s Blessings!

Stamping With Guneaux Designs

by

Beverly Polen

Enjoy using your Stampin Up Floral Frames Framelits

Faux Patina Technique Featuring Stampin Up Tweet Leaves

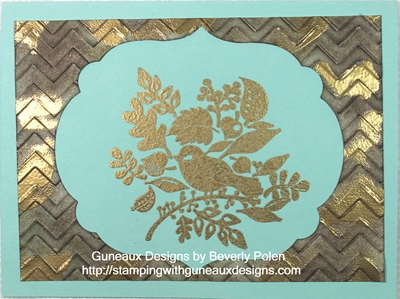
Have you created a card using the Faux Patina Technique?  Pull up a chair at your craft table, get out a few supplies (see below), and let’s make a card that uses the Faux Patina Technique and the Tweet Leaves Stamp Set from Stampin’ Up!  This is my first creation using the Faux Patina Technique, and I’m sure if I practice I’ll get better at it.  But for now, let’s try a simple card featuring the technique.  This is the card we’ll develop:

STAMPIN’ UP! SUPPLIES:

Stamp Set: Tweet Leaves (128111)

Paper:  Whisper White Card Stock (100730) and Pool Party Card Stock (122924)

Ink (Classic):  Crumb Cake (126975), Marina Mist (126962), Always Artichoke (126972), and Early Expresso (126974)

Accessories: Chevron Embossing Folder (127749), Labels Collection Framelits (125598),  Big Shot Die-Cutting Machine (113439), (Stamping Sponges (101610), VersaMark Ink (102283), Gold Embossing Powder (109129), and Heat Tool (129053)

INSTRUCTIONS:     Now let’s begin applying the Faux Patina Technique.

  • Cut a 5″ x 3-5/8″ piece of Whisper White Card Stock.
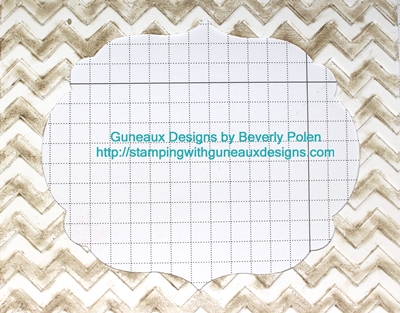
  • Center on the card stock the largest label from Labels Collection Framelits and run through the Big Shot on Tab 2.
  • Lightly ink one side of the Chevron Embossing Folder with Crumb Cake ink, insert the card stock, and run it through the Big Shot on Tab 1.

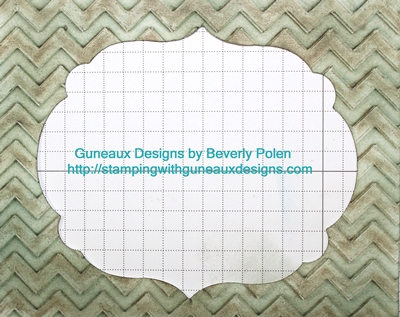
  •  Sponge Marina Mist ink over the embossed portion of the card stock.Faux Patina Technique
  • Sponge Always Artichoke ink over the Marina Mist ink.Sponge Early Expresso ink over the Always Artichoke ink.

  • Let the ink dry naturally or use a heat tool.
  • Randomly apply the edge of the VersaMark ink pad over the patina piece.  Do not completely cover the card stock with VersaMark.
  • Cover the patina piece with Gold Embossing Powder and heat set.

So, what do you think thus far about the Faux Patina Technique?  You can use other colors of ink of course if you desire.  Now, let’s create the card.

  • Cut an 8-1/2″ x 5-1/2″ piece of Pool Party card stock.
  • Fold the card stock in the center to form the card base.
  • Cover the Tweet Leaves stamp with VersaMark ink.
  • Stamp onto the card front, being careful to position the image on the card so the patina piece will be centered over the image.
  • Apply Gold Embossing Powder and heat set.
  • Attach the patina piece onto the card front centering it over the Tweet Leaves image.

You have just created a beautiful card using the Faux Patina Technique!  It will be interesting to try other color combinations for the technique.

God’s Blessings!

Stamping With Guneaux Designs

by

Beverly Polen

Have fun with the Faux Patina Technique!

Labels Collection Framelits

Labels Collection Framelits are one of Stampin Up Framelits sets that you can use for various rubber stamping techniques.  Today, I have for you a “thinking of you card” made with the Labels Collection Framelits and the card features stamping multiple card stock layersStampin Up Framelits

Before discussing the Labels Collection Framelits, let me share information about the  first layer for the card.  It reflects the hot waxing technique, which I’ve not used before but really enjoyed it.  I heated gold, silver, and red wax, one at a time, and spread it across the cardstock to create the background.   I used one of the Adorning Accents Edgelits (125595) to shape the top of the card stock. 

Now, on to the Labels Collections Framelits cut outs that make up the center piece of the card.  I used three of the Labels Collections Framelits.  Counting from the largest to the smallest with the largest numbered 5, I used the 4th, 3rd, and 2nd frames from the Labels Collections Framelits.   To begin the layering of the frames on which to stamp, I used a temporary adhesive on the back side of the frames and glued the 2nd frame to the 3rd and the 3rd to the 4th, as shown below.

Labels Collection Framelits

To decorate the Labels Collection Framelits cut outs and create the card, follow these steps:

1. Using the flower image from the Papaya Collage Stamp Set (126612), cover the stamp with Pretty In Pink Ink (126955) and randomly stamp the image.

Labels Collection Framelits

2.  Using the multiple floral stamp from the Betsy’s Blossoms Stamp Set (126006), cover the largest flower with VersaMark Ink and randomly stamp around the Labels Collection Framelits cut outs.

3.  Cover the VersaMark images with Gold Emboss Powder (109129) and set with heat. Labels Collection Framelits

 4.  Cover the leaf on the flower stamp from the Papaya Collage Stamp Set with the Gumball Green Stampin’ Write Marker and stamp the image in the spots shown in the below image.

Stampin Up Framelits

5.  Cut an 8-1/2″ x 5-1/2″ piece of Pretty in Pink Card Stock (100459) and fold in the center to create the card base.

6.  Emboss the top front of the card base with one of the Adorning Accents Folders (125601).

7.  Adhere your first layer (mine is the waxed background) to the card base.

8.  Adhere the decorated Labels Collection Framelits cut outs onto the first layer.

9. Stamp the sentiment, “thinking of you” onto a piece of Pretty in Pink Card Stock with VersaMark ink.  Cover with Gold Emboss Powder and heat set it.  Attach to the card.

Buy Stampin Up Products

God’s Blessings!

Stamping With Guneaux Designs

by

Beverly Polen

Enjoy your Labels Collection Framelits!

Stamping Multiple Card Stock Layers – Guneaux Designs

Stamping multiple card stock layers is a hot trend in the paper crafting world.  I created a card featuring the trend of stamping multiple card stock layers for an acquaintance who was diagnosed recently with breast cancer.  I wanted to send her a card to let her know that I care and am praying for her.  Therefore, I decided to use this technique of stamping multiple card stock layers for her card.
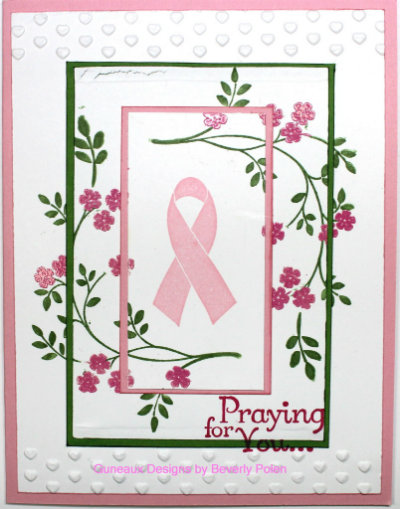
Everyone knows that the outcome of stamping multiple card stock layers would leave gaps in the stamped images, right?  Additionally, the result will be less than the aspired goal, which is to have a pretty card.  Agree?

Well, there is a method to use; however, you’ll still have gaps, but let’s see what we can do with those gaps.  Follow these instructions to use this technique:

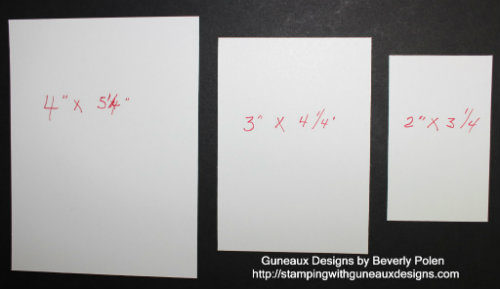
1.  Cut pieces of Whisper White Card Stock according to this picture:
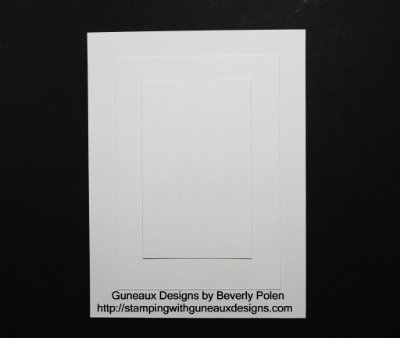
2.  Layer the Whisper White Card Stock according to the following picture.  You’ll need to use a temporary glue on the backside of the two top layers to prevent them from moving as you stamp the images.
3.  Using a single inked stamp, randomly stamp the image around the multiple card stock layers.

4.  Disassemble the three pieces of card stock.

5.  Cut two pieces of colored card stock that match your ink (your choice) of a size to form mats for the top two layers.

6.  Assemble the pieces and your gaps will appear as intended, and you’ll have a beautiful card, like this one.

Stampin’ Up! Supplies Used for the Above Card (including item numbers):

Paper:  Whisper White Card Stock (100730), Pretty in Pink Card Stock (100459), and Gumball Green Card Stock (126840)

Stamp Sets:  Thoughts and Prayers (127805 – c) and the retired Ribbon of Hope

Ink:  Gumball Green Stampin’ Write Marker (126856 – comes in one package of the new 2012-2014 In Colors) and Pretty in Pink Classic Stampin’ Pad (126861)

Accessories:  VersaMark Ink (102283), Melon Mambo Stampin’ Emboss Powder (123223) , Heat Gun (129053) , and Adorning Accents Folders (125601)

 Enjoy!

God’s Blessings!

Stamping With Guneaux Designs By Beverly Polen

Have fun Stamping Multiple Card Stock Layers
August and Stampin’ Up! Specials

August and Stampin’ Up! Specials!   August is a big month for Stampin’ Up! crafters! Let me share why!

August 1 Stampin’ Up! Special – MDS2: Today, the new upgraded Stampin’ Up! My Digital Studio (MDS2) becomes available! AND, you can try it out on a 30-day trial!! It can’t be any better!

  
August 1 Stamp’ Up! Special – Holiday Catalog: Today is the debut of the new Stampin’ Up! Holiday Catalog. Wow, so many wonderful items will be found in this catalog, which is a larger catalog than any previous holiday catalogs. What is your favorite item in this catalog?
 
 
(click on picture to see the catalog contents)


August 1 – 31 – Stampin’ Up! Special – 31% Discount: Beginning today through August 31, you can save 31% on 31 digital content items for the MDS2!  Yes, that’s right, 31% off on 31 digital content items!! Wow, what more could you want?

August 1 – 31 – Stampin’ Up! Special – Spooktacular Offer: During August, there are only treats – no tricks – for new Stampin’ Up! Demonstrators (i.e., those signing up during August)! New demonstrators will get a FREE Howl-o-ween Printer’s Tray project kit – a $60 value when they sign up. Remember, it’s only $99 to sign up under Guneaux Designs (scroll to the mid-section of the page) and create your own Starter Kit, choosing up to $125 in any current Stampin’ Up! products!

Whee, have I forgotten anything? If I remember other items, you are guaranteed that I’ll let you know!

Go to Guneaux Designs Facebook Business Page and like my page, PLEASE!
Follow me on Twitter too!

God’s Blessings!
 
 
Stamping With Guneaux Designs
By Beverly Polen