Rubber Stamping Technique – Sliced Rock – Guneaux Designs

I was playing around with my Stampin’ Up! rubber stamp supplies recently and developed a rubber stamping technique that I call the Sliced Rock Technique.  The rubber stamping technique is demonstrated in the video below.

I’m sure you’ve seen how beautiful sliced rock can be with various patterns and colors.  I think the most beautiful ones have a center pattern that is repeated in the outer layers in varying colors.  You can find images of sliced rock here, if interested.

Rubber Stamping Technique – Guneaux Designs Sliced Rock Technique

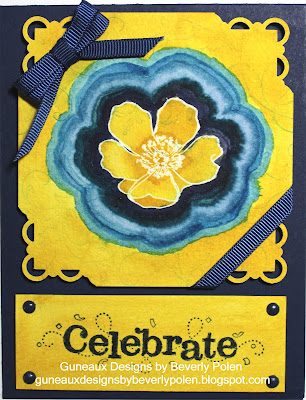
I call this rubber stamping technique , Unpolished Sliced Rock Technique.  I used one of the floral stamps from the Stampin’ Up! Fabulous Florets Stamp Set for my center image.  I covered the stamp with VersaMark and stamped it in the center of my piece of Watercolor Paper.  I then used White Embossing Powder over the image and set it with a heat gun.  Using my Aqua Painter and several blue inks, I water colored the floral pattern in layers around the center piece, the flower.  Here is the card I made with a similar image.
Rubber Stamping Technique - Guneaux Designs Sliced Rock Technique
The video (link) below demonstrates this rubber stamping technique, Guneaux Designs Unpolished Sliced Rock Technique.

COME BACK TO SEE THE SECOND VERSION OF THIS RUBBER STAMPING TECHNIQUE, THE POLISHED SLICED ROCK TECHNIQUE.
God’s Blessings!

Stamping With Guneaux Designs

by

Beverly Polen

I hope you try this rubber stamping technique!

A Cherry on Top Stamp Set, Floral District DSP, Labels Collection Framelits – Happy Birthday

Don’t you love making Stampin’ Up! greeting cards for people who are very special to you?  I sure do.  This card is just that ~ a happy birthday card for a very special friend.  It features the new Hostess Stamp Set, A Cherry On Top (125971).  Also featured are the beautiful Floral District Designer Series Paper (126919) and Labels Collection Framelits(125598).

INSTRUCTIONS:
  • Cut a 6″ x 12″ piece from a 12″ x 12″ piece of Rich Razzleberry Card Stock, folding it in a 6″ square so it opens from the bottom up.
  • Cut a 5-3/4″ square of Floral District DSP, round the edges with the  Stampin’ Up! Corner Punch(119871), and adhere to the card base.
  • Using the two largest Labels Collection Framelits, cut two frames; the largest with Rich Razzleberry Cardstock and second one with Lucky Limeade Card Stock.
  • Cover the cake dish top stamp image from the A Cherry On Top Stamp Set with VersaMark ink and stamp onto Whisper White Card Stock.
  • Emboss it with White Embossing Powder(109132).
  • Using Rich Razzleberry and Lucky Limeade inks, stamp the cake dish pedestal and cupcake bottom and top images on the Whisper White Card Stock in appropriate location (see pics).
  • Using Real Red ink, stamp the cherry on top of the cupcake.
  • Cover only the cake dish top with Crystal Effects (101055) and let dry.
  • Cut out the images as one piece and adhere it the Lucy Limeade Card Stock.
  • If desired, place a ribbon bow onto the pedestal.
  • Place foam dimensionals on the back of the Lucky Limeade frame.
  • Adhere it to the Rich Razzleberry frame.
  • Adhere that to the Floral District DSP.

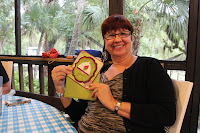
The following pictures are of the recipient of this beautiful card!  Happy Birthday, Lin!

God’s Blessings!
 
Stamping With Guneaux Designs

Direct to Paper Technique

Did everyone has a good Memorial Day remembering the holiday’s real purpose?  I don’t know how you feel, but I don’t like the commercialization of this holiday.
I’ll not get on my soap box and move on.  I decided for my project share today to try for the first time the Direct to Paper Technique where you use a swiping motion with stamp pads or spots to apply ink to card stock.  It really was quite simple.  Again, this was my first try, so don’t be too hard on me! (lol)

 I used a Getting Started Collection of Classic Stampin’ Spots (119979) to apply Marina Mist, Certainly Celery, Old Olive, Early Espresso, and Pumpkin Pie inks.  To my knowledge, there are no special tricks to this technique ~ it’s a form of art for which you decide how to use.
 
I added the expired Sale-A-Bration Everyday Enchantment Organdy Calypso Coral Ribbon at the bottom of the card.  The sentiment, enjoy, is from the Fabulous Phrases Stamp Set (120501) and it was applied to Whisper White card stock with Calypso Coral ink.  I used one of the new Bitty Banners Framelits (129267) to create the sentiment.  And the wonderful stamp set that I hate to see go, Plant Hope (117042) was used for the tree images.  This Thursday, May 31, is the last day to buy this stamp set.  Enjoy!
God’s Blessings!
 
 
Stamping With Guneaux Designs
by
Beverly Polen
 
Direct to Paper Technique

Memorial Day Card

Memorial Day Card:  Let us pause today in remembrance of those who gave their precious lives for our nation, the United States of America.  Let us also bow our heads in prayer for those brave military men and women who currently are serving our nation, and those who have served in a war, conflict, or engagement and walked away with visible and invisible injuries and scars.  May God bless them ALL, and may we be very thankful for them placing their lives in jeopardy to protect US and our precious freedom!

 If you cannot stand behind our veterans, please feel free to stand in front of them!
This Memorial Day Card is dedicated to my family members who have served this great country in such a brave manner!
God’s Blessings!
Stamping With Guneaux Designs
by
Beverly Polen
Memorial Day Card

Zentangle – Stamping With Guneaux Designs

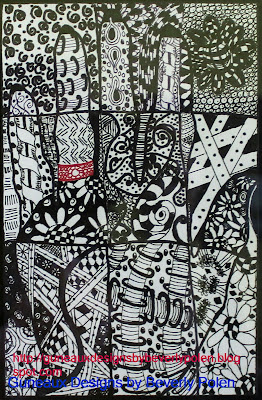
Today I am sharing a Zentangle piece of art that I developed.  I used a piece of Stampin’ Up! Whisper White Card Stock (100730) when developing it. If you are stressed, try this type of art.  It is so very relaxing!

I used several tangling patterns in creating this piece of art.  Tell me what you see as the main element in the Zentangle!  Hope you enjoy!

Zentangle
If you would like to try this beautiful form of artwork, you can find patterns of tangling to use at  http://tanglepatterns.com/tag/zentangle.
God’s Blessings!
Stamping With Guneaux Designs
by
Beverly Polen

Zentangle

Zentangle Valentine – Stampin’ Up! Hearts Collection Framelits

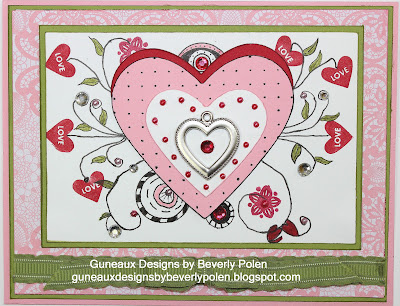
Today I have for you a Zentangle Valentine that features the Stampin Up Hearts Collection Framelits
 
What are your favorite colors for Valentine cards?  I don’t have a favorite. Therefore, I am not adverse to using non-traditional colors, as I did for this Zentangle Valentine card.  As you can see, my non-traditional colors are pink and green. I added some zentangle/doodling on the primary piece of the card (e.g., the leaves, circles, etc.).
 
Zentangle Valentine
 
STAMPIN’ UP! PRODUCTS AND CATALOG NUMBERS
 
Stamp Set: I {Heart} Hearts (118571)
  
Cardstock and Designer Series Paper: Pretty in Pink (100459), Lucky Limeade (122922), Real Red (102482), Whisper White (100730), and Flirtatious Specialty (122360)
 
Ink and Markers: Real Red (103133), Lucky Limeade (123002), Basic Black (100082), and Pretty in Pink (100045)

Accessories: Stampin Up Hearts Collection Framelits (125599) Basic Pearls (119247) , Basic Rhinestones (119247) , Trinket Hearts (125605), and Lucky Limeade 3/8″ Ruffled Ribbon (122977)

 
God’s Blessings!
Stamping With Guneaux Designs
by
Beverly Polen
 ENJOY THE ZENTANGLE VALENTINE CARD!