Splitcoaststampers Color Challenge, CC576

Splitcoaststampers has a Color Challenge, CC576, posted here today, and the colors being featured are Tempting Turquoise, Tangelo Twist, and Whisper White.  What do you think about Tempting Turquoise and Tangelo Twist together?  At first I was hesitant about the colors, but after I began creating, I realized how well they go together.  BTW,  I do not have any Tangelo Twist, so I substituted Tangerine Tango.

This is the card I made for the Splitcoaststampers Color Challenge, CC576:

Splitcoaststampers Color Challenge, CC576

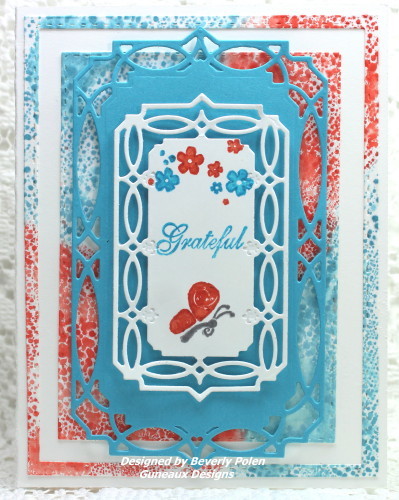
(Update:  This card was chosen as a Splitcoaststampers’ favorite.)

These are the steps I took to make the card:

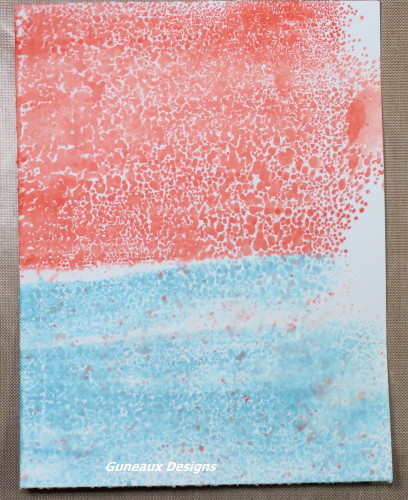
  • I began the card by spreading Tim Holtz’s Distress Ink – Broken China and Ripe Persimmon – (close to Tempting Turquoise and Tangerine Tango) onto my Rangerink non-stick craft sheet, being careful to not blend the colors.
  • Then I spritzed the craft sheet with water mist until bubbles formed.
  • I cut a 4″ x 5-1/4″ piece of Whisper White card stock and laid it, front side down, onto the ink.
  • I slightly, very slightly, touched the back of the card stock in several places to ensure ink transferred to the card stock.
  • I used the heat gun to ensure it was dry.

This photo is my first try.  Somehow, I don’t know how, I got the orange mixed into the blue.  Needless to say, that piece went into the trash and I started over following the above steps.

Splitcoaststampers Color Challenge CC576

  • After achieving the color mixture I wanted, I used Our Daily Bread Designs (ODBD) two largest Double Stitched Rectangles Dies (CBD123) to cut out three die cuts.
  • I only used the largest and smallest die cuts to adhered to the front of a Whisper White (thick) card stock, as shown in the following photo.

Splitcoaststampers Color Challenge, CC576

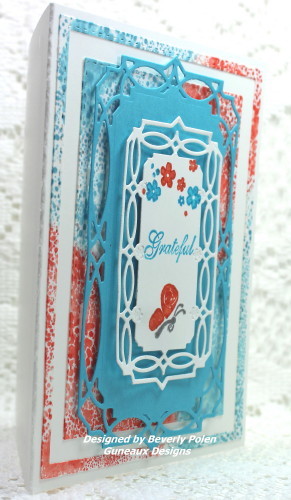
  • Next, I added adhesive foam to two frames, Tempting Turquoise and Whisper White, made with the Spellbinders Nestabilities Astoria Decorative Element Dies (S5-254)
  • Before adding the Whisper White frame, I stamped the images onto the frame.
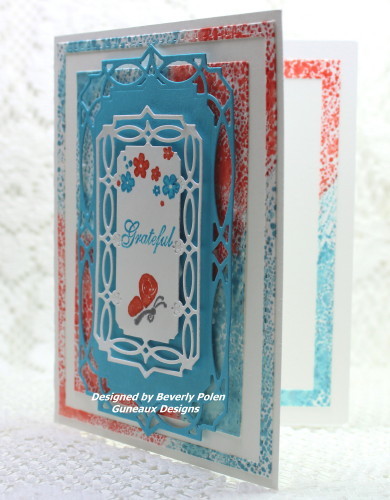
  • I adhered the third frame die cut that I mentioned above to the inside of the card as shown in the below photo.

Splitcoaststampers Color Challenge, CC576

Enjoy and thanks for stopping by!

BlogDivider_zpsed339ea1

SUPPLIES USED:

Stamps:  Studio g Blessed
Paper:  SU Whisper White, Tempting Turquoise, and Tangerine Tango Card Stock
Card Size: A2
Ink:  Tim Holtz Distress Ink and SU Tempting Turquoise and Tangerine Tango
Accessories:  Double Stitched Rectangles Dies (CBD123), Spellbinders Nestabilities Astoria Decorative Element Dies (S5-254), and Rangerink Non-Stick Craft Sheet

BlogDivider_zpsed339ea1

Swallowtail Butterfly

God’s Blessings!
Stamping With Guneaux Designs by Beverly Polen

“Come to me, all you who are weary and burdened, and I will give you rest.” Matthew 11:28

Painting Stamps With Brushos

Have you ever painted stamps with brushos and stamped your images onto card stock?  Well, I had never painted stamps with brushos until this week.  But there is a L O N G story about my ordeal with using brushos, and if you’re interested, keep reading.

There were two challenges for yesterday, Monday, on Splitcoaststampers.  So I made this card to submit for the two challenges: 1) TLC575 – Painting Stamps With Brushos – Hosted by Karen Dunbrook, and 2) CAS366 – Glittery Sentiment – Hosted by Holly (hbrown).

Painting Stamps With Brushos-

The easy challenge was to add glitter to a sentiment. I added a glitter glue to the word, LOVE, in my sentiment.  Hopefully you can see the sparkle, but if not, here’s a closeup of the sentiment.

Painting Stamps With Brushos

Now, on to what I considered a difficult challenge!  Painting stamps with brushos! This technique is a water coloring technique.  LOVE was NOT what I felt in responding to the challenge!!  First, I have NEVER used brushos, and I hadn’t planned to for a while! Yes, I had brushos on hand, but I had them sitting in a drawer, untouched!!  When I read the details about the challenge, I hit the panic button! Yes, I did!!  Sure I could have passed up this challenge and waited on the next one. Well, you have to know me. I don’t turn down a challenge!

So I first thought, “How in the world am I going to use brushos; I hardly know what they are!”  Then I told myself, “You’re not one to be defeated; get those “things” out of the drawer and get to it”.

Painting Stamps With Brushos_1

Well, I listened to “self”, got out the brushos, opened the box, and stared at those little white containers. Then I thought, “I saw a Jennifer McGuire video recently and she said NOT to open the containers.”  So, I wondered how am I to get to those “brushos”?  So I searched and searched to find that video again!  When I found it, that thing got watched over and over again.  Boy, does she make it look so easy. WRONG!!

As she instructed, I punched holes in the lids of those white containers and then looked at the name of the color on each container.

Painting Stamps With Brushos-4_1

Boy, some of those names, like Gamboge!  I headed to my computer to look for a definition of Gamboge.  Well, the internet told me that Gamboge is a yellow pigment. OK, I can work with that, I thought.  So I tapped some crystals onto my acrylic block!  “What? That’s not yellow!”, was my thought.

Painting Stamps With Brushos-5_1

Yeah, I know, get to the point!!  Well the point to all of my rambling is to say I had a terrible time painting my stamps with brushos. I brushed brushos on so MANY stamps, stamped them onto watercolor paper, and through them in the trash. I thought that it was the size of the stamp that was defeating me. Determined to not be defeated, I thought, “Get out the smallest stamp you can think of and get brushing!”  So I did.

And this card is the result of two days of struggling, when I had time to struggle! Just remember that word “LOVE” in the sentiment on my card when commenting, please!! Thank you so kindly!

If you’ve never used Brushos, I really am not the person to teach you, or at least not at this point!!  But give me time!!  However, you can go to Jennifer McGuire’s videos on YouTube.com, and you’ll find plenty of instruction there.

Oh, one last thing, here’s a photo of my acrylic block after finishing.  The pigment crystals dried up.  Add a touch of water and you can use them again.  How cool is that?

Painting Stamps With Brushos-6_1

BlogDivider_zpsed339ea1

SUPPLIES:

Stamps: SU Thanks for Caring, SU Nature Walk

Paper: SU Whisper White and Concord Crush

Card Size: A2 

Ink: Brusho Crystal Colors, SU Rose Red Marker

Accessories: Brusho Crystal Colors, Water Color Brush, Acrylic Block, ODBD Double Stitched Rectangles, MISTI, and SU Dazzling Diamonds

Techniques: Painting Stamps

BlogDivider_zpsed339ea1

Swallowtail Butterfly

STAMPING WITH GUNEAUX DESIGNS BY BEVERLY POLEN

“Cast your cares on the Lord and He will sustain you; He will never let the righteous fall.”  Psalm 55:22

Water Coloring Technique – Stampin’ Up! Bold Butterfly Framelits

I hope everyone had a blessed and safe New Year!  Mine was uneventful, which is just what I wanted.  Today’s card features a water coloring technique and is a Happy Birthday Card that features the Stampin’ Up! Bold Butterfly Framelits Dies.

http://stampingwithguneauxdesigns.com/water-coloring-technique-su-bold-butterfly-framelits

http://stampingwithguneauxdesigns.com/water-coloring-technique-su-bold-butterfly-framelits

Have you ever been inspired to create a piece of artwork based on something you saw on a website (e.g., websites featuring jewelry, clothes, shoes, purses, etc.)?  It is a fun process, and that process was used for creating this card.

Yesterday’s (1/2/15) Inspirational Challenge on the Splitcoaststampers.com website involved using punches or die cuts for a basic shape, and then picking a favorite medium and several colors to get a beautiful confetti effect. The Etsy.com website, The Wildlands, was to be viewed for inspiration.  This item inspired me to use the Stampin’ Up! Bold Butterfly Framelits Dies (item #138135) to create my project.  Check out the site as you will find such beautiful artwork featured there.

Water Coloring Technique SU Bold Butterfly Framelits4_1The Water Coloring Technique required using an adhesive tape (e.g., Frog Tape, a Painters’ Tape) from which to punch or die cut an image.  After cutting out an image, what is left (i.e., the tape’s negative cutout)  became a “mask” that is attached to a piece of water color paper.  After attaching the mask, the image is to be water colored.

A better explanation of the technique can be found in this YouTube video by Lydia (aka; Understand Blue) who was the wonderful hostess for this challenge.  Her video provides a wonderful tutorial on the technique.  Stop by and watch it.

This is a closeup of the water colored butterflies.  Unfortunately, I didn’t have my tape adhered correctly to my piece of water color paper, so the colors bled.  🙁  But, I gave it my best shot as water coloring is not my forta.

Water Coloring Technique SU Bold Butterfly Framelits3_1I added three Swarovski® crystals to the butterfly body to give it some dimension.

The photo below is one of the inside of the card.  I added some doodling along with stamp images from Stampin’ Up! Papillon Potpourri Stamp Set (item # 123759).

water-coloring-technique-su-bold-butterfly-framelits

Don’t forget to watch Lydia’s video and try the technique!


http://stampingwithguneauxdesigns.com/water-coloring-technique-su-bold-butterfly-framelits

God’s Blessings!

Stamping With Guneaux Designs By Beverly Polen

Water Coloring Technique - SU Bold Butterfly Framelits

Secret Garden Stamp Set Stampin’ Up!

 SECRET GARDEN STAMP SET – STAMPIN’ UP! 

Secret Garden Stamp Set and Watercoloring

 I certainly hope that Stampin’ Up!’s Secret Garden Stamp Set is carried over in the upcoming 2013-2014 Annual Catalog.  I have found myself gravitating to this stamp set quite often when making cards.

Today’s card features two stamp images from the Secret Garden Stamp Set.  I stamped the floral and leaves images from the stamp set onto a piece of Stampin’ Up!’s Watercolor Paper.

Secret Garden Stamp Set
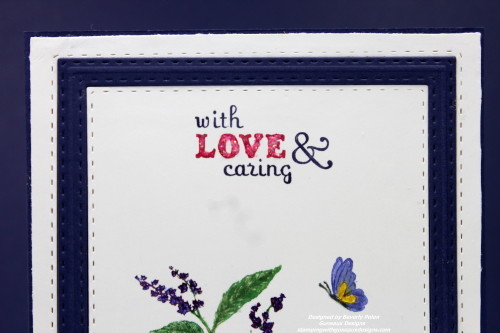
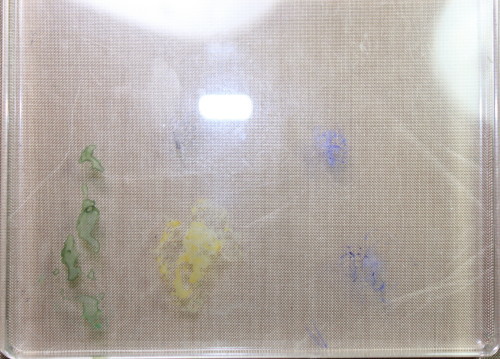
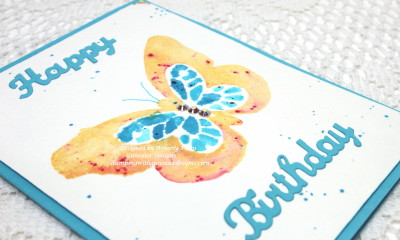
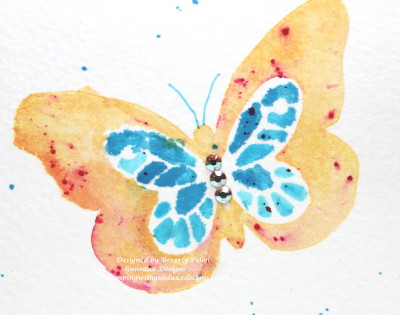
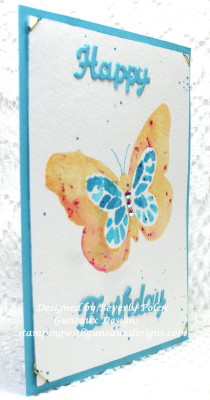
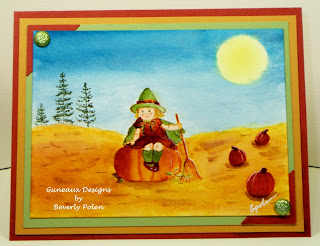
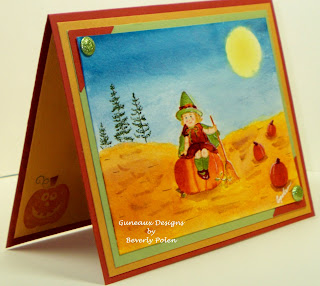
I stamped on Daffodil Delight and Rich Razzleberry Card Stock and cut out the three butterflies on the card front.  The butterflies are from the Kindness Matters Stamp Set.

The beautiful flower that is featured on the card front was stamped on the watercolor paper using Jet Black StazOn Ink.  I then water colored it with the Stampin’ Up! Rich Razzelberry Classic Ink.  After water coloring the flower, I masked it and stamped the stem and leaves from the Secret Garden Stamp Set. Secret Garden Stamp Set - Water ColoringThe sentiment, Happy Birthday (from the Apothecary Stamp Set), was stamped onto the watercolor paper with VersaMark Ink and then embossed with Gumball Green Embossing Powder.  I hope you enjoy it. 

SUPPLIES USED FOR THE SECRET GARDEN STAMP SET, WATER-COLORED  CARD: 

 Stamps:  Stampin’ Up! Secret Garden Stamp Set (129144 – clear), Kindness Matters Stamp Set (122902 – clear), and Apothecary Art Stamp Set (125527 – clear)

Paper:  Stampin’ Up! Watercolor Paper (122959), Rich Razzleberry Card Stock (115316), Daffodil Delight Card Stock (119683), and Rich Razzleberry Brights Color Collection Designer Series Paper Stack (117155)

Ink:  Stampin’ Up! Rich Razzleberry Classic Ink (126950), Rich Razzleberry Stampin’ Write Marker (115316), Daffodil Delight Classic Ink (126944), Daffodil Delight Stampin’ Write Marker (119677), Gumball Green Classic Ink (126861), Basic Black Stampin’ Write Marker (100082), Jet Black StazOn Ink (101406), and VersaMark (102283)

Accessories:  Daffodil Delight 1/4″ Stitched Grosgrain Ribbon (126872), Aqua Painter (103954), Stamp-a-ma-jig (101049), Gumball Green Embossing Powder (128981), and Paper Snips (103579) 

 God’s Blessings!
Stamping With Guneaux Designs
by
Beverly Polen

Secret Garden Stamp Set Stampin' Up!

SECRET GARDEN STAMP SET STAMPIN’ UP! 

Greeting Card Kids Stamp Set

GREETING CARD KIDS STAMP SET

 Living in FL does not allow me to enjoy the beautiful Fall season that I was so use to when I lived in N.VA.  Every year at this time, I have my friend, Sandy, send me pictures of her beautiful surroundings in PA so I can enjoy the Fall colors.  Missing the Fall colors prompted me to produce the following card made with the Stampin’ Up! Greeting Card Kids Stamp Set.  Also, I decided to take a stab at water coloring.  Please let me know what you think!
Greeting Card Kids Stamp Set
All products used to develop this card are from Stampin’ Up!, and are found HERE.
Stamp Sets:  Greeting Card Kids (item 120633); Got Treats (120627); and Plant Hope (120540)
Classic Ink (Ink Refills):  Pear Pizzazz (119674); Blushing Bride (119676); Pumpkin Pie (119672); Daffodil Delight (121604); Bashful Blue (105146); Marina Mist (121605); More Mustard (101990); Cajun Craze (121603); Always Artichoke 105177); and retired Blush Blossom
Paper:  Watercolor (105019); Cajun Craze (119684); More Mustard (100946); and Pear Pizzazz (119795)
Accessories:  In Color Glimmer Brads (121005; Pear Pizzazz); Photo Corner Punch (119878); and Aqua Painter (103954); 1/16″ Handheld Punch (101227); Sticky Strip (104294); and 2-Way Glue Pen (100425)
God’s Blessings to You!
Guneaux Designs by Beverly Polen
Stampin’ Up! Demonstrator in Parrish, FL