Beach Scene

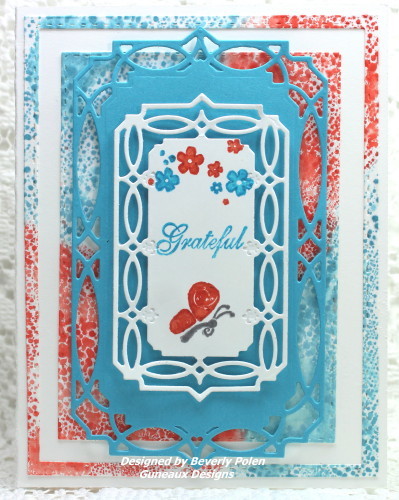
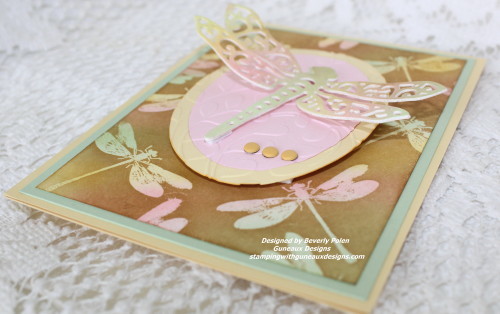
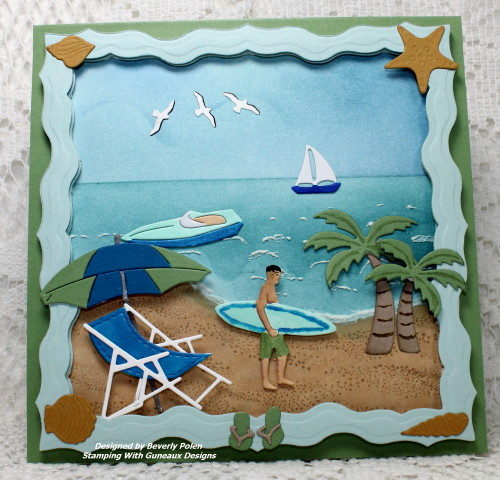
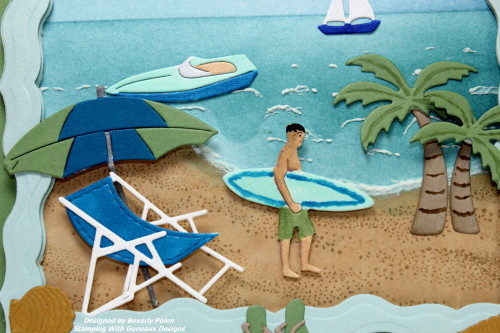
Today on Splitcoaststampers is a Color Challenge featuring Stampin’ Up! Colors of Soft Sky, Pacific Point, Wild Wasabi, and Crumb Cake.   I created a beach scene card for the challenge.  The scene features several dies from Impression Obsession, Marianne Design, Frantic Stamper Inc., Cottage Cutz, and Spellbinders.

If you want to play along with the Challenge, you can do so HERE!

Beach Scene


7-10-16 UPDATE:  This card was included in the Splitcoaststampers Favorites of the Week ending 7-10-16!

7-12-16 UPDATE:  This card was selected as Splitcoaststampers FAVORITE for last week’s Color Challenge, CC590!!


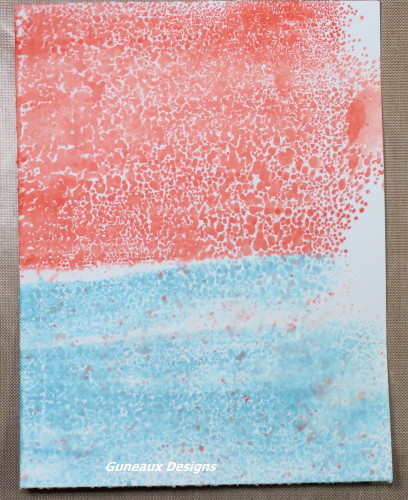
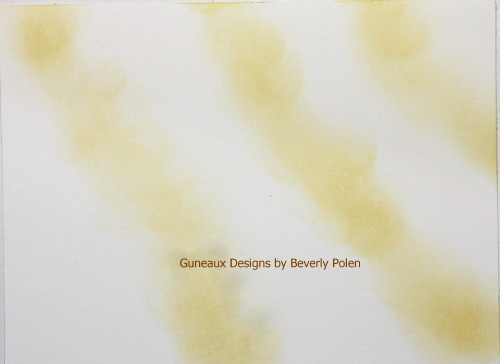
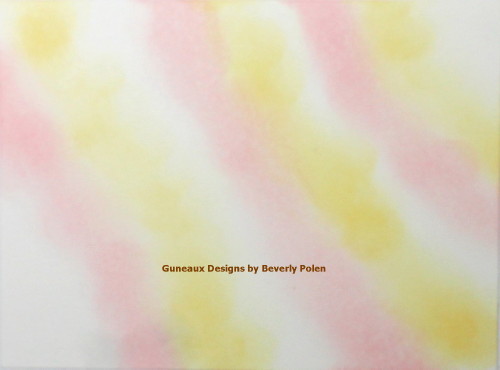
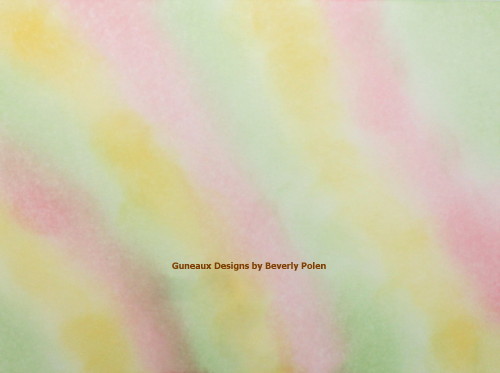
To create the card, I used a 4-1/2″ square piece of Neenah Solar White Card Stock and sponged on the Crumb Cake sand, Marina Mist ocean, and Soft Sky sky.  Because I wanted to use a surfer, I wanted to make the ocean seem a little rough; therefore, I used Liquid Applique and spread it along the shore and into the water.

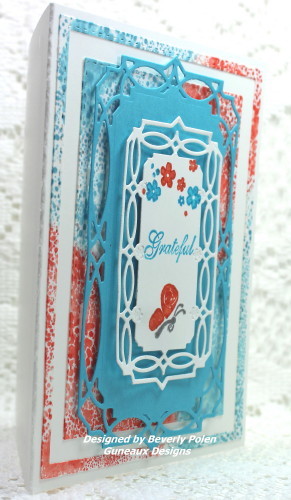
After cutting out all of the die cuts that I wanted to include on the card from the solar white paper (see list of supplies for the names of the dies), I used Copic Sketch Markers to color each one, and strategically place each cutout onto the scene.  After finishing that, I cut two Spellbinders Nestabilities Fairmont Labels dies, adhered them together with foam tape, and attached them around the scene.  I then added the flipflops and shells around the labels.  The scene was attached to a Wild Wasabi card base.

Beach Scene

I really like how the card turned out!  I hope you enjoyed it, and will take time to provide me feedback!

BlogDivider_zpsed339ea1

SUPPLIES:

Stamps:  None

Paper:  Neenah Solar White Card Stock, Stampin’ Up! Card Stock (i.e., Soft Sky, Pacific Point, and Wild Wasabi)

Card Size:  5-1/2″ x 5-1/2″

Ink:  Various Copic Sketch Markers, Stampin’ Up! Classic Ink (i.e., Crumb Cake, Baja Breeze, and Soft Sky

Accessories:  Three Surfers (Frantic Stamper Inc.), Beach Chair and Umbrella (Frantic Stamper Inc.), Lighthouse w/ Clouds (Cottage Cutz – for the birds in the sky), Palm Trees (Impression Obsession), Speed Boat (Frantic Stamper Inc.), Sailboat (Impression Obsession), Flipflops (Impression Obsession), Shell Set (Impression Obsession), Spellbinders Fairmont Labels (for the soft sky frame), Foam Tape, and Liquid Applique

Technique:  Sponging and Coloring with Copics

(To see the products pictured below, click on the links above.)

Frantic Stamper Precision Die - Three SurfersFrantic Stamper Precision Die - Beach Umbrella And ChairCottage Cutz - Die - Lighthouse w/ CloudsImpression Obsession - Die - Palm Trees (set of 4 dies)Frantic Stamper Precision Die - Boat IconsImpression Obsession - Die - Sailboats (set of 3 dies)Impression Obsession - Die - Single Beach Chair (set of 5 dies)Impression Obsession - Die - Mini Shell Set (set of 7 dies)Image 13M - Scotch Foam Mounting TapeMarvy Liquid Applique' - Black

BlogDivider_zpsed339ea1

SU Fifth Avenue Floral

God’s Blessings!

Stamping With Guneaux Designs By Beverly Polen

“In him and through faith in him we may approach God with freedom and confidence.”  Ephesians 3:12

Our Daily Bread Designs Star Quilt Die

Welcome, my artistic friends!  Today I’ve created for you a Mother’s Day card that features Our Daily Bread Designs Star Quilt Die.  At the beginning of April, Our Daily Bread Designs (ODBD) released a new set of stamps, dies, and paper that focus on sewing and quilting.  You can see the gorgeous new items HERE.

I purchased the new products when released, but haven’t used them until I made this card.  Actually, I was a little intimidated by the many pieces to the dies.  Now that I’m made this card, I feel more confident.

Our Daily Bread Designs Star Quilt Die

I LOVE Our Daily Bread Designs products!  This quilting release is so beautiful and reminds me of days gone by when I would sit and watch my dear Mom produce quilts, embroidery pieces, and develop other beautiful crafts.


UPDATE:  This card was included in Splitcoaststampers Favorites for the Week ending April 24!


Our Daily Bread Designs Star Quilt Die

The above photo gives you a closeup of the “quilt”.  Although Our Daily Bread Designs released designer paper to go with the dies in the release, I decided to use Stampin’ Up! Love Blossoms Designer Series Paper for this design.  After die cutting the quilting frame, I added SU Crystal Effects to give it some shine.  If you look closely, you can see that.  I also added a green embroidery thread knot in the center of the “quilt”.  I thought that would be quite appropriate.

Our Daily Bread Designs Star Quilt Die

This closeup shows the bottom portion of the card.  I used Our Daily Bread Designs Quilted With Love Stamp Set for my sentiment, “Love you to pieces!”.  I used VersaMark ink and a green embossing powder on the sentiment.  I love the two pairs of scissors and spool of thread die cuts that are from Spellbinders.  I wrapped green embroidery thread around the spool and threaded it through the green pair of scissors to make it appear that the thread is being cut.  Both pairs of scissors are highlighted with SU Crystal Effects.

Lastly, I created this card in response to a Splitcoaststampers Sketch Challenge, seen HERE.  (I almost forgot  to mention that!)

I hope you’ve enjoyed the card and will check out the sewing/quilting release from Our Daily Bread Designs!   Thanks for stopping by and leaving a comment!

BlogDivider_zpsed339ea1

SUPPLIES USED:

Stamps:  Our Daily Bread Designs Quilted With Love;  Ink: SU Blushing Bride and Rose Red; VersaMark Watermark Ink;  Paper:  SU Love Blossoms Designer Series Paper; and Blushing Bride, Rose Red, and Garden Green Card Stock; Card Size: 4-3/4″ x 6-1/4″; Accessories:  Our Daily Bread Designs Star Quilt Die, Our Daily Bread Designs Beautiful Borders Dies, Spellbinders All Stitched Up Dies, Embroidery Thread, SU Crystal Effects, Embossing Powder

Our Daily Bread Designs Star Quilt DieOur Daily Bread Designs Star Quilt DieOur Daily Bread Designs Star Quilt DieOur Daily Bread Designs Star Quilt Die

BlogDivider_zpsed339ea1

SU Fifth Avenue Floral

God’s Blessings!

Stamping With Guneaux Designs By Beverly Polen

“Religion that God our Father accepts as pure and faultless is this:  to look after orphans and widows in their distress and to keep oneself from being polluted by the world.”  James 1:27

Happy Birthday Greeting Card Purple Starling

Thanks for stopping by!  I’m sharing with you today a beautiful happy birthday greeting card featuring a Purple Starling.  I created the card in response to two Splitcoaststampers Challenges: 1) Splitcoaststampers Clean and Simply Card Challenge, CAS373, which is to create a happy birthday card; and 2) Splitcoaststampers Inspiration Challenge, IC541, Birds of a Feather.  This challenge involved viewing this Birds of a Feather site, selecting a photo of a bird, and developing a card based on how  the photo inspired you.  I selected this photo of a Purple Starling as my inspiration, which resulted in this card.

Happy Birthday Greeting Card purple Starling


UPDATE:  This card was included in Splitcoaststampers Favorites of the Week ending April 25!  “Congratulations! In the General Stamping forum, you’re in the FAVORITES for the week ending April 24.


The bird on my card isn’t a starling (I think), but it’s a bird and I colored it shades of purple, although it looks blue in the photo. There are so many beautiful birds on the Birds of a Feather site that it was difficult to pick just one for inspiration.

The bird stamp that I used is one from Martha Stewart.  The card, outside border, and center piece are in the shape of one of the new Spellbinders Fairmont Lables Dies. I created the border using Brushos.  (I’m starting to like Brushos!!)  To add something extra, I attached three SU Candy Dots to the bottom corner of the card.

Happy Birthday Greeting Card Purple Starling

Enjoy and TFL and commenting!!  If you have questions about the card, please don’t hesitate to leave them in the comment section and I’ll get back to you!  Have a blessed day!

BlogDivider_zpsed339ea1

Stamps: SU Rose Wonder, Martha Stewart Clear Bird Stamps  Paper: SU Whisper White  Card Size: 5-1/2″ Sq  Ink: Copic Markers and SU Elegant Eggplant Marker  Accessories: Copic Markers, Brushos, SU Candy Dots, and Spellbinders Fairmont Labels  Techniques: Coloring With Brushos and Copics

 BlogDivider_zpsed339ea1SU Fifth Avenue Floral

God’s Blessings!

Stamping With Guneaux Designs by Beverly Polen

“Even though I walk through the valley of the shadow of death, I will fear no evil, for you are with me; your rod and your staff, they comfort me.”  Psalm 23:4

Card Sketch Challenge

Yesterday, Splitcoaststampers had a great card sketch challenge as seen below.  The sketch challenge was so much fun that folks added more than one card to the Card Sketch Challenge, SC586, gallery.

Card Sketch Challenge

I decided to create a scene and cut it to fit the sketch.  Here is my response to the challenge:

Card Sketch Challenge

The majority of the card was sponged, except for the stamped images.   I used copic markers for portions of the images.   I love the technique of sponging so it was fun to participate in the challenge.  I think that when responding to a sketch challenge, one has more freedom to create than challenges with specific requirements.  I hope you enjoy the card, and any feedback is welcomed!

(Update:  This card was selected as a favorite on Splitcoaststampers!!)

BlogDivider_zpsed339ea1

The following supplies were used to create the card:

Stamps: ODBD Many Thanks, SU Plant Hope, and Rubber Stampede Thy Word is a Lamp

Paper: SU Whisper White, Crumb Cake, and Marina Mist

Paper Size: A2

Ink: SU Inks and Copics

Accessories: Copics Markers, SU Sponges, and Spellbinders Angel of Peace

ODBD Many ThanksSpellbinders Holiday Angel of Peace_1

BlogDivider_zpsed339ea1

Swallowtail Butterfly

God’s Blessings!

Stamping With Guneaux Designs By Beverly Polen

“Do not conform to the pattern of this world, but be transformed by the renewing of your mind.  Then you will be able to test and approve what God’s will is — His good, pleasing and perfect will.”  Romans 12:2

Splitcoaststampers Color Challenge, CC576

Splitcoaststampers has a Color Challenge, CC576, posted here today, and the colors being featured are Tempting Turquoise, Tangelo Twist, and Whisper White.  What do you think about Tempting Turquoise and Tangelo Twist together?  At first I was hesitant about the colors, but after I began creating, I realized how well they go together.  BTW,  I do not have any Tangelo Twist, so I substituted Tangerine Tango.

This is the card I made for the Splitcoaststampers Color Challenge, CC576:

Splitcoaststampers Color Challenge, CC576

(Update:  This card was chosen as a Splitcoaststampers’ favorite.)

These are the steps I took to make the card:

  • I began the card by spreading Tim Holtz’s Distress Ink – Broken China and Ripe Persimmon – (close to Tempting Turquoise and Tangerine Tango) onto my Rangerink non-stick craft sheet, being careful to not blend the colors.
  • Then I spritzed the craft sheet with water mist until bubbles formed.
  • I cut a 4″ x 5-1/4″ piece of Whisper White card stock and laid it, front side down, onto the ink.
  • I slightly, very slightly, touched the back of the card stock in several places to ensure ink transferred to the card stock.
  • I used the heat gun to ensure it was dry.

This photo is my first try.  Somehow, I don’t know how, I got the orange mixed into the blue.  Needless to say, that piece went into the trash and I started over following the above steps.

Splitcoaststampers Color Challenge CC576

  • After achieving the color mixture I wanted, I used Our Daily Bread Designs (ODBD) two largest Double Stitched Rectangles Dies (CBD123) to cut out three die cuts.
  • I only used the largest and smallest die cuts to adhered to the front of a Whisper White (thick) card stock, as shown in the following photo.

Splitcoaststampers Color Challenge, CC576

  • Next, I added adhesive foam to two frames, Tempting Turquoise and Whisper White, made with the Spellbinders Nestabilities Astoria Decorative Element Dies (S5-254)
  • Before adding the Whisper White frame, I stamped the images onto the frame.
  • I adhered the third frame die cut that I mentioned above to the inside of the card as shown in the below photo.

Splitcoaststampers Color Challenge, CC576

Enjoy and thanks for stopping by!

BlogDivider_zpsed339ea1

SUPPLIES USED:

Stamps:  Studio g Blessed
Paper:  SU Whisper White, Tempting Turquoise, and Tangerine Tango Card Stock
Card Size: A2
Ink:  Tim Holtz Distress Ink and SU Tempting Turquoise and Tangerine Tango
Accessories:  Double Stitched Rectangles Dies (CBD123), Spellbinders Nestabilities Astoria Decorative Element Dies (S5-254), and Rangerink Non-Stick Craft Sheet

BlogDivider_zpsed339ea1

Swallowtail Butterfly

God’s Blessings!
Stamping With Guneaux Designs by Beverly Polen

“Come to me, all you who are weary and burdened, and I will give you rest.” Matthew 11:28

Color on Color Emboss Resist Technique

Sponging and blending inks onto card stock is one of my favorite forms of art.  I have made many cards in this manner; however, I have only used the Color on Color Emboss Resist Technique for very few cards.  This technique requires sponging and blending inks as well.

Color-On-Color-Emboss-Resist-Technique-2

I have been thinking for a while that I wanted to create a card featuring the Color on Color Emboss Resist Technique.  Splitcoaststamper.com gave me the nudge to do so as it posted today a Technique Challenge for using the emboss resist technique.  I have included a tutorial in this post if you should want to try it too.  Here are additional pictures of my card.

Color-on-Color-Emboss-Resist-Technique_8_1Color-on-Color-Emboss-Resist-Technique-2Color-on-Color-Emboss-Resist-TechniqueColor-on-Color-Emboss-Resist-Technique

I did not add a sentiment on the card, but I will when an occasion arises that will dictate the type of sentiment needed. It will most likely be a “Thinking Of You” or “For You” sentiment.

BlogDivider_zpsed339ea1

SUPPLIES USED FOR THIS COLOR ON COLOR RESIST TECHNIQUE CARD:  

Stamps:  Stampin’ Up! Awesomely Artistic Stamp Set

Paper:  Stampin’ Up! Whisper White, Pink Pirouette, Barely Banana (retired), and Pistachio Pudding (retired) Card Stock

Ink: Stampin’ Up! Pistachio Pudding (retired), Barely Banana (retired), Pink Pirouette, and Baked Brown Sugar Classic Inks, and a VersaMark Watermark Stamp Pad

Accessories:  Stampin’ Up! Embossing Buddy, Clear Embossing PowderSponge Daubers, a heat gun, Stampin’ Up! Subtles Candy Dots, and Spellbinders Dragonfly Die – S2-157

Card Size: A2 – 5-1/2″ x 4-1/4″

I hope you enjoyed the card and plan to use the technique.  Now on to the tutorial.


BlogDivider_zpsed339ea1

COLOR ON COLOR RESIST TECHNIQUE TUTORIAL

A.  SUPPLIES NEEDED FOR USING THE COLOR ON COLOR EMBOSS RESIST TECHNIQUE:

Stamp:  Select a solid stamp that you want featured as the primary element.

Paper:  A white piece of card stock for sponging on ink and other card stock of your choice for your card.

Ink: You will need three light colors and one darker color and a watermark stamp pad

Accessories:  Talcum powder for rubbing across card stock before applying embossing powder; clear embossing powder, sponge daubers or sponges, and heat gun

B.  INSTRUCTIONS FOR THE COLOR ON COLOR EMBOSS RESIST TECHNIQUE:

1. Cut card stock accordingly:

  • 8-1/2″ x 5-1/2″ for card base
  • 5-1/4″ x 4″ for 1st layer
  • 5″ x 3-3/4″ for white card stock

2. Select a stamp that you want to be the main feature of the card.

3. Select three colors of ink that are light shades.

4. Using a sponge dauber, swirl your first light color onto the white card stock.

Color-on-Color-Emboss-Resist-Technique
5. Swirl your second light color onto the Whisper White Card Stock, and don’t worry about overlapping the colors.

Color-on-Color-Emboss-Resist-Technique

6. Swirl your third light color onto the Whisper White Card Stock, and then look for places where you want to blend the colors and do that with the daubers. Don’t worry about the look too much as it will completely change when you add the darker color.

Color-on-Color-Emboss-Resist-Technique

7. AFTER the ink dries (make sure the ink is dry), rub the talcum powder over the complete piece of card stock.

8. Cover your selected stamp with a watermark ink and stamp the image randomly on the card stock.

9. Cover with the clear embossing powder and heat set. Let it cool.Color-on-Color-Emboss-Resist-Technique

10. Swirl you dark color of ink all over the piece of card stock. You may need to do this a couple times or more.Color-on-Color-Emboss-Resist-Technique

11. Using a paper towel, rub the excess dark ink from the embossed images. Isn’t it cool how the clear embossing takes on the colors?

12. After reaching the desired colors on the colored piece of card stock, use a stamp image (can be the same that was used for the embossing) to create a center piece for the card.

13. Adhere the pieces together and add your desired embellishments.

14. If desired, add a sentiment to the card.

Enjoy!!

BlogDivider_zpsed339ea1Swallowtail Butterfly
God’s Blessings!

Stamping With Guneaux Designs

by

Beverly Polen