Stampin Up Framelits – Use Differently – Part 2

Yesterday, I shared an alternative method for using Stampin Up Framelits to create a debossed frame from a negative cutout.  Today, I am sharing another alternative method for using the Stampin Up Framelits.  This method provides a framelit size that is different from the usual.

If you have used any of the Stampin Up Framelits that are of the same design (i.e., Hearts Collection, Floral Frames, Window Frame Collection, and Labels Collection),  I’m sure you’ve noticed the size between each framelit is no less than 1/4″. 
 
 Hearts Collection Framelits DiesFloral Frames Framelits DiesWindow Frames Collection Framelits DiesLabels Collection Framelits Dies
 

Personally, I prefer the size between the Stampin Up Framelits to be smaller (i.e., 1/8″).  To that end, here is an alternative for you to acquire a smaller size.


ALTERNATIVE 2:  CREATE A STAMPIN UP FRAMELIT CUTOUT THAT IS ONLY 1/8″ LARGER THAN THE NEXT SMALLEST FRAMELIT (NOT THE USUAL 1/4″)

STEP 1. Select one framelit and desired card stock and cut out two framelits using the Big Shot. (Refer to yesterday’s post for the Big Shot sandwich.)

Stampin Up Framelits

STEP 2.  Lay the next smallest framelit onto one of the cutouts with the cutting edge facing upward.

STEP 3.  With a pencil, trace around the framelit.

Stampin Up Framelits

STEP 4. Using paper snips, cut along your tracing.

Stampin Up FramelitsStampin Up Framelits


Now you have a cutout that is 1/8″ smaller, except at the very top. I like the look better, don’t you?

Stampin Up Framelits


 Using this tool tip, your top framelit will provide more room on which to stamp.

 Stamping With Guneaux Designs

God’s Blessings!
Stamping With Guneaux Designs
by
Beverly Polen


STAMPIN UP FRAMELITS – HOW TO USE THEM DIFFERENTLY – PART 2

Floral Frames Framelits

The Floral Frames Framelits from Stampin’ Up! rank at the top of my favorite framelits.  When it debuted the framelits in January 2012, Stampin’ Up! also developed rubber stamps that coordinated with the framelits.  The Floral Frames Framelits have a coordinating stamp set; however, my card share today does not feature that stamp set.  It features the Floral Frames Framelits

Floral Frames Framelits

I’ve heard a lot of stampers express their displeasure with one of Stampin’ Up!’s new “In Colors” called Summer Starfruit.  I think it is a cool color and if you combine it with the right color(s), it looks great.  I think this card looks great with the Summer Starfruit Card Stock and Primrose Petals Card Stock, which is also a new In Color.

Below are the Stampin’ Up! Supplies used for this card as well as the instructions.

Stampin Up Supplies:

Paper:  Summer Starfruit Card Stock (126839), Primrose Petals Card Stock (126841), Gumball Green Card Stock (126840), and Whisper White Card Stock (1007300)

Stamp Set:  Full of Blessings (128081)

Ink (Classic):  Summer Starfruit (126991), Primrose Petals (126858), Gumball Green (126861), and Basic Black (126980)

Accessories: Betsy’s Blooms Stampin’ Around Standard Wheel (126943), Floral Frames Framelits (127012), Chevron Embossing Folder (127749), Big Shot Die-Cutting Machine (113439), Gumball Green 3/8″ Stitched Satin Ribbon (126848), and Primrose Petals 3/8″ Stitched Satin Ribbon (126844)

Instructions:

  • Cut an 8-1/2″ x 5-1/2″ piece of Primrose Petals Card Stock, score down the middle, and fold to create your card base.
  • Cut a 5-1/4″ x 4″ piece of Summer Starfruit Card Stock, insert it into the Chevron Embossing Folder, and run through the Big Shot (Tab 1).
  • Cut a 4″ square of Whisper White Card Stock.
  • Cover the Betsy’s Blooms Wheel with Primrose Petals Ink and roll it acriss the top of the Whisper White Card Stock.
  • Cover the Betsy’s Blooms Wheel with Gumball Green Ink and roll it across the middle of the Whisper White Card Stock.
  • Cover the Betsy’s Blooms Wheel with Summer Starfruit Ink and roll it across the bottom of the Whisper White Card Stock.
  • Lay the third largest Floral Frames Framelit onto the floral piece and run it through the Big Shot (Tab 2).
  • Lay the second smallest Floral Frames Framelit onto a piece of Gumball Green Card Stock and run it through the Big Shot (Tab 2).
  • Lay the smallest Floral Frames Framelit onto a piece of Whisper White Card Stock and run it through the Big Shot (Tab 2).
  • Cut out the impression left on the Whisper White Card Stock.
  • Stamp the sentiment, “Give Thanks”, from the Full of Blessings Stamp Set onto the Whisper White Floral Frame cutout.
  • Make a bow with a small piece of the Gumball Green Ribbon.
  • Assemble the card according to the above picture.

 Buy Stampin Up Products

God’s Blessings!

Stamping With Guneaux Designs

by

Beverly Polen

Enjoy using your Stampin Up Floral Frames Framelits

Labels Collection Framelits – Thoughts and Prayers

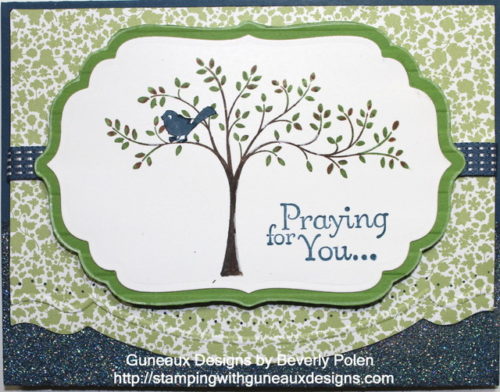
I could not do without the Stampin’ Up! Labels Collection Framelits, as well as all of the Stampin’ Up!’s framelits, as well as the Thoughts and Prayers stamp set.  To me, the Labels Collection Framelits and all of the other framelits are must-have tools for creating paper crafts. The Labels Collection Framelits may be designed to cut certain stamp cut images, but they certainly may be used for other purposes.

The card share for you today features the Labels Collection Framelits and Thoughts and Prayers Stamp Set.  To use the  Labels Collection Framelits, you will need the Big Shot, its multipurpose platform (Tab 1), and standard cutting pads.  Below are instructions for making this card.
 

STAMPIN UP PRODUCTS:

STAMPS:  Thoughts and Prayers (127805) ; PAPER:  Midnight Muse Card Stock (126843), Gumball Green Card Stock (126840), Whisper White Card Stock (100730), and Twitterpated Designer Series Paper (125406); INK: Soft Suede Stampin’ Write Marker (119703), Gumball Green Stampin’ Write Marker (126856), Midnight Muse Classic Stampin’ Pad (126860), and White Gel Pen (105021); ACCESSORIES: Labels Collection Framelits (125598), Strips Embossing Folder (123128), Adorning Accents Embossing Folders (125601), Adorning Accents Edgelits (125595), Essentials Paper Piercing Pack (126187), VersaMark Pad (102283), Dazzling Diamond Stampin’ Glitter(102023), Heat and Stick Powder (100625), Heat Tool (129053), Stampin’ Pierce Mat (126199), Paper-Piercing Tool (126189), and Midnight Muse 3/8″ Stitched Satin Ribbon (126847)

INSTRUCTIONS:

Card Base:

1.  Cut a 8-1/2″ x 5-1/2″ piece of Midnight Muse Card Stock and fold it in half.

2.  Stamp the VersaMark Pad onto the bottom 1″ of the front of the card base.

3.  Apply Heat and Stick Powder over the VersaMark Ink and heat set with the Heat Tool.

4.  Apply the Dazzling Diamond Stampin’ Glitter over the Heat and Stick Powder and heat set again.

First Layer:

5.  Cut a 4″ x 5-1/4″ piece of the green design (see picture) from the Twitterpated DSP.

6.  Assemble a sandwich to run through the Big Shot in this order:  a) multipurpose platform on Tab 1, b) Cutting Pad, c) DSP piece, d) Adorning Accents Edgelit, and e) Cutting Pad.  Run through  the Big Shot.

7. Place the piece of DSP inside the Adorning Accents Embossing Folder aligning it just above the cut created with the Adorning Accents Edgelit.  Create a Big Shot sandwich with the multipurpose platform on Tab 2 and run through the Big Shot.

8.  Place the DSP onto the Paper-Piercing Mat, lay the same design (i.e., that used with the embossing folder) from the Essentials Paper-Piercing Pack onto the DSP, and pierce the DSP with the Paper-Piercing Tool following the design grid.

Center Piece:

9.  Cover the tree stamp image from the Thoughts and Prayers with ink:  trunk and branches – Soft Suede; leaves – Gumball Green.  Stamp the tree image onto Whisper White Card Stock.

10.  Place the 3rd largest frame from the Frames Collection Framelits onto the Whisper White Card Stock ensuring it is centered over the tree image.  Create a Big Shot sandwich with these items and cut out the image.

11.  Using the Midnight Muse Classic Stampin’ Pad, stamp the sentiment, Praying for You, onto the bottom-right corner.

Center Piece Mat:

12.  Place a piece of Gumball Green Card Stock into the Strips Embossing Folder and run through the Big Shot (on Tab 2).

13.  Place the same frame from the Frames Collection Framelits onto the Gumball Green Card Stock.  Trace around the frame with a pencil.  Cut out the frame and use the White Gel Pen around the edge.  Adhere the Whisper White Card Stock with image onto the mat.

Assemble Card:

14.  Adhere a piece of the Midnight Muse Ribbon across the DSP.

15.  Adhere the DSP onto the card base front.

16.  Adhere the matted centerpiece to the DSP and enjoy your card.


God’s Blessings!

Stamping With Guneaux Designs

Beverly Polen