Stampin Up Soho Subway Designer Series Paper – Itty Bitty Banners

Stampin Up Soho Subway Designer Series Paper - Itty Bitty Banners
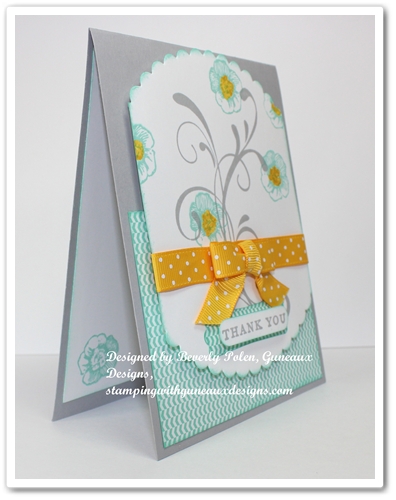
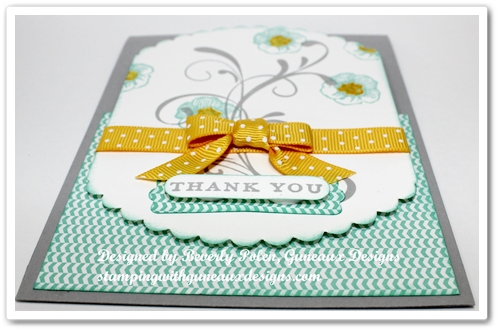
The Stampin Up Soho Subway Designer Series Paper has one design that I really like, and it is the one on this Happy Birthday Card. I think the new In Color Crisp Cantaloupe is beautiful, and it is almost identical to the 2008 Groovy Guava color.  The Crisp Cantaloupe is just slightly ligher than the Groovy Guava.

If you have not purchased the new Crisp Cantaloupe ribbon, you can substitute the 2008 Groovy Guava Double Stitched Ribbon.  It matches the Crisp Cantaloupe perfectly.

Here are additional pictures of the Stampin Up Soho Subway Designer Series Paper, Happy Birthday Card:

Stampin Up Soho Subway Designer Series Paper - Itty Bitty Banners

Stampin Up Soho Subway Designer Series Paper - Itty Bitty Banners

 SUPPLIES USED FOR THE CARD:

Stamps: Itty Bitty Banners Stamp Set (126257)

Paper:  Stampin Up Soho Subway Designer Series Paper (130140), Baked Brown Sugar Card Stock (131296), Crisp Cantaloupe Card Stock (131298), 2013-2015 In Color Designer Series Paper Stack (130136), and Very Vanilla Card Stock (101650)

Ink:  Baked Brown Sugar Classic Ink (131174) and Crisp Cantaloupe Classic Ink  (131176)

Accessories:  Big Shot Die-Cutting Machine (113439), Paper-Piercing Pack Essentials (126187), Paper-Piercer Tool, Border Edge Punch (I used a Martha Steward punch), Bitty Banners Framelits (129267), Fancy Fan Textured Embossing Folder (127751),  Crisp Cantaloupe Ribbon (130021 – or a matching color [the 2008 Groovy Guava Double Stitched Ribbon matches perfectly]), Very Vintage Button (129327), Linen Thread (104199), Mini Glue Dots (103683), and Stampin’ Dimensionals (104430)

INSTRUCTIONS:

  1. Cut an 8-1/2″ x 5-1/2″ piece of Baked Brown Sugar Card Stock, fold in half with the fold on the left side, and pierce around the edges of the card front.  I used one of the guides from the Paper-Piercing Pack Essentials (126187) to complete the piercing.
  2. Cut a 5″ x 3-3/4″ piece of the Crisp Cantaloupe design from the Stampin Up Soho Subway Designer Series Paper.  Sponge the edges with Crisp Cantaloupe Classic Ink and attach to the card front inside the piercing.
  3. Cut a 5″ x 2-1/2″ piece of Crisp Cantaloupe Card Stock and punch around the left and right sides with a border punch of your choice.  Sponge the edges with Crisp Cantaloupe Classic Ink.
  4. Cut a 5″ x 1-1/4″ piece of Baked Brown Sugar Designer Series Paper from the 2013-2015 In Color Designer Series Paper Stack.  Sponge the edges with Crisp Cantaloupe Classic Ink.  Attach to the border-punched piece of Crisp Cantaloupe Card Stock.
  5. Vertically attach a piece of Crisp Cantaloupe Ribbon onto the above.Stampin Up Soho Subway Designer Series Paper - Itty Bitty BannersStampin Up Soho Subway Designer Series Paper - Itty Bitty Banners
  6. Attach this piece onto the front of the Stampin Up Soho Subway Designer Series Paper with Stampin’ Dimensionals at approximately 1/4″ from the left side.
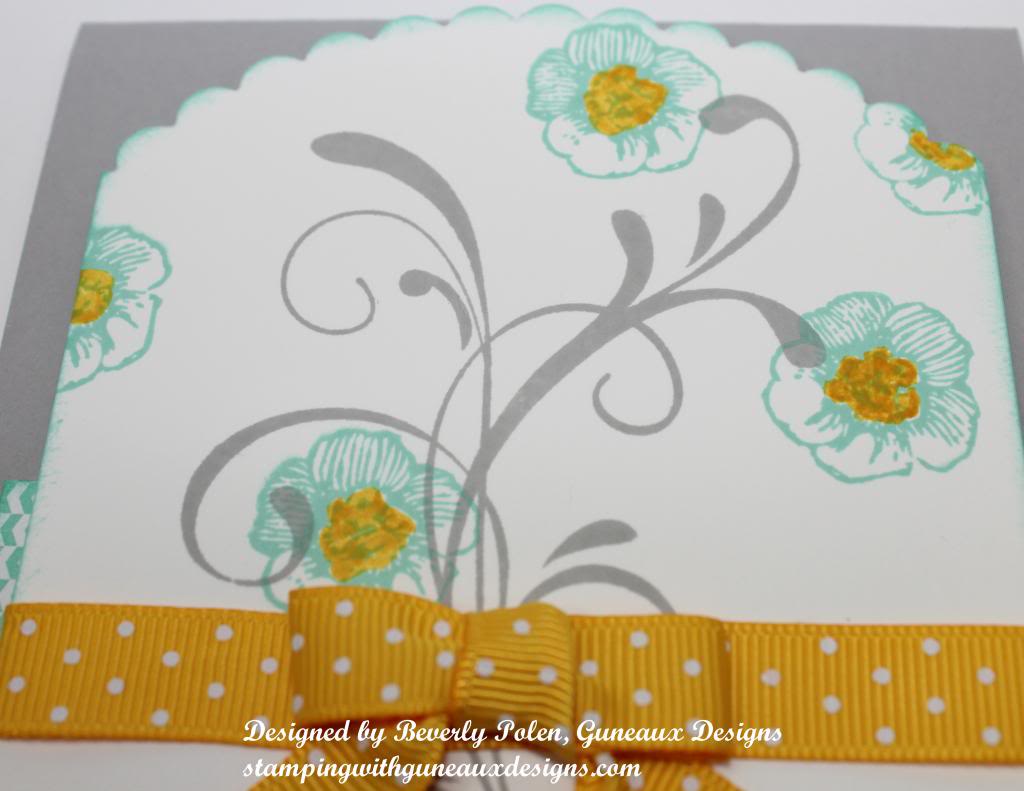
  7. Use a framelit, die cut, or punch to cut out a 2-1/2″ circle from Crisp Cantaloupe Card Stock.  (I used a Spellbinders Splendid Circles template.)  Place the circle into the Fancy Fan Textured Embossing Folder and run it through the Big Shot Die-Cutting Machine.  Sponge around the edges with Crisp Cantaloupe Classic Ink.  (NOTE:  The Fancy Fan Embossing Folder matches the design in the Baked Brown Sugar Designer Series Paper.)
  8. Cover the “Happy Birthday” stamp from the Itty Bitty Banners Stamp Set with Baked Brown Sugar Classic Ink.  Stamp the image onto Very Vanilla Card Stock.  Use the matching Bitty Banners Framelit to cut out the banner.  Sponge around the banner with Baked Brown Sugar Classic Ink.
  9. Trace along the edge of the framelit used in step 7 onto a piece of Baked Brown Sugar Card Stock.  Cut out the banner and sponge the edges with Baked Brown Sugar Classic Ink.  Attach it to the back of the Happy Birthday banner, the sentiment.
  10. Attach the sentiment in the middle of the circle and to the right (see picture).
  11. Double Stampin’ Dimensionals and place onto the back of the circle.  Attach this onto the card as shown in the above picture.
  12. Thread a Very Vintage Button with Linen Thread and attach to the sentiment with Mini Glue Dots. 
God’s Blessings!
Stamping With Guneaux Designs
by
Beverly Polen  Stampin Up Soho Subway Designer Series Paper - Itty Bitty Banners STAMPIN UP SOHO SUBWAY DESIGNER SERIES PAPER – HAPPY BIRTHDAY CARD


Everything Eleanor Stamp Set

Everything Eleanor Stamp Set

Thanks for stopping by for a Monday rubber stamping fix! (lol)  My card share for you today features the beautiful Everything Eleanor Stamp Set and two new Stampin’ Up! colors.  It is such a simple card to make, as you will see in the below instructions.

Also featured on the card is a sentiment from the hostess Morning Meadow Stamp Set.


SUPPLIES USED FOR THE CARD FEATURING THE EVERYTHING ELEANOR STAMP SET:

Stamp Sets:  Everything Eleanor Stamp Set (124164 – c) and Morning Meadow Stamp Set (129675 -c)

Paper:  Designer Series Paper Stack (Coastal Cabana – 2013-2015 In Colors – 130136), Smoky Slate Card Stock (new Neutrals color – 131203), and Whisper White Card Stock (100730)

Ink:  Coastal Cabana Classic Ink (new In Color – 131175), Smoky Slate Classic Ink (new Neutrals color – 131181), and Daffodil Delight Marker (119677)

Accessories:  Stampin’ Up! Circles Collection Framelits (130911), Word Window Punch (119857), Modern Label Punch (119849), and retired Daffodil Delight Ribbon


INSTRUCTIONS:

  • Cut an 11″ x 4-1/4″ piece of Smoky Slate Card Stock.  Fold in the center for a card base with the fold at the top.
  • Cut a 4″ x 3″ piece of Coastal Cabana Designer Series Paper from the 2013-2015 In-Color Designer Series Paper Stack.  Use a sponge to apply Costal Cabana Classic Ink around the piece.
  • Using the largest circle from the Circles Collection Framelits, cut a piece of Whisper White Card Stock.
  • Cut both sides of the circle to make the piece 3-5/8″ wide.  Use a sponge to apply Costal Cabana Classic Ink around the piece.
  • Cover the flourish image from the Everything Eleanor Stamp Set with Smoky Slate Classic Ink.  Stamp the image on the Whisper White modified circle.
  • Cover the small flower image from the Everything Eleanor Stamp Set with Coastal Cabana Classic Ink and randomly stamp the image around the stamped flourish.
  • Color the center of the flowers with the Daffodil Delight Marker.
  • Stamp the “Thank You” sentiment from the Morning Meadow Stamp Set onto a piece of Whisper White Card Stock with Smoky Slate Classic Ink.
  • Cut out the sentiment with the Word Window Punch.
  • Cut out a label using the Modern Label Punch from the Coastal Cabana Designer Series Paper.
  • Attach the sentiment onto the modern label using foam adhesive.
  • Attach this piece to the bottom of the stamped Whisper White Card Stock.
  • Add Daffodil Delight ribbon around the piece.
  • Attach the 4″ x 3″ piece of Coastal Cabana Designer Series Paper to the bottom of the Smoky Slate card base.
  • Using foam adhesive, attach the modified circle piece over the Coastal Cabana paper.
  • Finished – enjoy your card!

God’s Blessings!
Stamping With Guneaux Designs
by
Beverly Polen

 EVERYTHING ELEANOR STAMP SET

Stampin Up Courage Stamp Set – 4th of July 3-D Card

As I shared in my last post, I love the Stampin Up Courage stamp set that retired recently.  Having family members who were in the military and a Dad who loved the American Flag, I especially like this stamp set.  Personally, I think it was a mistake to retire the Stampin Up Courage stamp set.  Regardless, it’s retired, but I am featuring it on my card share for today.  This is my Stampin Up Courage Stamp Set – 4th of July 3-D Card.

Actually, I CASEd (i.e., copy and share everything) myself when making this card.  I made a similar card in 2010 for a special son-in-law who at the time was on active duty with the Army.  God took him home a year ago last month and I really miss him.

As for the card, it is a three-dimensional card.  It may not appear to be based on the photo, so let me share why it is.

I decided that I wanted each piece on the military-related image to be raised at varying levels.  So I stamped the image onto scrap paper and numbered what part of the image that I wanted at what level.

The picture to the right explains.  I numbered as 
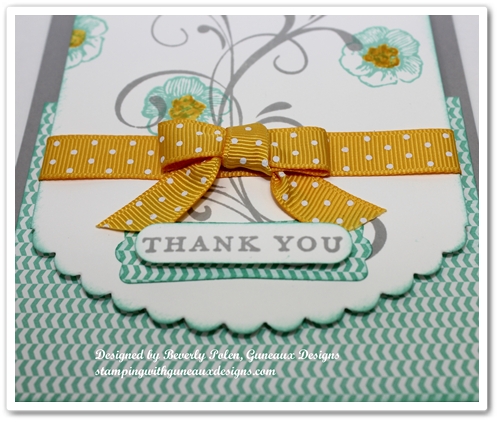
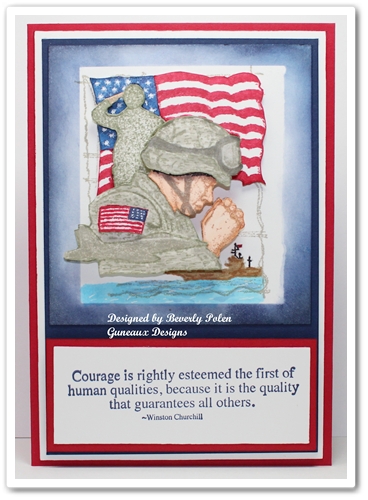
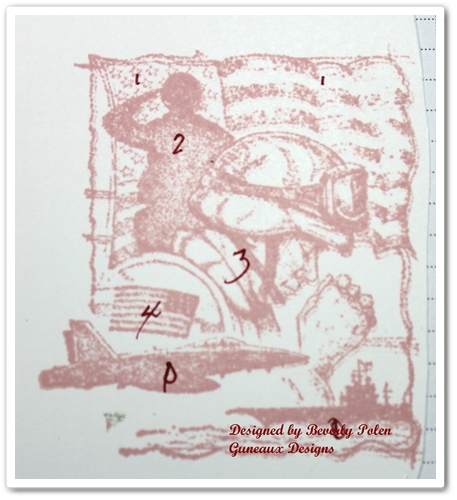
“1” the item I wanted raised with one layer of Stampin Up Dimensionals (i.e., adhesive foam), “2” for those with two layers of dimensionals, and so on.  I re-stamped the image, applied various ink colors, and cut out the pieces.  I then attached the pieces according to the “map” in the photo.

The following picture shows the process of attaching the pieces for the first level, which is the American Flag in the background.

Moving to the 2nd level, I attached the saluting soldier using two layers of dimensionals.  That is shown in the picture to the right.

Moving to the 3rd level, I attached the praying soldier with three layers of dimensionals.  However, I did make one change.  I wanted the helmet and the American Flag on the soldier’s uniform to be raised a level above the soldier.  Therefore, I added four layers of dimensionals to the helmet and one to the flag. The following picture reflects this and the completed image.

 The following pictures provide a better view of the dimensional elements.

The final product of the Stampin Up Courage card includes Real Red Card Stock as the base, Whisper White Card Stock for the 1st layer, and Night of Navy Card Stock as the 2nd layer.  Included is the sentiment from the Stampin Up Courage stamp set.

If you enjoyed the card and tutorial, please let me know by leaving a comment.


God’s Blessings!
Stamping With Guneaux Designs
by
Beverly Polen

STAMPIN UP COURAGE STAMP SET – 4TH OF JULY CARD

Stampin Up Morning Meadow Hostess Stamp Set

I have for you a quick and simple Thank You card that you can create in about ten minutes. The card features the new Stampin’ Up! Morning Meadow Hostess Stamp Set that can be purchased for $10 with a qualifying order.

Stampin Up Morning Meadow Hostess Stamp Set

Supplies for the Stampin Up Morning Meadow Hostess Stamp Set Thank You Card:

Stamp Set: Stampin Up Morning Meadow Hostess Stamp Set (129678)

Stampin Up Morning Meadow Hostess Stamp Set

Paper: Crisp Cantaloupe Card Stock (131298), Baked Brown Sugar Card Stock (131296), and Whisper White Card Stock (100730)

Ink: Crisp Cantaloupe Classic Ink (131176) and Baked Brown Sugar Classic Ink (131174)

Accessories: Apothecary Accents Framelits (127003), Pearl Basic Jewels (119247), Stamping Sponges (101610), and Adhesive of your choice

Stampin Up Morning Meadow Hostess Stamp Set

Instructions for the Stampin Up Morning Meadow Hostess Stamp Set Thank You Card:

1. Cut an 8-1/2″ x 5-1/2″ piece of Crisp Cantaloupe card stock and fold in the middle for the card base.

2. Cut a 5-1/4″ x 4″ piece of Baked Brown Sugar card stock and sponge the edges with matching ink.

3. With the small rectangle accent from the Apothecary Accents Framelits, cut an accent from Crisp Cantaloupe Card Stock. Sponge the edges with matching ink.

4. Lay the rectangle accent on a small piece of Whisper White Card Stock and trace along the INSIDE of the accent. Cut out the accent and stamp on it the sentiment, “Thank You”, in Baked Brown Sugar Classic Ink (the sentiment is also from the Morning Meadow Hostess Stamp Set). Sponge the edges with Crisp Cantaloupe Classic Ink.

5. Lay the rectangle accent onto a small piece of Baked Brown Sugar Card Stock and trace along the OUTSIDE of the accent. Cut out the accent and sponge it with matching ink.

6. Cut a 5″ x 3-3/4″ piece of Whisper White Card Stock. Ink the floral stamp from the Morning Meadow Hostess Stamp Set with Crisp Cantaloupe Classic Ink. Randomly stamp the image around the edges of the card stock (I stamped the image twice before re-inking). Sponge the edges with Crisp Cantaloupe Classic Ink.

7. Adhere the Baked Brown Sugar Card Stock to the card base.

8. Adhere the Whisper White Card Stock to the Baked Brown Sugar Card Stock.

9. Adhere the Baked Brown Sugar Card Stock accent onto the center of the Whisper White stamped card stock.

10. Adhere the Whisper White accent with the sentiment onto the Crisp Cantaloupe accent.

11. Add foam adhesive to the back of the of the sentiment and mat, and adhere it to the Baked Brown Sugar accent.

12. Use a permanent peach marker to color two pearls and add them to the sentiment.

13. Randomly adhere the smallest pearls in the center of some of the flowers.

There is so much more that could be added to this card, and the colors certainly can be substituted. You may want to change the center piece with the sentiment by using other framelits and sentiments. Regardless, ENJOY!

God’s Blessings!
Stamping With Guneaux Designs
by
Beverly Polen 

Morning Meadow Hostess Stamp Set

STAMPIN UP MORNING MEADOW HOSTESS STAMP SET

Sycamore Street Designer Series Paper, Ribbon Weaving, and Sliced Rock

Gee, the Stampin’ Up! Sycamore Street Designer Series Paper goes away on March 22 at the end of Stampin’ Up!’s Sale-a-bration – how time flies!  For me, the Sale-a-bration Sycamore Street Designer Series Paper has been a paper difficult to work with.  Regardless, I have used it multiple times, and today’s card project features the Sycamore Street Designer Series Paper and two techniques, Ribbon Weaving and Guneaux Designs Sliced Rock Technique.  (Just an FYI, the SU Stamp Set that matches the Sycamore Street Designer Series Paper is the Madison Avenue Stamp Set which is part of the SU Sale-a-bration.)

Sycamore Street Designer Series Paper

This is a closeup of the ribbon weaving and sliced rock techniques:

Sycamore Street Designer Series Paper

I selected two designs from the Sycamore Street Designer Series Paper (DSP) to create the card.  The top portion is the Rich Razzleberry design with circles, and the stems and multiple colors of leaves is the bottom portion.  I used the Stampin’ Up! Blossom Punch to punch a blossom into the center of the top piece.  I cut 14 pieces of the Stampin’ Up! Stitched Satin Ribbon (all colors), with each piece long enough to cover the blossom.  To ribbon weave, follow the instructions below.

Sycamore Street Designer Series Paper - Ribbon Weaving

After completing the ribbon weaving, I used Stampin’ Write Markers around the blossom, which is the Guneaux Designs Sliced Rock Technique.  If you’ve not seen this technique, there is a video with instructions at the bottom of this post.

Finally, I adhered the ribbon weaved piece of DSP to the upper portion of a Summer Starfruit card base, and the second piece of the Sycamore Street Designer Series Paper to the bottom.  A piece of Summer Starfruit Stitched Satin Ribbon was added.  

SUPPLIES USED FOR THE CARD FEATURING THE SYCAMORE STREET DESIGNER SERIES

Paper:  Sycamore Street Designer Series Paper (127540 – Sale-a-bration Product) and Summer Starfruit Card Stock (126991)

Ink:  Jet Black StazOn (101406) and Stampin’ Write Markers (119806 -your choice)

Accessories:  Stampin’ Up! Blossom Punch (125603), Stampin’ Up! Stitched Satin Ribbon (1026), and Adhesive  

INSTRUCTIONS FOR RIBBON WEAVING

STEP 1.  Determine how many pieces of ribbon are needed to cover the primary element of your project.  Your size of this element will determine the length of each piece.  For my blossom, I needed 14 pieces of approximately 5″ long.

STEP 2.  With the primary element facing down (i.e., in my case, the negative of the punched out blossom DSP), place adhesive (e.g., Sticky Strip) along the top, left, and right of the blossom.  Begin attaching the ribbons vertically, side by side (no space between). If you use a patterned ribbon, the patterned side of the ribbon should be facing down. Ensure the top portion of the ribbon pieces are well attached to the adhesive.

Sycamore Street Designer Series Paper

 STEP 3.  Move every other piece of the vertical ribbon up to the top of the piece of DSP.

Sycamore Street Designer Series Paper

STEP 4.  Lay a piece of ribbon horizontally across the remaining vertical ribbons (this step begins the weaving process).  Adhere one end of this piece of ribbon to the left of the vertical ribbons.  Ensure the very top of the punched out piece in the DSP is covered with this first piece of ribbon.  Adhere the other end to the right of the vertical ribbons.

 Sycamore Street Designer Series Paper

STEP 5.  Bring down the vertical ribbons across the horizontal piece of ribbon.

 Sycamore Street Designer Series Paper

STEP 6.  Lift up the vertical ribbons that weren’t lifted the first time.

 Sycamore Street Designer Series Paper

STEP 7.  Lay the second piece of ribbon horizontally across the vertical ribbons (adhere both ends).  Make sure that this piece of ribbon is pushed up against the first horizontal piece of ribbon.

 Ribbon Weaving

STEP 8.  Bring down the vertical ribbon pieces across the second piece of horizontal ribbon.

 Ribbon Weaving

STEP 9:  Repeat this process until you’ve completed the weaving process.

STEP 10.  Place adhesive along the bottom and adhere the vertical ribbons to the DSP.  If necessary, trim the ends of the vertical ribbons flush with the DSP.

 Sycamore Street Designer Series Paper and Ribbon Weaving

God’s Blessings!
Stamping With Guneaux Designs
by
Beverly Polen