Color On Color Emboss Resist Technique – Happy Father’s Day

I love the art of blending inks. However, I had not tried before the Color on Color Emboss Resist Technique. After trying it, I now know that I really, really like it and will be using it in future art. The card share I have for you today features this technique for a Happy Father’s Day card.

Color on Color Emboss Resist Technique

SUPPLIES USED FOR THE COLOR ON COLOR RESIST TECHNIQUE, HAPPY FATHER’S DAY CARD (I am listing the supplies I used; however, the supplies you use do not need to be the same, as it is the technique itself that is the subject of this tutorial).

Stamp Sets: Stampin’ Up! Fine Feathers (126517) and an old hostess stamp set, Something to Celebrate (for sentiment)

Paper: Baked Brown Sugar Card Stock (131296), Bermuda Bay Card Stock (131197), and Whisper White Card Stock (100730)

Ink: You will need three light colors and one darker color – Pistachio Pudding Classic Ink (131177), More Mustard Classic Ink (retired), Coastal Cabana Classic Ink (131175), and Baked Brown Sugar Classic Ink (131174)

Accessories: Embossing Buddy (103083), Ovals Collections Framelits (129381), Bitty Banners Framelits (129267), Sponge Daubers (102892), VersaMark (102283), Clear Embossing Powder (109130), Linen Thread (104199), Stampin’ Dimensionals (104430)

Color on Color Emboss Resist Technique

INSTRUCTIONS FOR THE COLOR ON COLOR EMBOSS RESIST TECHNIQUE:

1. Cut card stock accordingly:

8-1/2″ x 5-1/2″ for card base

5-1/4″ x 4″ for 1st layer

5″ x 3-3/4″ of Whisper White Card Stock

2. Select a stamp that you want to be the main feature of the card. (I used the feather stamp; however, I think it would work best with a solid stamp with few designs within).

3. Select three colors of classic ink that are light shades.

4. Using a sponge dauber, swirl your first light color onto the Whisper White Card Stock.

Color on Color Emboss Resist Technique

5. Swirl your second light color onto the Whisper White Card Stock, and don’t worry about overlapping the colors.

Color on Color Emboss Resist Technique

6. Swirl your third light color onto the Whisper White Card Stock, and then look for places where you want to blend the colors and do that with the daubers. Don’t worry about the look too much as it will completely change when you add the darker color.

Color on Color Emboss Resist Technique

7. AFTER the ink dries, rub the embossing buddy over the complete piece of card stock.

8. Cover your selected stamp with VersaMark and stamp the image randomly on the card stock.

9. Cover with the clear embossing powder and heat set. Let it cool.

10. Swirl you dark color of ink all over the piece of card stock. You may need to do this a couple times or more.

11. Using a paper towel, rub the excess dark ink from the embossed images. Isn’t it cool how the clear embossing takes on the colors?

12. After reaching the desired colors on the colored piece of card stock, use the stamp image to create a center piece for the card.

Color on Color Emboss Resist Technique

13. Adhere the pieces together and add your desired embellishments.

14. Add your sentiment to the card.

Enjoy!!

God’s Blessings!
Stamping With Guneaux Designs
by
Beverly Polen

Color on Color Emboss Resist Technique COLOR ON COLOR EMBOSS RESIST TECHNIQUE – HAPPY FATHER’S DAY

Stained Glass Technique – Stamping With Guneaux Designs

Was the sun shinning in your area this weekend?  It was a beautiful, sunny weekend in central Florida.  Speaking of the sun shinning reminds me of light – the light that shines through a window, especially a stained glass window.  Thus, today I am sharing a card I made featuring the Stained Glass Technique.  When I think of the Stained Glass Technique, I am reminded of the beautiful stained glass windows often seen in cathedrals.  They are so awesome when the sun shines through them creating many spectrums of color.

Stained Glass Technique

The Stampin’ Up! Secret Garden Stamp Set is highlighted in this card.  Using the largest floral image from the set, I stamped it with VersaMark Ink onto an oval piece of Vellum.

Stained Glass Technique

I covered the image with the Pewter Stampin’ Embossing Powder and heat set it.  With the image face down, I colored it using a Bermuda Bay Stampin’ Write Marker (I have one from the time that Bermuda Bay was a Stampin’ Up! color).  On selected sections of the image, I recolored after the ink dried, repeating this step until I got the shades I wanted.

Stained Glass Technique

To create the look of solder joining other pieces of glass, I used a Basic Gray Stampin’ Write Marker and drew lines randomly onto the back side of the Vellum.

The Stampin’ Up! Ovals Collection Framelits were used for the two oval mats that encase the stained glass image.  The pink mat was pierced  with two ovals from the Occasions Paper-Piercing Pack.

SUPPLIES USED FOR THE CARD FEATURING THE STAINED GLASS TECHNIQUE

Stamp Sets:  Stampin’ Up! Secret Garden Stamp Set (129144 – c) and Itty Bitty Banners (126257 – c – sentiment)

Paper:  Bermuda Bay Card Stock, Pink Pirouette Card Stock, and Vellum

Ink:  Bermuda Bay Classic Ink, VersaMark Ink, Bermuda Bay Stampin’ Write Marker, and Basic Gray Stampin’ Write Marker

Accessories:  Ovals Collection Framelits (129381), Occasions Paper-Piercing Pack (129387), Pewter Stampin’ Embossing Powder (124114), and Retired Pink Pirouette Ribbon 

Stamping With Guneaux Designs

 God’s Blessings!
Stamping With Guneaux Designs

Stained Glass Technique

STAINED GLASS TECHNIQUE

Sycamore Street Designer Series Paper, Ribbon Weaving, and Sliced Rock

Gee, the Stampin’ Up! Sycamore Street Designer Series Paper goes away on March 22 at the end of Stampin’ Up!’s Sale-a-bration – how time flies!  For me, the Sale-a-bration Sycamore Street Designer Series Paper has been a paper difficult to work with.  Regardless, I have used it multiple times, and today’s card project features the Sycamore Street Designer Series Paper and two techniques, Ribbon Weaving and Guneaux Designs Sliced Rock Technique.  (Just an FYI, the SU Stamp Set that matches the Sycamore Street Designer Series Paper is the Madison Avenue Stamp Set which is part of the SU Sale-a-bration.)

Sycamore Street Designer Series Paper

This is a closeup of the ribbon weaving and sliced rock techniques:

Sycamore Street Designer Series Paper

I selected two designs from the Sycamore Street Designer Series Paper (DSP) to create the card.  The top portion is the Rich Razzleberry design with circles, and the stems and multiple colors of leaves is the bottom portion.  I used the Stampin’ Up! Blossom Punch to punch a blossom into the center of the top piece.  I cut 14 pieces of the Stampin’ Up! Stitched Satin Ribbon (all colors), with each piece long enough to cover the blossom.  To ribbon weave, follow the instructions below.

Sycamore Street Designer Series Paper - Ribbon Weaving

After completing the ribbon weaving, I used Stampin’ Write Markers around the blossom, which is the Guneaux Designs Sliced Rock Technique.  If you’ve not seen this technique, there is a video with instructions at the bottom of this post.

Finally, I adhered the ribbon weaved piece of DSP to the upper portion of a Summer Starfruit card base, and the second piece of the Sycamore Street Designer Series Paper to the bottom.  A piece of Summer Starfruit Stitched Satin Ribbon was added.  

SUPPLIES USED FOR THE CARD FEATURING THE SYCAMORE STREET DESIGNER SERIES

Paper:  Sycamore Street Designer Series Paper (127540 – Sale-a-bration Product) and Summer Starfruit Card Stock (126991)

Ink:  Jet Black StazOn (101406) and Stampin’ Write Markers (119806 -your choice)

Accessories:  Stampin’ Up! Blossom Punch (125603), Stampin’ Up! Stitched Satin Ribbon (1026), and Adhesive  

INSTRUCTIONS FOR RIBBON WEAVING

STEP 1.  Determine how many pieces of ribbon are needed to cover the primary element of your project.  Your size of this element will determine the length of each piece.  For my blossom, I needed 14 pieces of approximately 5″ long.

STEP 2.  With the primary element facing down (i.e., in my case, the negative of the punched out blossom DSP), place adhesive (e.g., Sticky Strip) along the top, left, and right of the blossom.  Begin attaching the ribbons vertically, side by side (no space between). If you use a patterned ribbon, the patterned side of the ribbon should be facing down. Ensure the top portion of the ribbon pieces are well attached to the adhesive.

Sycamore Street Designer Series Paper

 STEP 3.  Move every other piece of the vertical ribbon up to the top of the piece of DSP.

Sycamore Street Designer Series Paper

STEP 4.  Lay a piece of ribbon horizontally across the remaining vertical ribbons (this step begins the weaving process).  Adhere one end of this piece of ribbon to the left of the vertical ribbons.  Ensure the very top of the punched out piece in the DSP is covered with this first piece of ribbon.  Adhere the other end to the right of the vertical ribbons.

 Sycamore Street Designer Series Paper

STEP 5.  Bring down the vertical ribbons across the horizontal piece of ribbon.

 Sycamore Street Designer Series Paper

STEP 6.  Lift up the vertical ribbons that weren’t lifted the first time.

 Sycamore Street Designer Series Paper

STEP 7.  Lay the second piece of ribbon horizontally across the vertical ribbons (adhere both ends).  Make sure that this piece of ribbon is pushed up against the first horizontal piece of ribbon.

 Ribbon Weaving

STEP 8.  Bring down the vertical ribbon pieces across the second piece of horizontal ribbon.

 Ribbon Weaving

STEP 9:  Repeat this process until you’ve completed the weaving process.

STEP 10.  Place adhesive along the bottom and adhere the vertical ribbons to the DSP.  If necessary, trim the ends of the vertical ribbons flush with the DSP.

 Sycamore Street Designer Series Paper and Ribbon Weaving

God’s Blessings!
Stamping With Guneaux Designs
by
Beverly Polen

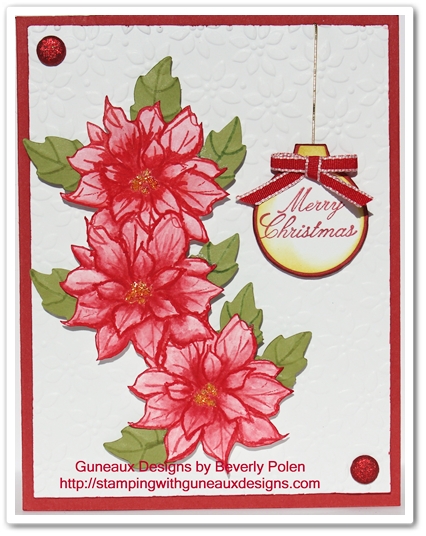
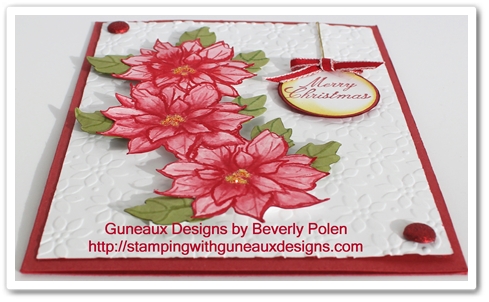
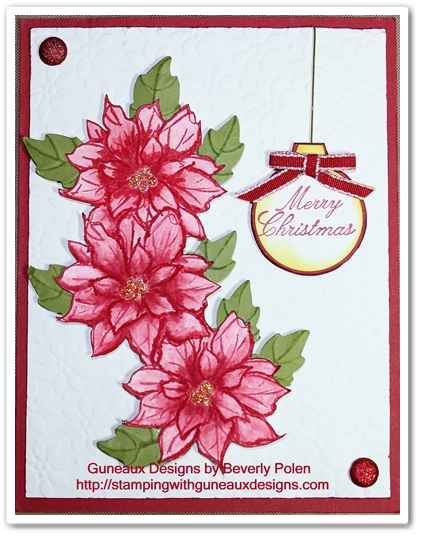
Stampin Up Watercolor Winter – Cascading Poinsettia Christmas Card

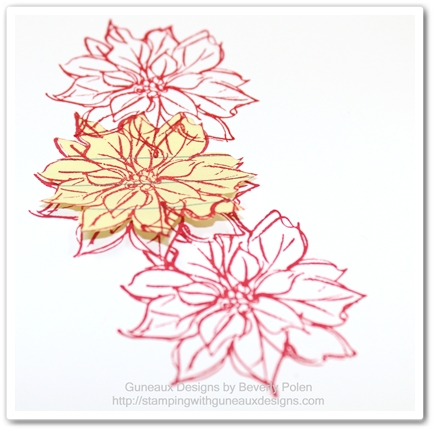
Today I am using the Stampin Up Watercolor Winter Stamp Set to instruct you on a technique called Cascading Images.  This technique is wonderful for adding a series of connecting images over the top of a background to create a focal point.  The poinsettia stamp in the Stampin Up Watercolor Winter Stamp Set is great for this technique.

Stampin Up Supplies (and catalog item numbers) used for the Stampin Up Watercolor Winter card:

Stamps:  Stampin Up Watercolor Winter Stamp Set (129727) and Come to Bethlehem Stamp Set (120591)

Paper:  Riding Hood Red Card Stock (111348), Whisper White Card Stock (100730), and Lucky Limeade Card Stock (122926)

Ink:  Real Red Classic Ink (126949), Real Red Stampin Write Marker (199952), and Riding Hood Red Write Marker (119701)

Accessories:  Big Shot Die-Cutting Machine (113439), Blender Pen (102845), Petals-A-Plenty Embossing Folder (116824), Dimensionals (104430), and Post-it Note

Instructions for creating the cascading poinsettia:

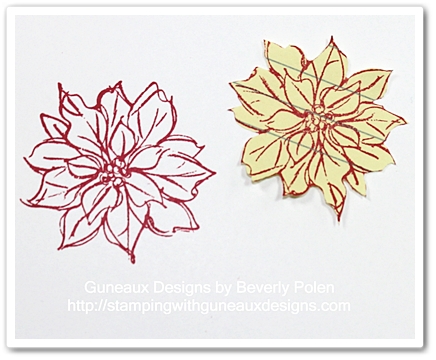
  • Cover in Real Red Classic Ink the poinsettia outline stamp and stamp onto a Post-it Note (henceforth called sticky note) and a 4″ x 5-1/4″ piece of Whisper White Card Stock (when stamping on the sticky note, ensure you stamp on the portion that contains the stickiness on the back side), 
  • Cut out the poinsettia on the sticky note, cutting right on or just inside the lines,

  • Place the sticky note over the stamped poinsettia on the Whisper White Card Stock,
  • Ensure the sticky note does not cover any outside lines of the poinsettia,
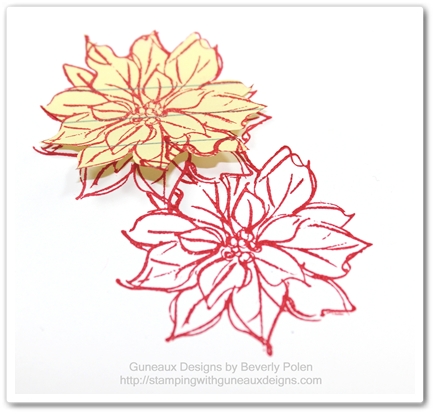
  • Cover the poinsettia stamp with Real Red Classic Ink and stamp the image just below the first poinsettia, ensuring you stamp on the bottom of the sticky note,
  • When stamping the second poinsetta, stamp it slightly to the right of the first one,

  • Cover the poinsettia stamp again with Real Red Classic Ink and, leaving the sticky note in place, stamp the poinsettia above the center one in the same manner as that done for the second poinsettia, and
  • Remove the sticky note.

  • If you got out your crafting tools and followed along in creating this image, you have just learned about and created a Cascading Image.

Let’s move on to finishing the Stampin Up Watercolor Winter Christmas card.

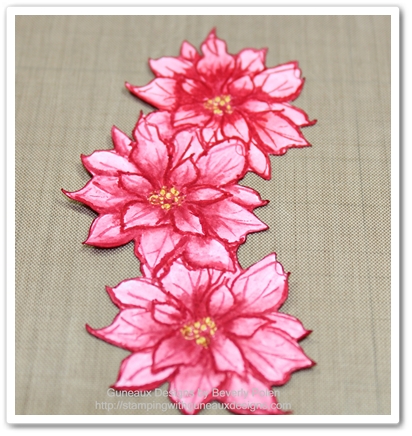
  • Color the poinsettias using a Real Red Stampin Marker and Stampin Up Blender Pen (use the marker around the center of each poinsettia and then spread the ink with the Blender Pen),
  • Add some yellow glitter glue in the center of the flowers and let dry,
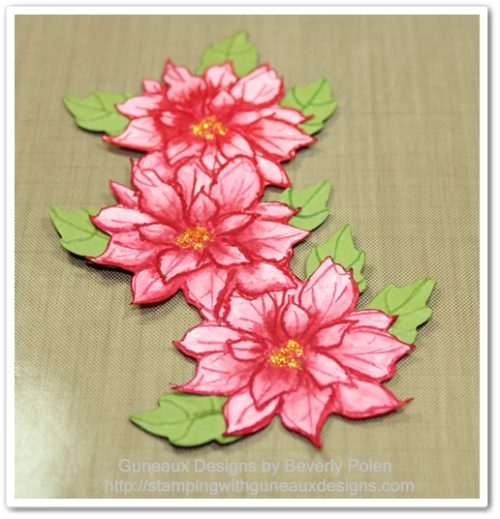
  • Cut out the cascading poinsettias, 

  • (OPTIONAL) Punch or die cut leaves to adhere to the underside of the poinsettias,
  • Attach dimensions (double layer) on the back of the piece,
  • Place a 4″ x 5-1/4″ piece of Whisper White Card Stock inside the Petals-A-Plenty Embossing Folder and run through the Big Shot,
  • Cut an 8-1/2″ x 5-1/2″ piece of Riding Hood Red Card Stock and fold (or score) in half to create a card base,
  • Attach the embossed Whisper White Card Stock to the card base,
  • Attach the cascading poinsettias onto the left side of the Whisper White Card Stock (see picture),
  • Add a sentiment (I used the “Merry Christmas” sentiment from the Come to Bethlehem stamp set),
  • Finish decorating as desired.

 God’s Blessings!
Stamping With Guneaux Designs
by
Beverly Polen

Enjoy using your Stampin Up Watercolor Winter Stamp Set!

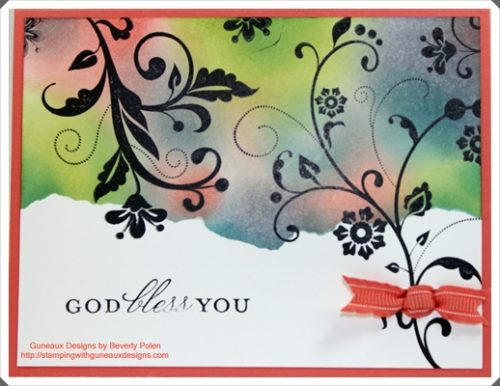
Blending Inks Technique – Stampin’ Up! Flowering Flourishes

I absolutely love the blending inks technique using Stampin’ Up! classic inks!  There are so many beautiful color combinations that can be created by blending these inks.  I’ve created a card for you today that highlights the blending inks technique and the Stampin’ Up! 2011-2013 In Color inks.

When using the blending inks technique, I typically use only three ink colors.  Today, I decided to use four.  Personally, I think the card is beautiful!

TIP:  If you need help with selecting inks to blend, rely on the Stampin’ Up! Color Coach (120148)

SUPPLIES:

Stamps SetsCrosses of Hope (120567) and Flowering Flourishes (126367)

Paper:  Whisper White Card Stock (100730), Calypso Carol Card Stock (122925)

Ink:  Calypso Carol Classic Pad (122939), Wisteria Wonder Classic Pad (122936), Lucky Limeade  Classic Pad (122935), Island Indigo Classic Pad (122937), and StazOn Jet Black Ink Pad (101406),

Accessories:  Calypso Coral Ruffled Ribbon (122976), Stamp-A-Ma-Jig (101049), Sponge Daubers (102892), and Retired Double Rectangle Punch or a tool to cut slits into cardstock.

INSTRUCTIONS For MAKING THIS CARD FEATURING THE BLENDING INKS TECHNIQUE

  • Cut an 8-1/2″ x 5-1/2″ piece of Calypso Carol Card Stock and fold it in the middle to create the card base.
  • Cut a 5-1/4″ x 4″ piece of Whisper White Card Stock.
  • Tear a piece of paper (e.g., Post It Note, scrap card stock, etc.) and lay it on the bottom 1/3″ of the Whisper White Card Stock.
  • Cover a Sponge Dauber with Lucky Limeade Classic Ink and sponge it in a circular motion onto the Whisper White Card Stock above the piece of paper and in a random manner (see card picture).
  • Cover another Sponge Dauber with Wisteria Wonder Classic Ink and sponge it in a circular motion onto the Whisper White Card Stock in a random manner.
  • Cover another Sponge Dauber with Calypso Carol Classic Ink and sponge it in a circular motion onto the Whisper White Card Stock in a random manner.
  • Cover another Sponge Dauber with Island Indigo Classic Ink and sponge it onto the Whisper White Card Stock in a random manner.
  • Remove the piece of paper from the bottom 1/3″ of the card stock.
  • Cover with StazOn Jet Black Ink the large floral stamp from the Flowering Flourishes Stamp Set.
  • Stamp the image on the right side of the card stock.
  • Cover with StazOn Jet Black Ink the second to the largest floural stamp from the Flowering Flourishes Stamp Set.
  • Stamp the image upside down on the upper left side of the card stock.
  • If desired, cover with StazOn Jet Black Ink the smallest floural stamp and stamp the image a couple of times on the card stock.
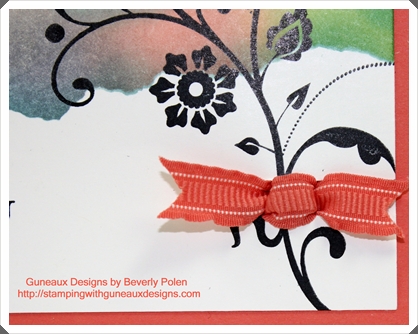
  • Using the Double Rectangle Punch (if you have one) or another tool to cut two slits into the card stock, one slit on the left side of the stem and one slit on the right side of the stem of the largest floural stamp image.
  • Cut a small piece of Calypso Carol Ruffled Ribbon and insert it into the slits from the front to the back.
  • Turn over the card stock and re-insert the ribbon ends back through the slits.  This creates a faux knot.
  • Cover with StazOn Jet Black Ink the sentiment “God Bless You” from the Crosses of Hope Stamp Set and stamp the sentiment onto the bottom left of the card stock.
  • Adhere the decorated Whisper White Card Stock to the Calypso Carol card base.
God’s Blessings!
Stamping With Guneaux Designs
by
Beverly Polen

Enjoy making cards using the blending inks techniques. 

Daydream Medallions

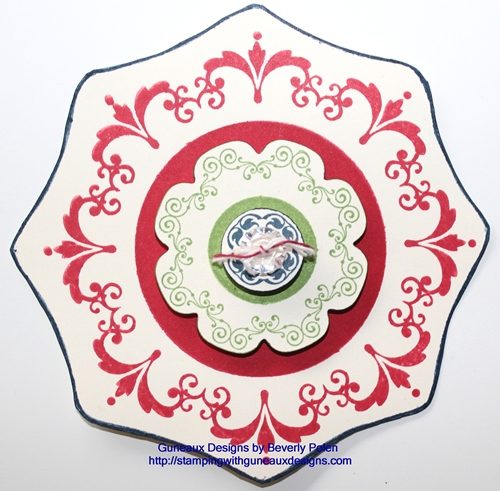
It is intended that the gorgeous Stampin Up Daydream Medallions Stamp Set (126467) be used with the wonderful Floral Frames Framelits (127012), right?  Being a person who tends to “think outside of the box”, I did not use the Floral Frames Framelits to frame the Daydream Medallions image in the picture below.  The picture is of an element that I am using to make a greeting card.

Looking closely, can you tell me how I made the frame around the Daydream Medallion stamp image?  If you have the Daydream Medallions stamp set, get it out and examine it closely and take a guess at how I framed the stamp image.  Leave your “guess” in the comments, and come back tomorrow to see the answer and the card that I made.

If I receive no guesses, I’ll assume there is no interest in learning a new method for framing the Daydream Medallions.

If you don’t have the Daydream Medallions stamp set, you can purchase it at my on-line shop.

Have a blessed day! Buy Stampin Up Products

God’s Blessings!
Stamping With Guneaux Designs
by
Beverly Polen

Think outside of the box when creating your artwork, especially when using the Daydream Medallions stamp set.