Impression Obsession Sleigh Scene

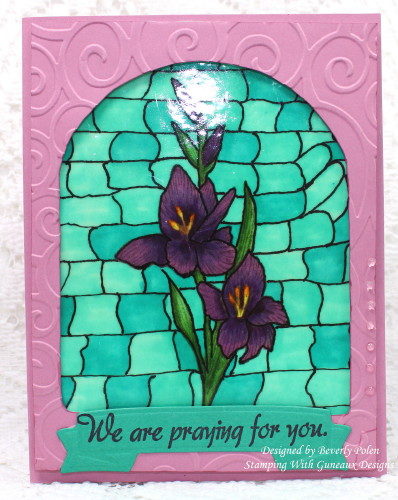
Hello, stampers!  Happy Monday to you!  Today’s card share features the Impression Obsession Sleigh Scene Dies.

Impression Obsession Sleigh Scene

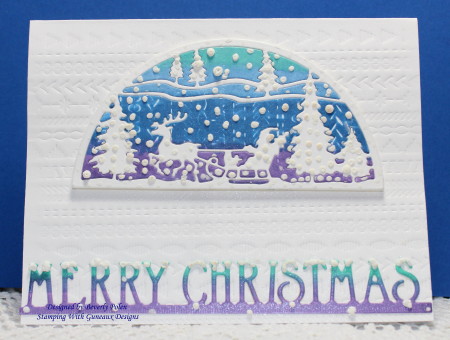
I used the Inlay Technique to create the Sleigh Scene on the card.  First I used a few copic sketch markers in blue, lavender, and aqua to color on a piece of white card stock.  I overlapped the colors for a good blend.  Then I die cut the scene from this colored piece, as well as from a piece of white card stock.  I also used the colored paper to cut my sentiment.

After the positive and negative of the Impression Obsession Sleigh Scene die were cut out, I adhered the pieces of colored card stock into the white Sleigh Scene, which is the Inlay Technique process.  I think it turned out great.  I added double sided foam adhesive tape on this piece to adhere it to the front of the card base that I embossed with the Stitches Cover Plate by Ellen.  To add the look of snow, I used the Marvy Uchida Snow Maker to add snow on the card.

Thank you for stopping by and leaving comments!  I hope you have a blessed week!


Paper:  Neenah Solar White

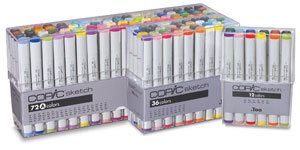
Ink:  Copic Sketch Markers

Accessories: Impression Obsession Sleigh Scene Die, Stitches Cover Plate by Ellen, ODBD Merry Christmas Border Die, Double-Sided Foam Tape, and Marvy Uchida Snow Maker

      MERRY CHRISTMAS BORDER DIE       SNOW MARKER


Butterfly_1_1

God’s Blessings!

Stamping With Guneaux Designs By Beverly Polen

Firm Reliance on Divine Providence!

The birth of Jesus Christ:  “This is how the birth of Jesus Christ came about:  His mother Mary was pledged to be married to Joseph, but before they came together, she was found to be with child through the Holy Spirit.  Because Joseph was a righteous man and did not want to expose her to public disgrace, he had in mind to divorce her quietly.  But after he had considered this, an angel of the Lord appeared to Him in a dream and said, “Joseph son of David, do not be afraid to take Mary home as your wife, because what is conceived in her is from the Holy Spirit.  She will give birth to a son, and you are to give him the name Jesus, because he will save his people from their sins.”  Matthew 1:18-21 

ODBD Christmas Candles and Sunburst Background

Today’s Splitcoaststampers Color Challenge CC613 involves a color combination of Stampin’ Up! (SU) Real Red, Crushed Curry, and Garden Green.  For “dessert”, the hostess asked for “Christmas Glow”.  To achieve a “Christmas Glow”, I created a card that features Our Daily Bread Designs (ODBD) Christmas Candles and Sunburst Background Dies for the challenge.

ODBD Christmas Candles and Sunburst Background

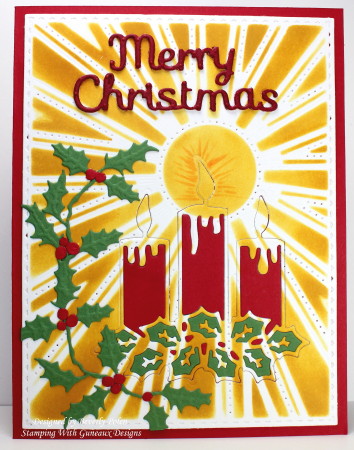
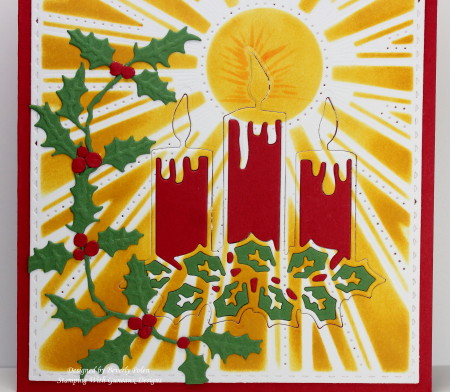
These are the colors for the color challenge. I began developing the card using a piece of Neenah Solar White Card Stock to emboss the ODBD Sunburst Background Die.  After embossing the card stock, I laid the die back on the card stock, and using a sponge dauber, I sponged SU Crushed Curry through the die.  I sponged more ink onto the outer sections to made them darker.

After sponging, I die cut a portion of the colored card stock with the ODBD Christmas Candles Dies.  I decided I wanted to use the Inlay Technique to create the candles and holly.  This is a closeup of the result.

To finish the card I added more holly that I die cut with the Tim Holtz Holiday Greens Dies.  Using the Spellbinders Holiday Sentiments Dies, I cut out the Merry Christmas sentiment and added it to the card.

I hope you enjoyed my card and will return for further inspiration!


Paper:  Neenah Solar White Card Stock and SU Real Red and Garden Green Card Stock
Ink:  SU Crushed Curry
Accessories:  ODBD Christmas Candles Dies, ODBD Sunburst Background Dies, Tim Holtz Holiday Greens Dies, Spellbinders Holiday Sentiments Dies, Be Creative Tapeand Foam Adhesive
Technique:  Inlay

   CHRISTMAS CANDLES DIES   SUNBURST BACKGROUND DIE   


Butterfly_1_1

God’s Blessings!

Stamping With Guneaux Designs By Beverly Polen

Firm Reliance on Divine Providence! 

Jesus said,  “When an evil spirit comes out of a man, it goes through arid places seeking rest and does not find it.  Then it says, ‘I will return to the house I left.’ When it arrives, it finds the house unoccupied, swept clean and put in order. Then it goes and takes with it seven other spirits more wicked than itself, and they go in and live there.  And the final condition of that man is worse than the first.  That is how it will be with this wicked generation.”  Matthew 12:43-45

Tim Holtz Mixed Media Christmas Dies

Christmas is rapidly approaching, and I am enjoying making Christmas cards.  I think Christmas cards are my favorite to make!  My card share is a Christmas card that features the Tim Holtz Mixed Media Christmas Dies.  These dies are corner dies, and I love them.

holly-and-poinsettias_1

The poinsettias on the bottom right of the card were created with one of the Tim Holtz Mixed Media Christmas Dies.  I used the Inlay Technique to create that corner.  But first, I embossed a piece of white card stock with the Stampin’ Up! Falling Snow Embossing Folder.  Then I cut out the corner of the embossed white card stock with the Tim Holtz’s poinsettias die.  I removed the pieces from the white card stock and adhered two 2.5″ pieces of a very strong adhesive to the back of the piece of card stock where the cut out is located.

Using the same die and pieces of Stampin’ Up! Real Red and Always Artichoke card stock, I cut out the poinsettias’ petals and holly leaves and berries.  Trying to keep the cut out pieces within the die with both the red and green card stock, I laid them over the cut out section on the white card stock, matching them exactly.  Then I used a Paper-Piercing Tool to push each piece onto the white card stock, thus creating an inlay.

The holly and berries were made with the Tim Holtz Holiday Greens dies and adhered to the top left corner of the card.  The Merry Christmas sentiment in the center at an angle is from the Catherine Pooler Hip Holiday Stamp Set which is currently unavailable.


Stamps: Catherine Pooler Hip Holiday (sentiment – unavailable)

Paper: SU Real Red and Always Artichoke, Neenah Solar White

Ink: SU Real Red

Accessories: Tim Holtz Mixed Media Christmas Dies, Tim Holtz Holiday Greens Dies, SU Softly Falling EF, Be Creative® Sookwang Adhesive, and Paper-Piercing Tool

sizzix-thinlits-dies-mixed-media-christmas-by-tim-holtz-sx661602_image1__85693-1472765877-250-250  be-creative-tape-65mm-_2-5__-bct65bct_image1__40802-1406092110-250-250   


Butterfly_1_1

God’s Blessings!

Stamping With Guneaux Designs By Beverly Polen

Firm Reliance on Divine Providence! 

“The Lord is my shepherd, I shall not be in want.  He makes me lie down in green pastures, He leads me beside quiet waters, He restores my soul.  He guides me in the paths of righteousness for His name’s sake.  Even though I walk through the valley of the shadow of death, I will fear no evil, for You are with me; Your rod and your staff, they comfort me.”  Psalm 23

Lattice Ornaments Christmas Bells

Hello, my friends!!  My card share today features the Spellbinders Lattice Ornaments Christmas Bells dies.  I made this card to honor this week’s Featured Stamper on Splitcoaststampers, the lovely Jan (i.e., Precious Kitty).  It is a pleasure to be inspired by and case one of Jan’s cards!   She is a wonderful person who creates beautiful artwork and leaves the nicest comments on my work posted on Splitcoaststampers. Jan’s “Ornament and Plaid” card is the card I selected to case.  This is my card:

christmas-bells_1

I love the Christmas ornament and plaid paper on Jan’s card.  Therefore, I created a card with two ornaments and a plaid panel.  However, my ornaments are bells and except for the white and red, the colors I used are different.  Also my card features the “Inked Inlay” technique.

christmas-bells-2_1

The following provides a closeup of the inked inlay technique used.  I first colored with Copics a piece of card stock in various colors.  I simply colored with back and forth strokes of each color.  Then I die cut the bell from this paper and a piece of white card stock.  I added a strong adhesive behind the die cut on the white card stock, and laid the colored die cut bell over the white, matching the exact image.  Then I pushed the colored pieces through the white card stock to create the inlay.

christmas-bells-3_1

I used the same colored piece of card stock to die cut the Merry Christmas sentiment to place at an angle on the embossed, white card stock.

christmas-bells-4_1

I hope you enjoy the look of the card featuring the inlay technique.


Paper: Neenah Solar White, Lawn Fawn Perfectly Plaid, SU Real Red

Ink: Various Copic Markers

Accessories:  Spellbinders Lattice Ornaments Dies, Impression Obsession Merry Christmas Die, Essentials by Ellen Stitches Plate, Shimmer Mist, Martha Stewart Glitter Acrylic Craft Paint, SU Curvy Corner Punch

Techniques: Inked Inlay


Butterfly_1_1

God’s Blessings!

Stamping With Guneaux Designs By Beverly Polen

Firm Reliance on Divine Providence! 

“May the God of hope fill you with all joy and peace as you trust in him, so that you may overflow with hope by the power of the Holy Spirit.”  Romans 15:13

Happy Birthday – Falliday Fest

Thanks for stopping by, my friends!  My card share today is a Happy Birthday card that I made for the Splitcoaststampers Falliday Fest.  Dr Sonja’s (Sonja Van Laar) Falliday Fest Challenge (FF16DrSonja) is related to a card drive for Hospice of St. Francis in Melbourne, FL.  She asked for birthday cards with wrinkles.  The technique she recommended to get wrinkles is the Faux Silk Technique (tutorial).

happy-birthday-card_1

This Happy Birthday card is a gate-fold card that I created using the Spellbinders Die mentioned below.  I cut the gate fold from Tempting Turquoise Card Stock and adhered to it a panel made with the same Spellbinders die using SU Flock Together DSP.

To get wrinkles on the card, I followed the Faux Silk Technique.  Once the tissue was dry, I wrinkled it and adhered it to the center piece of the card.  I stamped the SU Happy Birthday Greetings stamp in Tempting Turquoise ink and onto the tissue paper.


Stamps: SU Happy Birthday Greetings

Paper: SU Tempting Turquoise, Very Vanilla, and So Saffron Card Stock, and SU Flock Together DSP

Ink: SU Tempting Turquoise

Accessories: Spellbinders 5×7 Reflective Moment Dies, ODBD Pierced Rectangles Dies, Tissue Paper, Stick It Adhesive Sheet, Foam Tape

Techniques: Faux Silk Technique


Butterfly_1_1

God’s Blessings!

Stamping With Guneaux Designs By Beverly Polen

Firm Reliance on Divine Providence! 
 

Jesus said to his disciples, “No good tree bears bad fruit, nor does a bad tree bear good fruit.  Each tree is recognized by its own fruit.  People do not pick figs from thorn-bushes, or grapes from briers.  The good man brings good things out of the good stored up in his heart, and the evil man brings evil things our of the evil stored up in his heart. For out of the overflow of his heart his mouth speaks.”  Luke 6:43-45

Scented Stain Glass Window

Hello, friends!!  The card I am sharing today is a Scented Stained Glass Window card. I started developing the card in response to a faux stained glass challenge on Splitcoaststampers.  As I created the card, it evolved into more than a faux stained glass challenge response.

Scented Stained Glass Window

As I started thinking of other Splitcoaststampers challenges for the week, I decided to incorporate all of these challenges, but the faux stained glass would be the primary focus for the card.

MIX190 – Ky (Scrapacat) is the hostess of the challenge to create a card with faux stained glass. I began my window by stamping and coloring (with copics) a purple Gladiolus flower, which is from Our Daily Bread Designs. Upon completion, I used a MICRON pen to draw my wonky pieces of “glass”.  I used two greenish Copic markers to color the glass.

TLC630 – Judy (StampingQueenJAR) hosted a challenge to add texture to a card by using a technique and not an embellishment. The technique I used is the stain-glass window technique. The texture I added was a flavorful embossing powder. It smells like Vanilla and it is a retired Stampin’ Up! powder!

WT601 – Carla (Covington Crafter) hosted a challenge to create a card that “Mmmmm, Smells Good!” by adding or creating a scented embossing powder.  I used three layers of SU Vanilla Scented Embossing Power, and I was surprised that it had not lost its scent as it is old. I was wrong, mmmmmm, my card smells GOOD!

F4A343 – Shirley (wannabcre8tive) hosted a challenge to get “Swirly” by creating a card with swirls. The front panel, my hand-made cathedral window, is covered with swirls made from a Cuttlebug Swirls Embossing Folder.

Scented Stained Glass Window

Whee, that was a lot of work, but does my card ever smell good!  If interested in seeing all the wonderful comments made about this card, you can see them HERE!


SUPPLIES

GLADIOLUS  DOGWOOD MINI

  susweetsugarplum  gardengreen  Copic Sketch Markers  eleganteggplantink

Spellbinders Shapeabilities 'Ribbon Banners' Dies    Sakura Pigma Micron Pens (Set of 6)

suembossing-buddy  versamark   scotch-double-sided-foam-mounting-tape


Butterfly_1_1

God’s Blessings!

Stamping With Guneaux Designs By Beverly Polen


“See to it, brothers, that none of you has a sinful, unbelieving heart that turns away from the living God.  But encourage one another daily, as long as it is called Today, so that none of you may be hardened by sin’s deceitfulness.”  Hebrews 3:12-13