SU Everything Eleanor

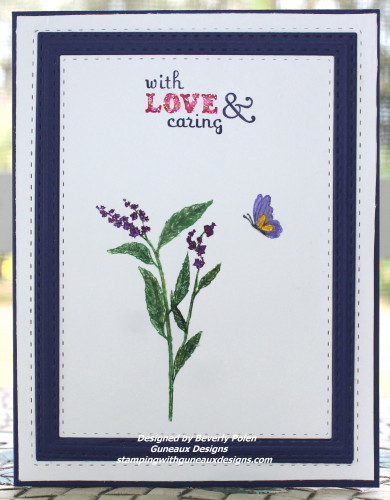
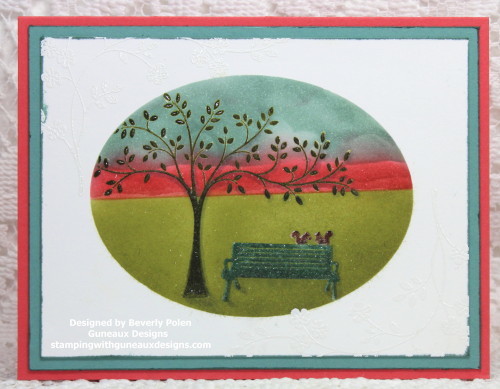
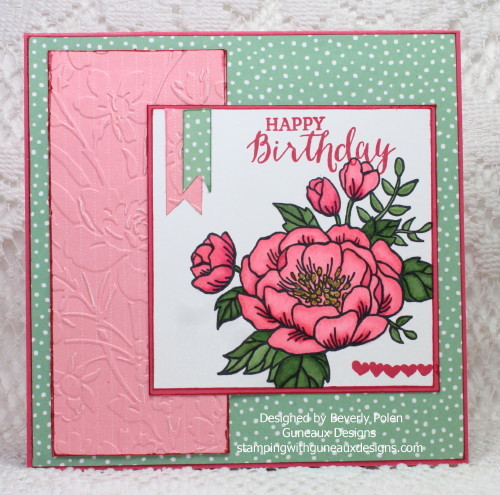
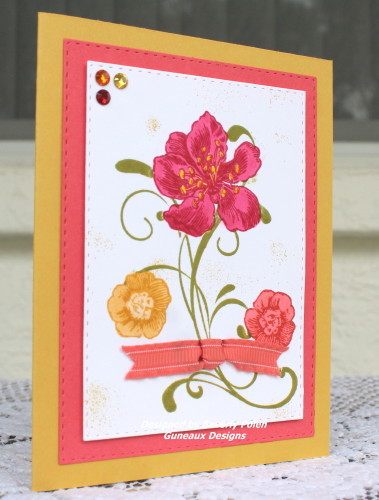
Hello, and welcome to Guneaux Designs!  Today I have for you a card that features the current Stampin’ Up! (SU) Everything Eleanor Stamp Set.

SU Everything Eleanor

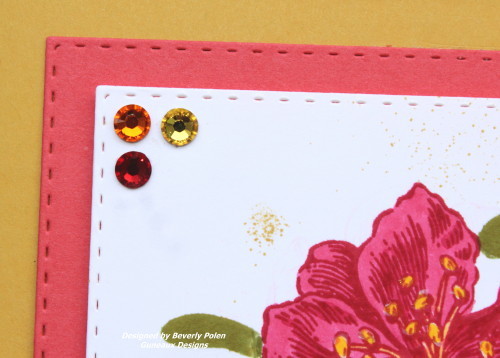
I created this card to submit to a Splitcoaststampers Challenge, Ways To Use It, WT575, hosted by Sabrina (Cook22).  The challenge simply was to think in threes!  Thus, I added three flowers, three layers, and  three Swarovski Crystals.

(This card was included in Splitcoaststampers Favorites of the Week ending March 20, 2016.)

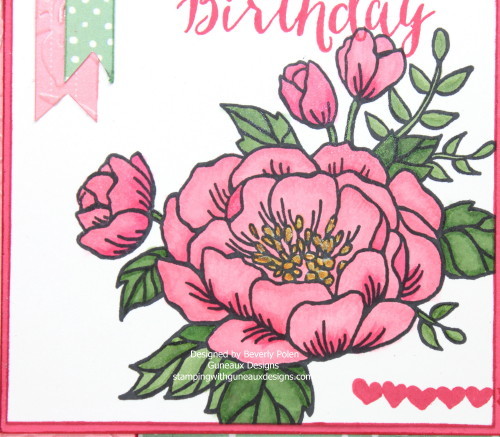
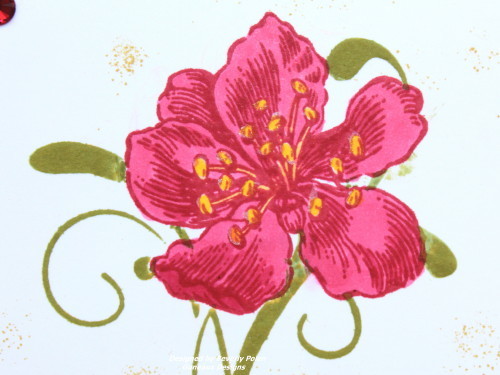
I created the floral images by strategically placing them on my MISTI before stamping. (Love the MISTI!)  After stamping the floral images onto the panel with SU inks, I used Copics to enhance the flowers and fill in the white spaces.  After stamping the images onto the card stock, I stamped them onto a piece of Frog Tape to use as masks over the images before adding the stems. I used the swirly stamp from the SU Everything Eleanor Stamp Set to create the stems for the flowers.

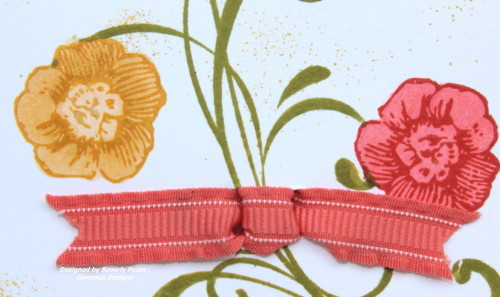
As for the ribbon, I punched two slots near the bottom of the “stems” to thread the ribbon through. I threaded both ribbon ends through the slots on the front side, crisscrossed the ends on the back side, and threaded the ribbon ends through the back to the front. That gives the appearance of a ribbon being tied into a knot.

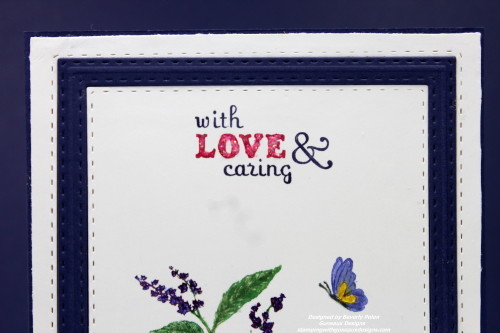
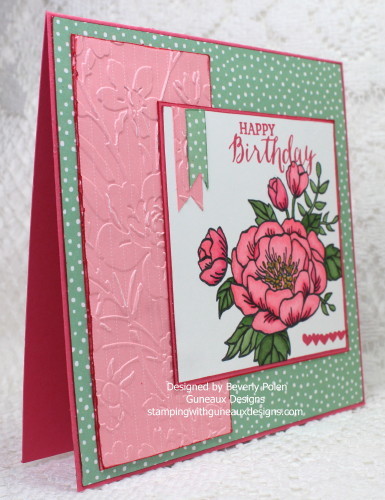
After finishing my panel, I spritzed Hello Honey ink onto the Whisper White panel.  The following are more photos.  I didn’t add a sentiment on the card front, but inside the message is “Thinking of You”!

SU Everything EleanorSU Everything Eleanor

SU Everything EleanorSU Everything Eleanor

BlogDivider_zpsed339ea1

SUPPLIES:

Stamps:  SU Everything Eleanor

Paper: SU Hello Honey, Watermelon Wonder, and Whisper White

Card Size: A2

Ink: SU Strawberry Slush, Crisp Cantaloupe, Hello Honey, Pear Pizzazz, and Copics

Accessories: ODBD Double Stitched Rectangles Dies, MISTI, SU Ribbon, Frog Tape, and Swarovski Crystals

Everything Eleanor Clear-Mount Stamp Set by Stampin' Up!ODBD Rectangles

MINI-MISTI-2T

FrogTape 1.41 in. x 60 yds. Yellow Multi-Surface Delicate Masking Tape


Techniques: Coloring With Copics, Masking

BlogDivider_zpsed339ea1

 Swallowtail Butterfly

God’s Blessings!

Stamping With Guneaux Designs By Beverly Polen

“Jesus replied: ‘Love the Lord your God with all your heart and with all you sould and with all your mind.’  This is the first and greatest commandment.  And the second is like it: ‘Love your neighbor as yourself.’ ”  Matthew 22:37

Painting Stamps With Brushos

Have you ever painted stamps with brushos and stamped your images onto card stock?  Well, I had never painted stamps with brushos until this week.  But there is a L O N G story about my ordeal with using brushos, and if you’re interested, keep reading.

There were two challenges for yesterday, Monday, on Splitcoaststampers.  So I made this card to submit for the two challenges: 1) TLC575 – Painting Stamps With Brushos – Hosted by Karen Dunbrook, and 2) CAS366 – Glittery Sentiment – Hosted by Holly (hbrown).

Painting Stamps With Brushos-

The easy challenge was to add glitter to a sentiment. I added a glitter glue to the word, LOVE, in my sentiment.  Hopefully you can see the sparkle, but if not, here’s a closeup of the sentiment.

Painting Stamps With Brushos

Now, on to what I considered a difficult challenge!  Painting stamps with brushos! This technique is a water coloring technique.  LOVE was NOT what I felt in responding to the challenge!!  First, I have NEVER used brushos, and I hadn’t planned to for a while! Yes, I had brushos on hand, but I had them sitting in a drawer, untouched!!  When I read the details about the challenge, I hit the panic button! Yes, I did!!  Sure I could have passed up this challenge and waited on the next one. Well, you have to know me. I don’t turn down a challenge!

So I first thought, “How in the world am I going to use brushos; I hardly know what they are!”  Then I told myself, “You’re not one to be defeated; get those “things” out of the drawer and get to it”.

Painting Stamps With Brushos_1

Well, I listened to “self”, got out the brushos, opened the box, and stared at those little white containers. Then I thought, “I saw a Jennifer McGuire video recently and she said NOT to open the containers.”  So, I wondered how am I to get to those “brushos”?  So I searched and searched to find that video again!  When I found it, that thing got watched over and over again.  Boy, does she make it look so easy. WRONG!!

As she instructed, I punched holes in the lids of those white containers and then looked at the name of the color on each container.

Painting Stamps With Brushos-4_1

Boy, some of those names, like Gamboge!  I headed to my computer to look for a definition of Gamboge.  Well, the internet told me that Gamboge is a yellow pigment. OK, I can work with that, I thought.  So I tapped some crystals onto my acrylic block!  “What? That’s not yellow!”, was my thought.

Painting Stamps With Brushos-5_1

Yeah, I know, get to the point!!  Well the point to all of my rambling is to say I had a terrible time painting my stamps with brushos. I brushed brushos on so MANY stamps, stamped them onto watercolor paper, and through them in the trash. I thought that it was the size of the stamp that was defeating me. Determined to not be defeated, I thought, “Get out the smallest stamp you can think of and get brushing!”  So I did.

And this card is the result of two days of struggling, when I had time to struggle! Just remember that word “LOVE” in the sentiment on my card when commenting, please!! Thank you so kindly!

If you’ve never used Brushos, I really am not the person to teach you, or at least not at this point!!  But give me time!!  However, you can go to Jennifer McGuire’s videos on YouTube.com, and you’ll find plenty of instruction there.

Oh, one last thing, here’s a photo of my acrylic block after finishing.  The pigment crystals dried up.  Add a touch of water and you can use them again.  How cool is that?

Painting Stamps With Brushos-6_1

BlogDivider_zpsed339ea1

SUPPLIES:

Stamps: SU Thanks for Caring, SU Nature Walk

Paper: SU Whisper White and Concord Crush

Card Size: A2 

Ink: Brusho Crystal Colors, SU Rose Red Marker

Accessories: Brusho Crystal Colors, Water Color Brush, Acrylic Block, ODBD Double Stitched Rectangles, MISTI, and SU Dazzling Diamonds

Techniques: Painting Stamps

BlogDivider_zpsed339ea1

Swallowtail Butterfly

STAMPING WITH GUNEAUX DESIGNS BY BEVERLY POLEN

“Cast your cares on the Lord and He will sustain you; He will never let the righteous fall.”  Psalm 55:22

Faux Patina Technique Featuring ODBD Ornamental Crosses

Hello, my friends!  My card share for you today spotlights the Faux Patina Technique, and features Our Daily Bread Designs, ODBD, Ornamental Crosses.

Faux Patina Technique Featuring ODBD Ornamental Crosses

(Click HERE for instructions on the Faux Patina Technique.)

Every Saturday on Splitcoaststampers there is an Inspiration Challenge.  Today I created this card in response to the challenge.  The Inspiration Challenge, IC533, is to view this website page to be inspired and create a card based on your inspiration. I saw many beautiful pieces that inspired me; however, I decided to go with this one:

Gypsy DamaskThis piece brought to mind the Faux Patina Technique and that is why I used the technique to make my card.


UPDATE (from Splitcoaststampers):  Congratulations! In the General Stamping forum, you’re in the FAVORITES for the week ending February 21.


You will note that my sentiment, “Know what I love?” is stamped and embossed onto a piece of ribbon.  The sentiment is from a stamp in the Stampin’ Up! Sale-A-Bration Stamp Set, What I Love. I hope the answer to the sentiment question is obvious.

Enjoy and come back for more beautiful creations!

BlogDivider_zpsed339ea1

SUPPLIES USED:

Stamps: SU What I Love; Paper: SU Whisper White, Marina Mist, and Mint Macaron CS; Paper Size: A2; Ink: SU Crumb Cake, Marina Mist, Mint Macaron, Baked Brown Sugar, and VersaMark; Accessories: SU Embossing Folder, ODBD Ornamental Cross, Gold Embossing Powder, White Embossing Powder, and Marina Mist Ribbon; Techniques: Sponging and Faux Patina Technique

BlogDivider_zpsed339ea1

Swallowtail Butterfly

God’s Blessings!

Stamping With Guneaux Designs By Beverly Polen

“Blessed is the nation whose God is the Lord”  Psalm 32:12

SU Thoughts and Prayers

What is your opinion about a Stampin’ Up! color combination of SU Watermelon Wonder, Old Olive, and Lost Lagoon?  I think they are beautiful together.  I used the SU Thoughts and Prayers and Pendant Park to create a scene with these colors.

SCS Color Challenge 2-9-16

Splitcoaststampers had these colors as its Color Challenge for today (CC569).  Here is the card I submitted for the challenge.

SU Thoughts and Prayers


UPDATE:  My card was selected as one of the favorites for the week ending February 14, 2016


The scene is of squirrels enjoying the park bench (lol), and it’s in the shape of an oval (which gave one extra points if an oval was used). I added a floral image on the top left and bottom right that I embossed with white embossing powder.  It’s quite difficult to see that.

I covered the two image stamps with VersaMark and ink and embossed them with clear embossing powder. This was to prevent mixing inks while sponging for the background. I have to say that I’m disappointed with a couple of products I used as the ink I added to the Whisper White card stock edges bled onto the front of the card stock. Then forgetting about the SU ink serving as a base for embossing, I got white embossing powder on the scene while embossing the floral images on the white portion of the card. My mistake.

BlogDivider_zpsed339ea1

SUPPLIES USED:

Stamps: SU Thoughts and Prayers and Pendant Park Stamp Sets

Paper: SU Whisper White, Watermelon Wonder, and Lost Lagoon Card Stock

Card Size: A2

Ink: SU Watermelon Wonder, Old Olive, and Lost Lagoon Inks

Accessories: SU Sponges and Daubers, VersaMark, and White and Clear Embossing Powders

Techniques: Sponging BlogDivider_zpsed339ea1

Swallowtail Butterfly

God’s Blessings!

Stamping With Guneaux Designs By Beverly Polen

Stampin’ Up! Birthday Blooms

Hello my friends!  Are you anxious for spring?  I certainly am!  Actually, the weather in my part of Florida has been totally abnormal for some time now, and I have azalea bushes blooming already. I love when my hibiscus bushes start blooming as some of them have 6″ – 8″ flowers!  They are beautiful!

To get me in the frame of mind for spring, I’ve created a beautiful Happy Birthday card featuring the Stampin’ Up! Birthday Blooms Stamp Set and Stampin’ Up! Birthday Bouquet Designer Series Paper.  The large floral stamp in the stamp set is so gorgeous and can be colored with numerous colors.  I’m not 100% sure, but I think the image is of a peony.

Stampin' Up! Birthday Blooms

Also, I created my card in response to a “sketch challenge” at Splitcoaststampers.com. This is the sketch – ©Splitcoaststampers.com:

Splitcoastampers.com Sketch ChallengeHere are additional photos of my card:

Stampin' Up! Birthday Blooms Stampin' Up! Birthday Blooms-1_1


BlogDivider_zpsed339ea1

SUPPLIES USED:

Stamps:  Stampin’ Up! Birthday Blooms Stamp Set (140658), and Stampin’ Up! Rose Wonder Stamp Set  (for the sentiment) (140697)

Paper: Stampin’ Up Birthday Bouquet Designer Series Paper (DSP) (140557), Stampin’ Up! Prints Pack DSP (retired), SU Strawberry Slush Card Stock (CS), and Whisper White CS

Ink:  Various Copic Sketch Markers, SU Strawberry Slush Classic Ink, and SU Pink Pirouette Classic Ink

Card Size:  5-1/2″ Square

Accessories:  Anna Griffin Floral Embossing Folder

Stampin' Up! Birthday Bouquet DSP and Stampin' Up! Birthday BloomsStampin Up Birthday Blooms

If you have questions or comments, feel free to leave them in the comments section.

BlogDivider_zpsed339ea1

Swallowtail Butterfly

God’s Blessings!

Stamping With Guneaux Designs By Beverly Polen

Stampin Up Cut and Ready Card Bases

STAMPIN UP CUT AND READY CARD BASES

With the holidays approaching at lightning speed, effective today through December 31, Stampin’ Up! is offering a new trial product –  Cut and Ready Card Bases. These pre-scored, pre-cut card bases will make it easy for you to create a stack of cards in no time – or even just a card or two. Think of it . . . holiday cards, thank you cards, party invitations, and more in a snap!

Here’s why these card bases will help you relax and enjoy the season.  You will:

  1. Save work and time not having to cut and score cards – even if you’re simply making a card or two.
  2. Be able to make multiples in no time.
  3. Save on prep time to make your holiday cards as there is no trimming required, therefore no trimmer necessary.

Cut and Ready Card Bases Color Choices!

The Cut and Ready Card Bases are available in a variety of colors for any occasion or creative whim.  These colors were chosen to coordinate with the holiday catalog Designer Series Papers to make it even easier to get those holiday cards done.

Cut and Ready Card Bases Details:

Each package contains:

  • 20 pre-scored, pre-cut cards in one color.
  • Each card measures 5-1/2″ x 8-1/2″-scored at 4-1/4″.  Finished card size is 4-1/4″ x 5-1/2″. (Card Bases are packaged flat.)
Description Item Number Price
Whisper White Cut & Ready Card Bases 135804 $4.95
Very Vanilla Cut & Ready Card Bases 135805 $4.95
Crumb Cake Cut & Ready Card Bases 135806 $4.95
Smoky Slate Cut & Ready Card Bases 135807 $4.95
Cherry Cobbler Cut & Ready Card Bases 135808 $4.95
Old Olive Cut & Ready Card Bases 135809 $4.95
Pool Party Cut & Ready Card Bases 135810 $4.95

Cut and Ready Card Bases Coordinating Products:

You will definitely want to add a package of envelopes to your Card Bases order. Try any of these:

  • Clear Medium Envelopes (item 102619)
  • Crumb Cake Medium Envelopes (item 107297)
  • Very Vanilla Medium Envelopes (item 107300)
  • Whisper White Medium Envelopes (item 107301)

If desired, you can download the flyer.

Stamping With Guneaux Designs

 God’s Blessings!
Stamping With Guneaux Designs
By
Beverly Polen

STAMPIN UP CUT AND READY CARD BASES