Stampin Up More Amore DSP Valentine Purse

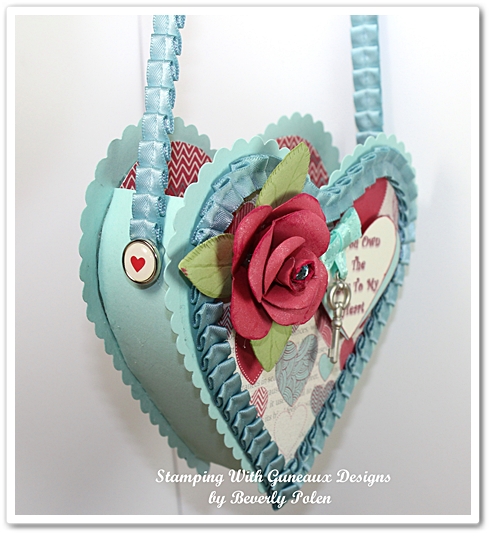
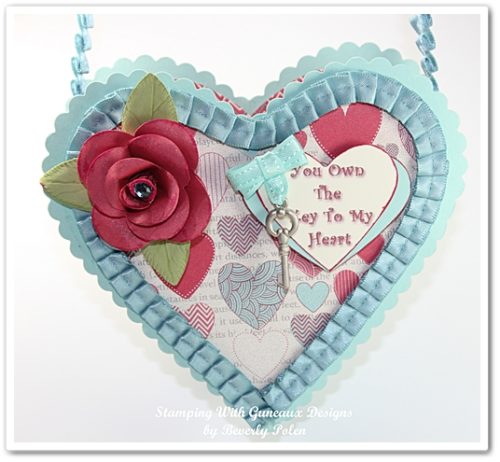
Today I am sharing how to make this beautiful Stampin Up More Amore DSP Valentine Purse!  I made this for my granddaughter, and I am sure she will be delighted when she receives it on Valentine’s Day!


SUPPLIES USED TO MAKE THE STAMPIN UP MORE AMORE DSP VALENTINE PURSE

Paper:  Stampin Up More Amore DSP (129309), Pool Party Card Stock, Primrose Petals Card Ctock, and Certainly Celery Card Stock

Ink:  Primrose Petals Classic Ink

Accessories:  Hearts Collection Framelits (125599); Big Shot, Platform, and Cutting Plates; Sticky Strip or Adhesive of your choice; Ribbon of your choice, and Brads of your choice


INSTRUCTIONS FOR MAKING THE STAMPIN UP MORE AMORE DSP VALENTINE PURSE

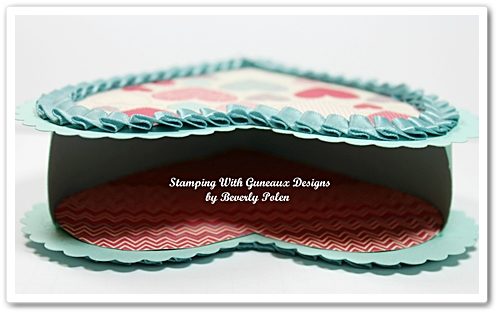
  • Using the Big Shot and Hearts Collection Framelit (Scalloped), cut out two Pool Party hearts.
  • Cut out two hearts from the Stampin Up More Amore DSP with the next to the largest heart framelit

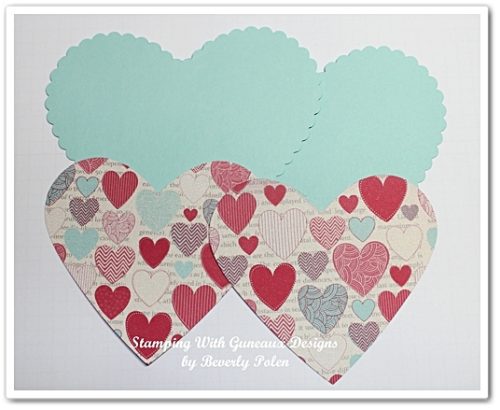
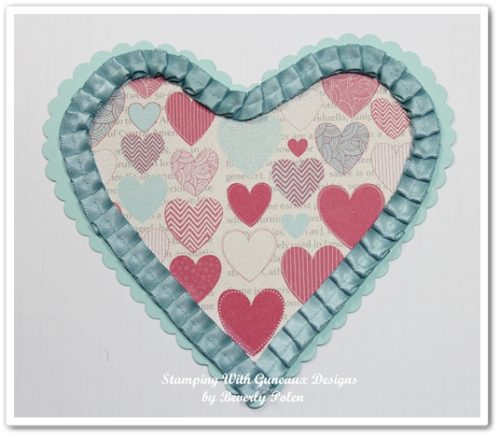
  • Attach the DSP hearts to the Pool Party hearts and add ribbon around the edges of each.

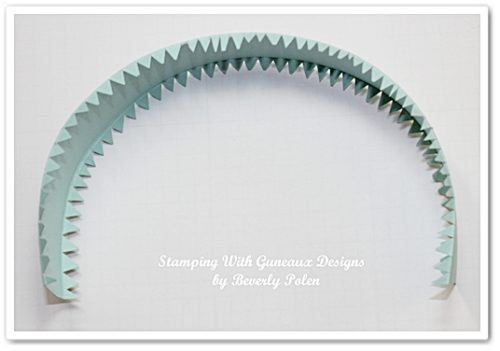
  • Cut an 8-1/4″ x 2″ piece of Pool Party Card Stock and score it along the 8-1/4″ side at the 1/4″ and 1-1/2″ marks.
  • Place one end of the card stock between your thumb and index finger and hold it.  Now place the card stock between your opposite thumb and index finger and begin to curl the card stock by repeatedly moving your thumb and finger down the 8-1/4″ length of the card stock.  This will make the card stock more pliable and it will curl up into a half-circle.
  • Cut notches along the 1/4″ and 1-1/2″ scored sides of the card stock.

  • Use the next to the largest heart framelit and trace around it with a pencil on the back side of both heart pieces.  Make sure the heart framelit is placed on both hearts at the same spot.

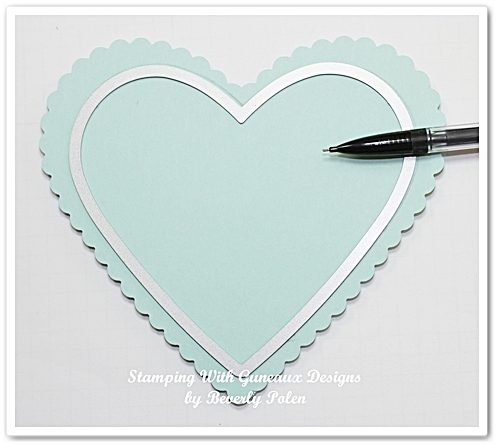
  •  Attach Sticky Strip to each heart along the pencil tracing.

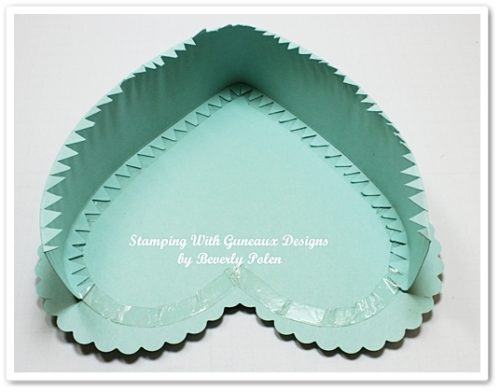
  • Remove the red liner from the Sticky Strip and begin attaching one side of the 8-1/4″ notched piece of Pool Party Card Stock to one of the hearts.  Assure both ends will line up evenly.

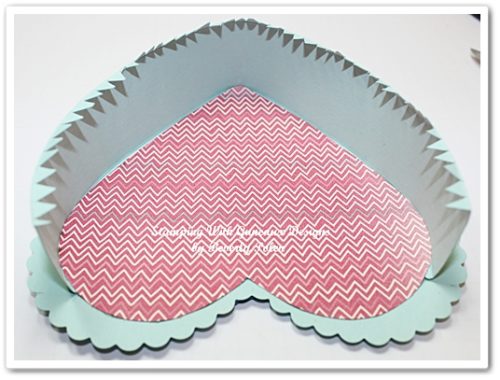
  • Select a DSP design that you want to be the purse liner and trace the outer rim of the next- to-the-largest-heart framelit onto this DSP twice.
  • Cut out both hearts and insert one into the purse and press it down to adhere it, as shown in the below picture.  At this point you may be thinking, “Wouldn’t it have being easier to add this before the purse side piece was added?”  Yes, however, the notched portion of the 8-1/4″ piece of card stock would not be covered up if the heart were added first.

  • Begin attaching the second heart to the first heart by lining it up with the edge of the other notched side of the heart and begin adhering it..

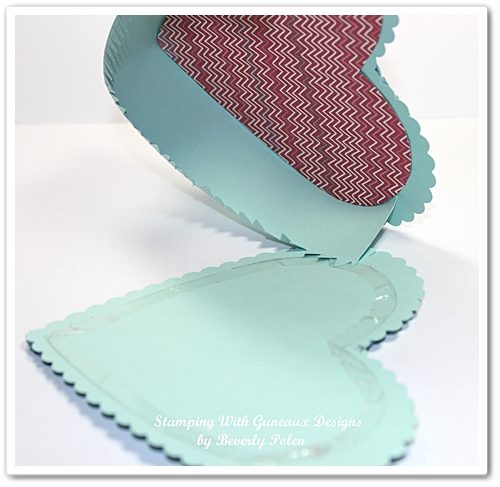
  •  Just as before, Insert the second DSP heart inside  and press it down to adhere it.  You now have the bottom of the purse made.

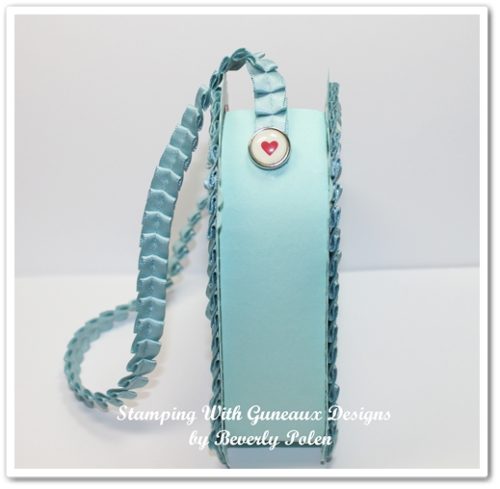
  • Attach to the purse sides a handle made of the ribbon that was used around the front and back of the purse.  Use hot glue to attach.
  • Select two medium to large brads, remove their prongs, and attach to the ends of the ribbon with hot glue.  I used two of Stampin Up epoxy brads from long ago.

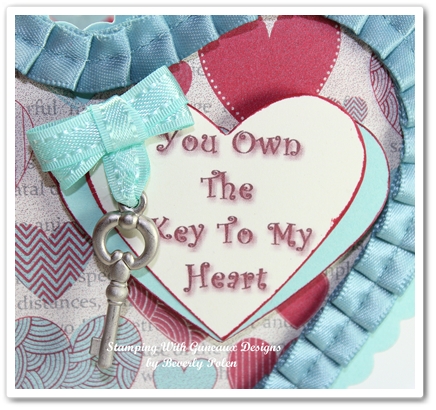
  •   Decorate the purse front as desired.

 God’s Blessings!
Stamping With Guneaux Designs
by
Beverly Polen

 STAMPIN UP MORE AMORE DSP VALENTINE PURSE

Holly Berry DSP – Stampin Up Box Card

I am excited to share with you my box card that is made with the Stampin’ Up! Holly Berry DSP  and Pines & Poinsettias stamp set.

Stampin Up Holly Berry DSP Box CardStampin Up Holly Berry DSP Box Card

Inside the box card are several gifts tags to use when wrapping presents. The tags were made with several of Stampin’ Up! stamp sets.

The sentiment in the bottom of the box is from the Stampin’ Up! God’s Blessings stamp set.

Other Stampin’ Up! products used in making the box card are:

Card Stock: Garden Green, Brushed Gold, and Red Glimmer Paper
Ink: Real Red, Chocolate Chip, and Garden Green
Accessories: Chocolate Chip 5/8″ Satin Ribbon, Perfect Pennants Bigz L Die, 1-3/4″ Scallop Circle Punch, Antique Brads , and Champagne Glitter Glass

Purchase the project products by clicking on the links above.
God’s Blessings!
Stamping With Guneaux Designs by Beverly Polen
Stampin’ Up! Demonstrator in FL
FIRM RELIANCE ON DIVINE PROVIDENCE!
Enjoy your Stampin Up Holly Berry DSP!

Stampin Up Purse Card Design – Happy Birthday – Stamping With Guneaux Designs

How does a new Stampin Up Purse Card Design sound to you?  Well, I have one for you.  Listening to my readers and customers who have stated they want new card designs, I have created for you a Stampin Up Purse Card Design.  This purse card can be made with any color of card stock or designer series paper.  My instructions below for making the card describe the card stock and designer series paper that I used. 

Also, the purse card has a new flower design for you!

Stampin Up Purse Card Design

 STAMPIN UP SUPPLIES NEEDED FOR THE STAMPIN UP PURSE CARD DESIGN: (if you chose to make the purse card identical to mine):

Stamp Set:  Itty Bitty Banners (126257)

Paper:  Basic Black Card Stock (121045 – one 8-1/2″ x 11″ and a 4″ x 7″ scrap piece), Cherry Cobbler Card Stock (119685), Very Vanilla Card Stock (101650), and Mocha Morning Designer Series Paper (retired)

Ink: Cherry Cobbler Classic (126966)

Accessories:  Big Shot Die-Cutting Machine (113439), Simply Scored Stylus (125624), Sticky Strip (104294), Crystal Effects (101055), Paper Snips (103579), Bigz Clear Large Scallop Square Die (115950), VersaMarker Watercolor Pen (non-SU), Black Embossing Powder (109133), Elegant Bouquet Embossing Folder (115964), Heat Gun of your choice, Cherry Cobbler 3-1/2″ Scalloped Tulle Ribbon (127841), Bigz L Perfect Pennants Die (123126), Bitty Banners Framelits (129267), Antique Brad (117273), and Cherry Cobbler Baker’s Twine (123125). 

INSTRUCTIONS FOR MAKING THE STAMPIN UP PURSE CARD DESIGN:

  • Click HERE for the “Purse Card Template” 

If you have difficulty retrieving the template, here’s a picture that you can work from:

Picture of the Purse Card Template

 CARD BASE

  • Score the center of an 8-1/2″ x 11″ piece of Basic Black Card Stock and fold it.
  • Place the template over the folded card stock with the fold at the bottom (use a temporary adhesive to prevent the template from moving).  Using the Simply Scored Stylus and with pressure, trace the purse from below the handles (at the 5″ mark) to the bottom including the sides.

Stampin Up Purse Card Design

  •  Remove the template and cut along the traced lines.

Stampin Up Purse Card DesignStampin Up Purse Card Design

CARD HANDLES:

  • Fold a piece of 4″ x 7″ scrap Basic Black Card Stock and place the handle portion of the template over it with the folded part at the top (you’ll cut out two handles and you don’t want them connected).  So you have 1/4″ extra on the ends of the handles to adhere to the purse card base, lay the template about 1/4″ above the bottom of the folded card stock.
  • Using the Simply Scored Stylus and with pressure, trace around the handle of the template.
  • Cut out the handles following the traced lines.

Purse HandlesPurse Handles

  • Cover one side of the handles with Crystal Effects and let dry.
  • After drying, cover the other side of the handles with Crystal Effects and let dry.
  • Attached the handles to the inside of the purse card base with Sticky Strip after completing the following.

CARD EMBELLISHMENTS:

  • Lay the template onto the Mocha Morning Designer Series Paper (again, this project is organic, so other DSP can be used) and trace the inside lines around the purse card.  Cut around the traced lines.  Use the cut out for your template to cut a second piece of the Mocha Morning Designer Series Paper.  You will have one piece for the front of the purse card and one for the back.  Ensure the pieces are about 1/8″ smaller than the purse card base.
  • Cut 1/4″ off the top of these two pieces.

Purse Front and Back Pieces

  • Using the Bigz Clear Large Scallop Square Die, cut out two Cherry Cobbler large scallops.
  • Insert each scallop into the Elegant Bouquet Embossing Folder and run through the Big Shot Die-Cutting Machine.
  • OPTIONAL:  Swipe one scallop with the embossing buddy and, with a VersaMarker Watermarker Pen, carefully apply VersaMark on the raised portions of the scallop.  Apply Black Embossing Powder and set with a heat gun.  It’s best to do a small section of the raised portions at a time. (This isn’t an easy task and it’s difficult to not get specks of powder where you don’t want it.)

Card Embellishment

  • Lay the Mocha Morning Designer Series Paper purse front over back side of the embossed scallop, line it up just below the center of the top embossed flower, and draw a line with a pencil across the scallop.  Trace with the pencil about 1″ down the two sides of the purse front.  Cut along these penciled lines.  Repeat for the purse back.

Purse Embellishmen tPurse Embellishment

  • Trace the purse back DSP piece onto Very Vanilla Card Stock, trace around the piece, and cut it out.

Stampin Up Purse Card Design

  • Cover with Cherry Cobbler ink the sentiment “Happy Birthday” from the Itty Bitty Banners stamp set onto a piece of Very Vanilla Card Stock.
  • Use the appropriate Bitty Banners Framelit to cut out the sentiment.  Sit to the side.

CARD FLOWER:


CARD ASSEMBLY:

  • FRONT AND BACK DSP PIECES:  Adhere with Sticky Strip the DSP front piece to the front of the card base, placing it 1/4″ down from top card base showing.  Repeat for the back side of the card base.

Stampin Up Purse Card Design

  • HANDLES:  Draw a light pencil line on the left inside of the card base, 1/2″ from the top.  Place sticky strip on the card base from the top down to the 1/2″ pencil line, ensuring that the tape is no wider than the bottom of the handle ends.  Remove the red liner and adhere the handle to the card base.  Erase the pencil line.  Repeat this to adhere the other handle to the right inside of the card base.

  • This picture shows how it should look:
  • INSIDE CARD:  Adhere the Very Vanilla Card Stock inside the card on the right side, placing it over the handle.

Stampin Up Purse Card Design

  • At this point the card will look like this:

Stampin Up Purse Card Design

  • OUTSIDE CARD EMBELLISHMENTS:
  • Punch a hole at the top of the “happy birthday” sentiment.
  • Thread a piece of Cherry Cobbler Baker’s Twine throw the hole.
  • Wrap the twine around the prongs of the antique brad that was used for the tulle ribbon flower.
  • Punch a hole 1-1/2″ down from the top center of the Cherry Cobbler Black Embossed Large Scallop piece.

Stampin Up Purse Card Design

  • Insert the brad that is holding the tulle ribbon flower and baker’s twine into the hole and spread the prongs.

Stampin Up Purse Card Design

  • Attach this to the top of the card front. (You may want to use a glue dot to attach the end of the sentiment to the card front.)

Stampin Up Purse Card Design

  •  Attach the second Cherry Cobbler Embossed Large Scallop piece to the back side of the card.

Stampin Up Purse Card Design

If you followed these instructions and made the card, you now have a beautiful Stampin Up Purse Card that is worthy of a very special recipient!

Stampin Up Purse Card Design

Share your comments with me please on the Stampin Up Purse Card Design!

God’s Blessings!
Stampin With Guneaux Designs
by
Beverly Polen

Fancy Favor Box – Bigz XL Die

I have for you today a piece of art created with the Stampin’ Up! Fancy Favor Box Bigz XL Die. While creating my Fancy Favor Box, I decided I wanted to give it a fall theme. Therefore, I chose to use the beautiful Spice Cake Designer Fabric to make the box.

Fancy Favor Box Fancy Favor Bigz XL

SUPPLIES:

Stamp Set: Tweet Leaves (128111)

Paper: Tangerine Tango Card Stock (102067), Pool Party Card Stock (122924), and Very Vanilla (101650)

   Pool Party Card Stock   

Ink: Various Stampin’ Write Markers

Accessories: Fancy Favor Bigz XL Die (115965), Spice Cake Designer Fabric (124066), Big Shot Die-Cutting Machine (113439), Sticky Strip (104294) or other adhesive, 3/8″ Designer Printed Brads – Pool Party (122940),

Spice Cake Designer Fabric


Click to Buy Stampin' Up! Products

INSTRUCTIONS FOR MAKING THE FANCY FAVOR BOX:

FANCY FAVOR BOX

  • Cut a 6″ x 11″ piece of Tangerine Tangle Card Stock.
  • Place it onto the Fancy Favor Box Die and run through the Big Shot.
  • Cover only the box’s front piece with glue and add a fall-color glitter (I used the  retired orange glitter).

Fancy Favor Box

  • Cut a 6″ x 11″ piece of Spice Cake Designer Fabric.
  • Place it onto the Fancy Favor Box Die and run through the Big Shot.
  • Adhere the Spice Cake Designer Fabric to the Fancy Favor Box, EXCEPT cut out the section (leaving the flaps) that would cover the front glitter portion.
  • Fold the Fancy Favor Box along score lines and glue the box together.

Fancy Favor Box

Fancy Fabor Box

This picture is of the box bottom:

Fancy Favor Box Bottom

  • Cut a 2-1/8″ x 3-1/16″ piece of Tangerine Tango Card Stock and adhere it to the inside bottom of the box.

Fancy Favor Box

HANDLE

  • Cut a 1″ x 10″ piece of Pool Party Card Stock and a 3/4″ x 10″ piece of Tangerine Tango Card Stock.
  • Place the piece of Pool Party Card Stock at the top portion of the Fancy Favor Box die and run through the Big Shot to get an edge that is identical to to top edge of the Fancy Favor Box.
  • Turn the card stock over and cut the other edge.

Fancy Favor Box Die

  • Cut a 3/4″ x 10″ piece of Spice Cake Designer Fabric.
  • Place Sticky Strip onto the 10″ length of the 3/4″ x 10″ piece of Tangerine Tango Card Stock.
  • Place the center of the 3/4″ x 10″ piece of Spice Cake Designer Fabric over the Sticky Strip and adhere it to the card stock.
  • Turn over the piece of card stock and attach Sticky Strip on the length of the card stock.
  • Turn one side of the fabric over onto the Sticky Strip.
  • Place Sticky Strip onto the fabric that was just turned over
  • Turn over the other side of the fabric and adhere it to the card stock.
  • Place Sticky Strip to the center of the 10″ length of the Pool Party card stock.
  • Place the fabric piece onto the center of the Pool Party card stock and assure it adheres well.
  • Punch or pierce a hole about 3/8″ from the ends of the piece.
  • Insert a Pool Party Designer Printed Brad into the holes. Fancy Favor Box Handle
  • Punch or pierce a hole about 1/2″ from the top of both box sides.
  • Insert the brads into these holes, which attaches the handle.Fancy Favor Box Fancy Favor Box

FRONT PANEL DECORATION:

  • Using various Stampin’ Write Markers (greens, oranges, etc.), cover the Tweet Leaves stamp with ink.
  • Stamp the image onto Very Vanilla Card Stock and cut out the image (Optional – I traced the cut out onto More Mustard Card Stock and cut it out about a 1/16″ from the tracing to create a mat).
  • Using adhesive foam dots, attach to the front of the box.
  • Decide what you want to put into the box and decorate according. I wrapped a small box of candy to put inside the box and tied it with ribbon and a flower made with the Spice Cake Designer Fabric.

Tweet Leaves

Tweet Leaves


Spice Cake Designer Fabric

Enjoy making your Fancy Favor Box, and if you have questions, you may email me at the beverly@stampingwithguneauxdesigns.com.

Click to Buy Stampin' Up! Products

God’s Blessings!
Stamping With Guneaux Designs
by
Beverly Polen

Enjoy your Fancy Favor Box

Stampin Up Fridge Magnets

Aren’t these Stampin Up Fridge Magnets sooooo cute.  Image the different kinds you can make!  And with the holidays coming up, what perfect gifts these would be.

Here are more pictures of the Stampin Up Fridge Magnets:


Again, the Stampin Up Fridge Magnets are so very easy and quick to make.  I can’t wait to make more with a Christmas theme!

STAMPIN UP SUPPLIES:

Paper:  Your Choice – I chose the Stampin Up Orchard Harvest Designer Series Paper (126895)

Accessories:  Bigz Autumn Accents Die (127812), Bigz Beautiful Butterflies Die (114507), Big Shot Die Cutting Machine (113439), Crystal Effects (101055), Basic Rhinestones (119246), Stampin’ Dimensionals (104430), and Magnets (from local craft store)

INSTRUCTIONS FOR MAKING STAMPIN UP FRIDGE MAGNETS:

1. Select Stampin Up Original or Bigz Dies that would produce appropriately sized magnets.  I chose the dies mentioned in the above supply list.

2. Select a Stampin Up Designer Series Paper (I used the Orchard Harvest Designer Series Paper (126895).

3. Prepare your Big Shot “sandwich” and run it through the machine. Cut out two of each design.

4. Apply a very thin coat of Crystal Effects over each design and allow to dry.

5. After drying, adhere the two cutouts of each design together using Stampin’  Dimensionals.

6. Decorate with Basic Rhinestones or other accessories as desired.

7.  Using Crystal Effects, adhere magnets to the back side of each design.

Now, how easy is that? Enjoy your fridge magnets!!

God’s Blessings!
Stamping With Guneaux Designs
by
Beverly Polen

Make Christmas-related Stampin Up Fridge Magnets!

Stampin Up Petal Cone Die

Here is a 3-D project featuring the must-have Stampin’ Up! Petal Cone Die (item #120890).  I love the Stampin Up Petal Cone Die as there are many 3-D projects that can be created with it.  You just have to think outside the box, as they say!

Thinking about the upcoming Thanksgiving Holiday, I thought that a place holder would be good if you are having a large family gathering.  Therefore, I made one with the Stampin Up Petal Cone Die as shown below.  This place holder would also be a nice gift to provide to your guests.

Petal Cone Placement Holder

STAMPIN UP SUPPLIES USED AND CATALOG NUMBERS (obviously you can choose your own paper and fabric):

PAPER:  Pool Party Card Stock (122924), and Comfort Cafe Designer Series Paper (126898)

ACCESSORIES:  Stampin Up Petal Cone Die (121810), Comfort Cafe Fabric (126894), Anywhere Glue Stick (104045), Sticky Strip (104294), Fun Flowers Bigz L Die (121812), Pool Party 3/8″ Ruffled Ribbon (122975), Designer Printed Brads (122940), Large Pearl Basic Jewel (125577), and Vanilla Shimmer Smooch Spritz (118772)

INSTRUCTIONS:

1.  Using the Stampin Up Petal Cone Die, cut two petal cones and one banner from the Pool Party Card Stock, and two petal cones from the Comfort Cafe Fabric (Pool Party design).

2.  Using the Stamping Up Petal Cone Die, cut four scallops from the Baja Breeze Card Stock, and four scallops from the Comfort Cafe Fabric (the yellow shade design of the fabric – see pictures).

3.  Adhere the yellow shade design of the Comfort Cafe Fabric scallops onto the Pool Party Card Stock scallops and set aside.

4  Completely cover one of the two Pool Party petal cones with the Anywhere Glue Stick.

5. Quickly adhere one piece of the Comfort Cafe Fabric Pool Party design to one Pool Party petal cone, and then repeat the same process for the other Pool Party petal cone.

6. Using Sticky Strip, glue together the two petal cone pieces covered with the fabric.

7.  Adhere the four scallop pieces of the yellow shade of Comfort Cafe Fabric and Pool Party Card Stock onto the flaps of the petal cone (see placement in the pictures).

8.  Cut out flowers from the Comfort Cafe Designer Series Paper using the Fun Flowers Bigz L Die and adhere them together.

9.  Adhere a Large Pearl into the center of the floral piece.

10.  Adhere the floral piece to one side of the finished petal cone.

11. Using the Vanilla Shimmer Smooch Spritz, cover the Pool Party Card Stock banner and let dry.

12.  Attach two Pool Party Designer Printed Brads to the Pool Party banner.

13.  On the other side of the finish petal cone, turn up one of the scallop pieces covered with the yellow design fabric and adhere it to the petal cone (see picture)

14.  Adhere the spritzed Pool Party Card Stock banner with the brads to the turned up scallop (see picture).

15.  Make a bow with the Pool Party Scalloped Ribbon and adhere it above the banner.

HERE ARE OTHER POSTINGS ON THE STAMPIN UP PETAL CONE DIE!

1. Table Decoration

2.  Workshop Name Holder

3.  Workshop Gift for Guests

4.  Wall Sconce

5.  Valentine Card

6.  Door Hanger

God’s Blessings!

Stamping With Guneaux Designs

Enjoy making your 3-D item using the Stampin Up Petal Cone Die