Tweet Leaves – Stampin’ Up! – Stamping With Guneaux Designs

I love the Stampin’ Up! Tweet Leaves stamp and have made another Autumn-themed card using the stamp.  Living in Central Florida typically does not give one the Autumn feeling. I resort to making my Autumn-themed cards to create a dose of Autumn for me (LOL).

However, I must share that my neighbor put in a 15′ Red Maple tree last month and its leaves have turned and are falling.  So now I can look out my craft room window and see  various colors of leaves falling.  However, the colors are dull and not like the vibrant colors from up North.  I need to see more Autumn colors when I look out my window!  🙁

Now, don’t giggle, but I I used Tempting Turquoise on my Autumn card!  Tempting Turquoise???  I know, who thinks of Tempting Turquoise when thinking of Autumn?  It has to be the influence of living in an area that never gets the “It Is Fall” memorandum.  Can any of you do something to get that memorandum sent to Florida each year??  (LOL)

No more nonsense – here’s the Tweet Leaves card (tempting turquoise and all):

Tweet Leaves

 Here is a closeup of the Tweet Leaves stamp image:

Tweet Leaves - Stampin Up

STAMPIN’ UP! SUPPLIES USED (unless otherwise noted):

Stamp:  Tweet Leaves (129111)

Paper:  Tempting Turquoise (102067), Tangerine Tango (111349), Old Olive (100702), and Whisper White Card Stock (100730), and Orchard Harvest Designer Series Paper (126895)

Inks (Stampin’ Write Markers):  Tempting Turquoise (119702), Tangerine Tango (119702), Old Olive (100079), Lucky Limeade (123002), Daffodil Delight (119677), Cajun Craze (119701), Gumball Green (126856), More Mustard (119701), and Raspberry Ripple (126856)
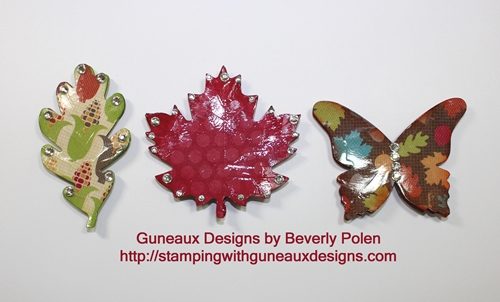
Accessories  Old Olive 1/2 Inch Scallop Dots Ribbon (124139), Crystal Effects (101055), 3/8″ Designer Printed Brads (122940 – Calypso Coral), Brights Collection Brads (119740 – Tempting Turquoise), a Distressed Sizzix Embossing Plate, Sizzix Bigz Autumn Accents, and the Big Shot

I think that just looking at the card one would be able to duplicate it.  Therefore, I won’t provide step-by-step instructions.

God’s Blessings!
Stamping With Guneaux Designs
by
Beverly Polen


Here are more Tweet Leaves projects: 

Perfectly Preserved Stampin Up

Isn’t the Perfectly Preserved  stamp set so cute?  I think of the fall season and “canning” when I look at the set.

As a child, I use to help my Momma make apple butter around this time every year. It always turned out soooo good and there was never enough for us children. (LOL) Thinking of the fall season and my childhood, I decided to create for you a card with an image of a jar filled with yummy apple butter using the Perfectly Preserved Stamp Set! The jar rests upon the Orchard Harvest Designer Series Paper.

OK, I hear you! Some are saying they don’t like apple butter. In that case, get creative and  fill the jar as you like (hehe)!  What about blueberry, raspberry, cherry, strawberry, mixed berries, or other preserves!

 Perfectly Preserved

Perfectly Preserved

Perfectly Preserved


SUPPLIES:

Stamp Set: Perfectly Preserved (126692 – c)

Paper: Cajun Craze Card Stock (119684), Very Vanilla Card Stock (101650), Island Indigo Card Stock (122923), Lucky Limeade Card Stock (122926), and Orchard Harvest Designer Series Paper (126895)

Ink: Early Espresso Reinker (119789), Early Espresso Stampin’ Write Marker (119680), and Cajun Craze Classic Ink Pad (126965)

Accessories: Big Shot Die-Cutting Machine (113439), Cannery Set Framelits (127822), Crystal Effects (101055), Bitty Banners Framelits (129267), and Island Indigo 3/8″ Ruffled Ribbon (122974)

Perfectly Preserved Clear-Mount Stamp SetOrchard Harvest Designer Series PaperEarly Espresso Stampin Write Marker - by Stampin' Up!Early Espresso Classic Stampin Ink Refill - by Stampin' Up!Cajun Craze Classic Stampin' PadCannery Set Framelits DiesCrystal Effects - by Stampin' Up!Big Shot Die-Cut Machine - by Stampin' Up!Bitty Banners Framelits DieIsland Indigo 3/8 Inch Ruffled Ribbon - by Stampin' Up!

INSTRUCTIONS:

  • Fold an 8-1/2″ x 5-1/2″ piece of Cajun Craze Card Stock in half to create a card base.
  • Cut a 5-1/4″ x 4″ piece of the selected design from the Orchard Harvest Designer Series Paper.
  • Cover with Cajun Craze Classic Ink the jar stamp from the Perfectly Preserved Stamp Set and stamp the image onto a piece of Very Vanilla Card Stock.
  • Mix two drops of Early Espresso Ink (Reinker) and some Crystal Effects onto a non-porous surface and quickly mix.
  • Quickly brush the mixture onto the stamped jar image, staying inside the Cajun Craze lines. (Don’t try to get the mixture smooth as you want it to look natural.)
  • Set it aside to dry. When the mixture has dried, apply plain crystal effects on the top portion of the jar. Set aside to dry.
  • Adhere the DSP to the card base.
  • Using the Cannery Set Framelits and the design on the opposite side of the piece of DSP, cut out the cover for the lid.
  • Sponge the edges with Island Indigo ink.
  • (Optional: Pierce holes in the cover and thread with linen thread – see picture of card)
  • Cut a 3-1/4″ x 2-1/4″ piece of Lucky Limeade Card Stock.
  • Cut a 3-1/2″ x 2-1/2″ piece of Island Indigo Card Stock.
  • Cut a 3-3/4″ x 2-3/4″ piece of Cajun Craze Card Stock.
  • Sponge the edges of the three pieces of card stock with matching ink and adhere them together to create a mat.
  • Wrap the bottom of the mat with a piece of knotted 3/8″ Island Indigo Ruffled Ribbon.
  • Adhere the mat onto the center of the DSP and card base.
  • Using an Early Espresso Stampin’ Write Marker, cover the ”just for you” sentiment stamp from the Perfectly Preserved Stamp Set.
  • Stamp this image onto a scrap piece of Very Vanilla card stock.
  • Cut out the sentiment using the Bitty Banners Framelits.
  • Pierce a hole into the sentiment and thread it onto the linen thread on the left side of the lid cover.
  • Adhere the jar to the center of the mat just above the ribbon. (I used foam glue dots – dimensionals).
  • Adhere the lid cover to the top of the jar with it turned upward. (I wanted the jar to appear open and ready to have a spoon inserted for one to taste the yummy apple butter-LOL.)

Perfectly Preserved

Perfectly Preserved

Perfectly Preserved

Enjoy!
Click to Buy Stampin' Up! Products God’s Blessings!
Stamping With Guneaux Designs
by
Beverly Polen

  Have fun with your Perfectly Preserved Stamp Set!

Stampin Up Fridge Magnets

Aren’t these Stampin Up Fridge Magnets sooooo cute.  Image the different kinds you can make!  And with the holidays coming up, what perfect gifts these would be.

Here are more pictures of the Stampin Up Fridge Magnets:


Again, the Stampin Up Fridge Magnets are so very easy and quick to make.  I can’t wait to make more with a Christmas theme!

STAMPIN UP SUPPLIES:

Paper:  Your Choice – I chose the Stampin Up Orchard Harvest Designer Series Paper (126895)

Accessories:  Bigz Autumn Accents Die (127812), Bigz Beautiful Butterflies Die (114507), Big Shot Die Cutting Machine (113439), Crystal Effects (101055), Basic Rhinestones (119246), Stampin’ Dimensionals (104430), and Magnets (from local craft store)

INSTRUCTIONS FOR MAKING STAMPIN UP FRIDGE MAGNETS:

1. Select Stampin Up Original or Bigz Dies that would produce appropriately sized magnets.  I chose the dies mentioned in the above supply list.

2. Select a Stampin Up Designer Series Paper (I used the Orchard Harvest Designer Series Paper (126895).

3. Prepare your Big Shot “sandwich” and run it through the machine. Cut out two of each design.

4. Apply a very thin coat of Crystal Effects over each design and allow to dry.

5. After drying, adhere the two cutouts of each design together using Stampin’  Dimensionals.

6. Decorate with Basic Rhinestones or other accessories as desired.

7.  Using Crystal Effects, adhere magnets to the back side of each design.

Now, how easy is that? Enjoy your fridge magnets!!

God’s Blessings!
Stamping With Guneaux Designs
by
Beverly Polen

Make Christmas-related Stampin Up Fridge Magnets!