Stampin Up Petal Cone Die

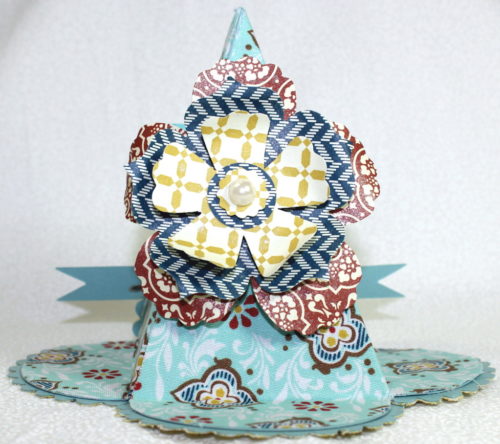
Here is a 3-D project featuring the must-have Stampin’ Up! Petal Cone Die (item #120890).  I love the Stampin Up Petal Cone Die as there are many 3-D projects that can be created with it.  You just have to think outside the box, as they say!

Thinking about the upcoming Thanksgiving Holiday, I thought that a place holder would be good if you are having a large family gathering.  Therefore, I made one with the Stampin Up Petal Cone Die as shown below.  This place holder would also be a nice gift to provide to your guests.

Petal Cone Placement Holder

STAMPIN UP SUPPLIES USED AND CATALOG NUMBERS (obviously you can choose your own paper and fabric):

PAPER:  Pool Party Card Stock (122924), and Comfort Cafe Designer Series Paper (126898)

ACCESSORIES:  Stampin Up Petal Cone Die (121810), Comfort Cafe Fabric (126894), Anywhere Glue Stick (104045), Sticky Strip (104294), Fun Flowers Bigz L Die (121812), Pool Party 3/8″ Ruffled Ribbon (122975), Designer Printed Brads (122940), Large Pearl Basic Jewel (125577), and Vanilla Shimmer Smooch Spritz (118772)

INSTRUCTIONS:

1.  Using the Stampin Up Petal Cone Die, cut two petal cones and one banner from the Pool Party Card Stock, and two petal cones from the Comfort Cafe Fabric (Pool Party design).

2.  Using the Stamping Up Petal Cone Die, cut four scallops from the Baja Breeze Card Stock, and four scallops from the Comfort Cafe Fabric (the yellow shade design of the fabric – see pictures).

3.  Adhere the yellow shade design of the Comfort Cafe Fabric scallops onto the Pool Party Card Stock scallops and set aside.

4  Completely cover one of the two Pool Party petal cones with the Anywhere Glue Stick.

5. Quickly adhere one piece of the Comfort Cafe Fabric Pool Party design to one Pool Party petal cone, and then repeat the same process for the other Pool Party petal cone.

6. Using Sticky Strip, glue together the two petal cone pieces covered with the fabric.

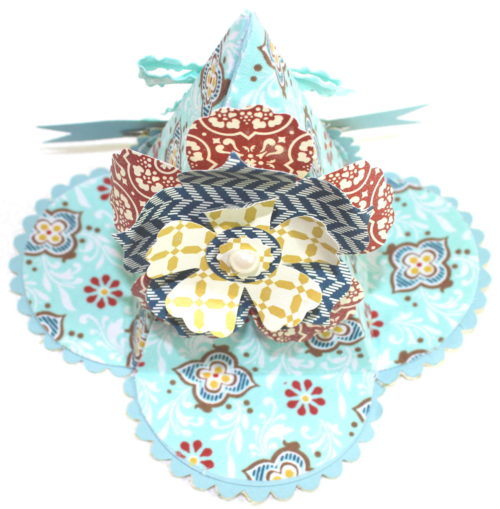
7.  Adhere the four scallop pieces of the yellow shade of Comfort Cafe Fabric and Pool Party Card Stock onto the flaps of the petal cone (see placement in the pictures).

8.  Cut out flowers from the Comfort Cafe Designer Series Paper using the Fun Flowers Bigz L Die and adhere them together.

9.  Adhere a Large Pearl into the center of the floral piece.

10.  Adhere the floral piece to one side of the finished petal cone.

11. Using the Vanilla Shimmer Smooch Spritz, cover the Pool Party Card Stock banner and let dry.

12.  Attach two Pool Party Designer Printed Brads to the Pool Party banner.

13.  On the other side of the finish petal cone, turn up one of the scallop pieces covered with the yellow design fabric and adhere it to the petal cone (see picture)

14.  Adhere the spritzed Pool Party Card Stock banner with the brads to the turned up scallop (see picture).

15.  Make a bow with the Pool Party Scalloped Ribbon and adhere it above the banner.

HERE ARE OTHER POSTINGS ON THE STAMPIN UP PETAL CONE DIE!

1. Table Decoration

2.  Workshop Name Holder

3.  Workshop Gift for Guests

4.  Wall Sconce

5.  Valentine Card

6.  Door Hanger

God’s Blessings!

Stamping With Guneaux Designs

Enjoy making your 3-D item using the Stampin Up Petal Cone Die

Stampin’ Up! Petal Cone Die-Happy July 4th!

Do you have plans to celebrate today with family and friends?  How do you plan on decorating the table that will hold all of the yummy food?  I have an idea for you that features the Petal Cone Die, but you’ll need to get started creating it early in the day so you’ll have your table decorated prior to food being served.  Making several of these would further enhance your table.

Again, this table decoration features the Stampin’ Up! Petal Cone Die.  I love this die and use it often.

(Click on the pictures to enlarge)

 SUPPLIES:
 
Paper: Real Red Cardstock (102482), Whisper White Cardstock (100730), Night of Navy Cardstock (100867), Silver Glimmer Paper (124005), and Red Glimmer Paper (121790)
Accessories:  Big Shot Die-Cutting Machine (113439), Petal Cone Bigz L Die (121810), Retired Stars #2 Original Die, Full Heart Punch (119883), Strips Embossing Folder (123128), Vanilla Shimmer Smooch Spritz (118772), Adhesive of your choice, and Fourth of July decorations from a local craft store
 
To make this table decoration, follow these steps:
 
  • Cut 3 petal cones using the Petal Cone Die – 1 Whisper White, 1 Real Read, and 1 Night of Navy
  • Emboss each cone with the Strips Embossing Folder
  • Spritz each with the Vanilla Shimmer Smooch Spritz
  • Fold along each score line
  • Adhere the Real Red cone to the Whisper White cone, lining up the embossed strips
  • Adhere the Whisper White cone to the Night of Navy cone, lining up the embossed strips
  • Lay the adhered pieces face down (at this point you have not adhered the Night of Navy flap yet)
  • Adhere your craft store decorations about 1″ down from the top portion of the Whisper White cone (you will need to cut a small half circle from the top of each cone so that when you close and adhere the final pieces together, the decorations fit nicely into the top)
  • Place adhesive on the flap of the Night of Navy cone and adhere it to the Real Red cone, folding under the flaps of each cone
  • Adhere the folded flaps to each other
  • Set the adhered cones down on Real Red Cardstock and trace around it
  • Cut out the traced piece of Real Red Cardstock and adhere it to the bottom of the cones (this provides a bottom cover to hide the flaps)
  • Using the Stars #2 Die (or a star punch), cut out stars from the Red Glimmer and Silver Glimmer paper and Night of Navy Cardstock
  • Adhere the stars onto the final adhered cone where desired.
  • Decide on your sentiment and place it onto Whisper White Cardstock
  • Using the Full Heart Punch, punch out the sentiment from the Whisper White Cardstock, as well as a heart from the Read Glimmer Paper and Night of Navy Cardstock
  • Layer the hearts as shown in the pictures and adhere them to the cone
  • Enjoy
 
God’s Blessings!
 
 
Stamping With Guneaux Designs by Beverly Polen

Stampin Up Petal Cone Die

The Stampin Up Petal Cone Die is quite versatile as the things you create with it are limited to your imagination.  I have to admit that I did not purchase the die with my first Occasions Mini order as I wasn’t sure if I would use it.  However, I later purchased it and I am so glad I did.  I am finding myself thinking of many ways to use the Stampin Up Petal Cone Die.  Buy the die; you’ll enjoy it.

My second creation with the die is a Pink Pirouette Valentine Card.  I used the Stampin’ Up! Manhattan Flower Textured Embossing Folder on the card front and outlined the embossing with a VersaMarker Watermark Pen.  Next I used the Stampin’ Up! Silver Embossing Powder to make the flowers pop.  Outlining the embossing with the watermark pen is a little difficult if your hand is not completely steady, like mine.  However, try it; you’ll like it.

Stampin Up Petal Cone Bigz Die

How to create this type of card?  Run card stock and the die through your Big Shot, glue the two flaps together, use your bone folder to crisply fold the card, and cover the flaps (which will be on the inside of the card) with other card stock or, as I did, Designer Series Paper (Love Impressions).  Decorate the card to your pleasing.


Don’t waste time searching for item numbers of products!  Just click on the blue words above and shop!

Come back tomorrow!
God’s Blessings!
Guneaux Designs by Beverly Polen
Stampin’ Up! Demonstrator in Florida

Stampin Up Petal Cone Die


Petal Cone Die

My share today is one of my creations using the new Stampin’ Up! Petal Cone Die from the new Occasions Mini Catalog.  This Petal Cone Die is one to buy.  You can create more than a cone with it, and tomorrow I will share other creations made with the cone.

Petal Cone Die
The petal cone is embellished with two of the beautiful Stampin’ Up! Embossing FoldersElegant Bouquet and Perfect Polka Dots.  The new Stampin’ Up! Designer Series PaperLove Impressions, was used to make the paper “LOVE” heart and two of the cone’s petals.  The charming pink button and the red one below is from the Big Designer Buttons, Candy Cane, which became unavailable on January 3th when the Holiday Mini Catalog expired.  As is with the red button, the pink button is threaded with the retired Stampin’ Up! Silver Elastic Cord.  The handle of the cone is the Stampin’ Up!’s Real Red 1/8″ Taffeta Ribbon.
Petal Cone DieThis side of the cone shows the “friend” stamp from the I {Heart} Hearts stamp set and the big beautiful red button.
Petal Cone DieThe same red ribbon was used on this side of the cone and threaded through an old pink heart brad that I dug out of my collection.  This side shows more clearly the embossing with the Elegant Bouquet Textured Folder.
Petal Cone Die
Inside the cone is lace tulle and it is filled with yummy heart shaped chocolate.
Please enjoy and email me with any questions.  Come back tomorrow to see my next creation with the Petal Cone Die!  Comments are appreciated as they let me know what you enjoy on my site and gives me information on what you would like in future postings.
Lastly, any item highlighted like this will take you directly to my Guneaux Designs store where you can enjoy shopping!  Therefore, place your cursor over the highlighted words, click, and shop!  I challenge you to be the first one to shop at my store within the next 24 hours!  An award awaits you!
God’s Blessings!
Guneaux Designs by Beverly Polen
Stampin’ Up! Demonstrator in Florida

Petal Cone Die