Santa’s Sleigh

Hope you had a great weekend and a happy Monday!  Today’s card share is a Christmas Card featuring the Sizzix Santa’s Sleigh Bigz Die.  I made the card in response to Splitcoaststampers’ Saturday Inspiration Challenge.  For an Inspiration Challenge, a website is selected by the hostess of the challenge from which to draw inspiration.  The hostess of Saturday’s challenge, the talented Audrie (a.k.a. girlgeek101), provided this inspirational website.  I selected the ornament category under the house and home drop-down menu on the site.  I found this ornament and fell in love with it.  Therefore, it was the inspiration for my card.

Santa's Sleigh

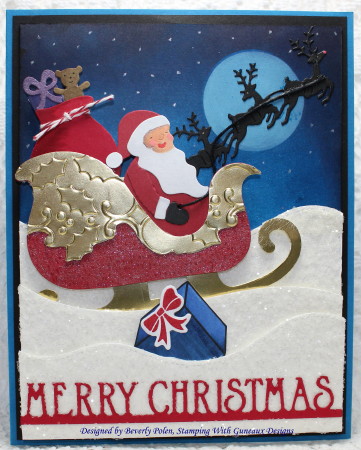
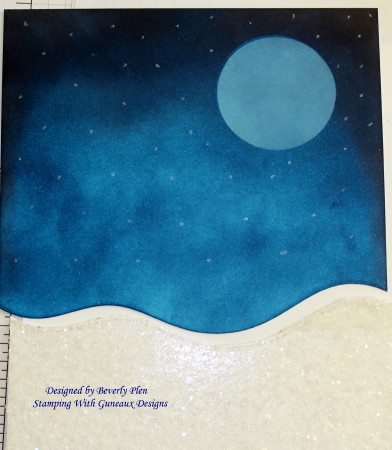
I created the blue, starry background by sponging Stampin’ Up! Pacific Point and Basic Black ink onto a piece of white card stock.  I used a mask to create the moon and sponged on it Stampin’ Up! Whisper White ink.  Then I used a Silver Gel Pen to create the stars.  I intentionally left some sponge marks in the sky to give it a look of a cloudy sky.

Santa's Sleigh

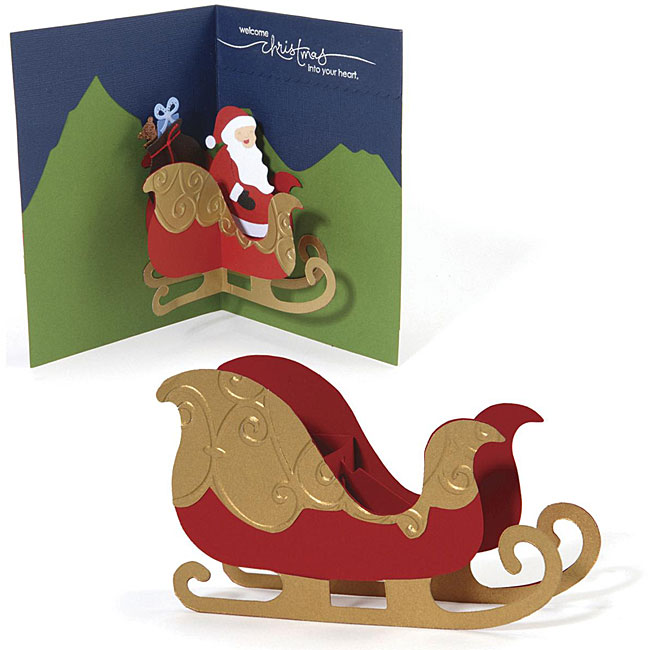
The primary element on the card is the Santa’s Sleigh that I created with the old Sizzix Bigz Die.  Actually, the die is meant for creating a 3-D pop-up sleigh, but I only wanted one side of the sleigh.  I used pieces of Stampin’ Up! (SU) Real Red Card Stock and SU Gold Foil Sheet that I embossed with a SU Holly Embossing Folder.

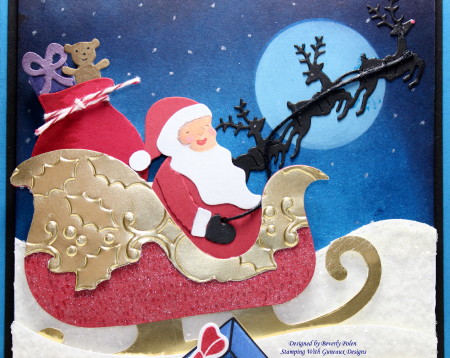
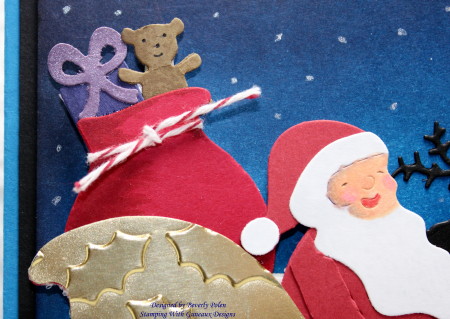
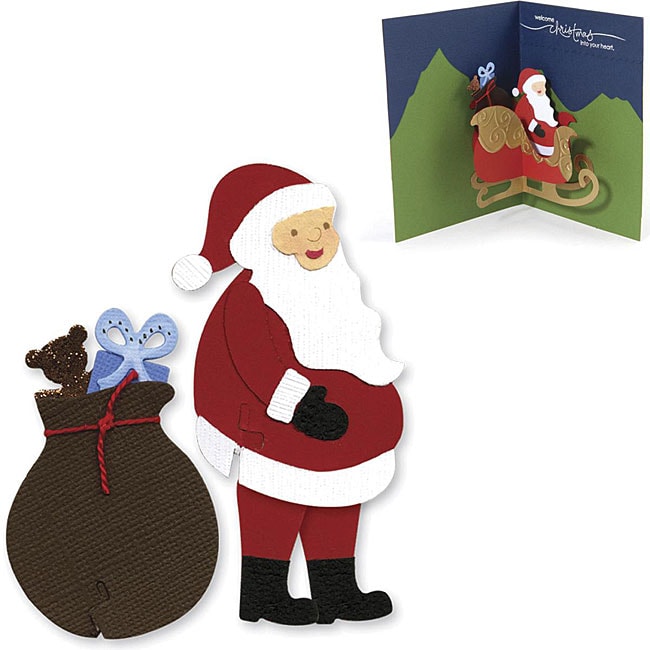
For the Santa and his toy bag, I used old Sizzix Santa Set Dies, which are three of the older Sizzlits.  His toy bag contains a gift and teddy bear among other gifts.  I have had both the sleigh and Santa set for years and never used them until I made this card!

Santa's Sleigh

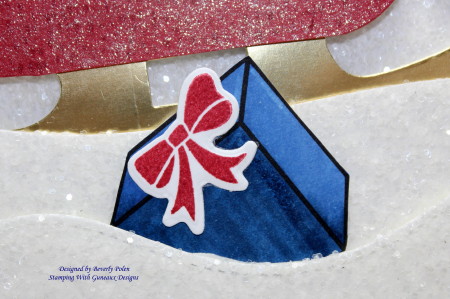
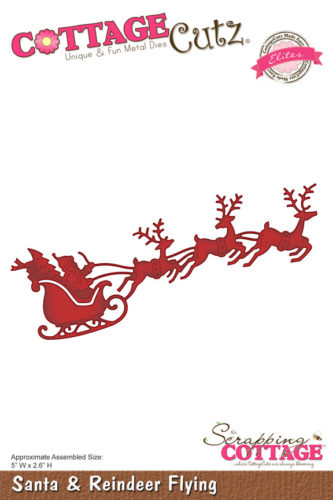
I used the CottageCutz Santa & Reindeer Flying Die to create the black/shadow reindeer flying in the air and pulling Santa’s sleigh.  Of course I had to give Rudolph his red nose!  Unfortunately, one of Santa’s gifts fell out of his sleigh and onto a snow bank! Therefore, Santa is pulling back on the reins to slow down his reindeer so he can retrieve the gift!  Unfortunately, he was not successful and someone will be without a gift on Christmas morning!  LOL


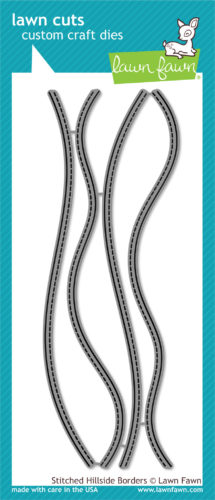
Speaking of the snow banks, I created three of them using the Lawn Fawn Stitched Hillside Borders and white card stock.  I covered each with a strong adhesive (i.e., Be Creative Sookwang Tape), and covered them with retired Stampin’ Up! Chunky Essentials White Glitter.  Using my hand, I pressed firmly on the glitter to adhere it to the adhesive.  Because the adhesive is so strong, the glitter does not fall off.  For the sentiment, I used Our Daily Bread Designs Merry Christmas Border die and adhered the cutout to the bottom snow bank prior to adding the glitter.

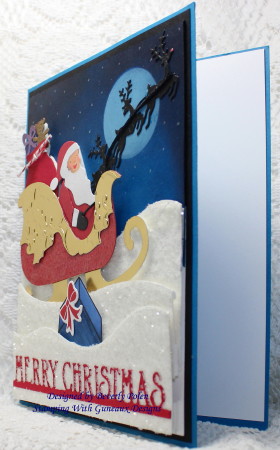
The layered snow banks are better seen in this photo.  I adhered them to the card with double-sided foam tape.

This card was great fun to make!  I especially like it because it will be my 2-year old granddaughter’s Christmas card!  Thanks for stopping by!  Have a blessed week!


Stamps:  None
Paper:  Stampin’ Up! (SU) Real Red, Pacific Point, and Basic Black Card Stock, Neenah Solar White Card Stock, and a SU Gold Foil Sheet
Ink:  SU Pacific Point, Basic Black, and Whisper White Ink and Copic Sketch Markers
Accessories:  Sizzix Santa Sleigh Bigz Die, Sizzix Santa Set DiesLawn Fawn Stitched Hillside Borders, CottageCutz Santa & Reindeer Flying Die, Our Daily Bread Designs Merry Christmas Border,  Silver Gel Pen, Be Creative Sookwang Tape, Retired Stampin’ Up! Chunky Essentials White Glitter, SU Holly Embossing Folder, SU Red and White Baker’s Twine, Scotch Double Sided Foam Tape, Sponges, Daubers, and Black Cord

   Sizzix 'Sleigh 3-D Pop-up' Bigz BIGkick/ Big Shot Die   Sizzix Sizzlits Santa Die Set (Pack of 3)        


Butterfly_1_1

God’s Blessings!

Stamping With Guneaux Designs By Beverly Polen

Firm Reliance on Divine Providence! 

Jesus said, “But I tell you that men will have to give account on the day of judgment for every careless word they have spoken.  For by your words you will be acquitted, and by your words you will be condemned.”  Matthew 12:36 & 37 

ODBD Holly Night Nativity Scene

Hello, my friends!  Thank you for stopping in to see my latest card featuring the ODBD Holly Night Nativity Scene.  I made this card for the Splitcoaststampers Falliday Fest Challenge, FF16UnderstandBlueB, to use the salted watercolor technique on a card (link to a tutorial is below).

nativity-scene_1

I am sccod-buttono blessed by Our Daily Bread Designs, Angie Crockett, as she selected this card for the ODBD Customer Card of the Day!  I am so grateful to ODBD for such an honor!!


Stamps: ODBD Delightful Decoration (sentiment)

Paper: Solar White, SU Glossy White, Basic Black, Silver Foil, and Brilliant Blue Card Stock

Ink:   SU Brilliant Blue, Ballet Blue, and Whisper White (sentiment)

Accessories: ODBD Holy Night Dies, Water, Silver Watercolor Brushes, Salt, and Foam Tape

Techniques: Salted Watercolor  (Click HERE for a tutorial)


Butterfly_1_1

God’s Blessings!

Stamping With Guneaux Designs By Beverly Polen


Paul’s Charge to Timothy:  “Command those who are rich in this present world not to be arrogant nor to put their hope in wealth, which is so uncertain, but to put their hope in God, who richly provides us with everything for our enjoyment.  Command them to do good, to be rich in good deeds, and to be generous and willing to share.”  1 Timothy 6:17-18

FF16diniA, Delightful Decorations

This post is a continuation of projects I did for the Splitcoaststampers Falliday Fest. This card features the ODBD Delightful Decorations Stamp Set and was my submission to Dina K’s (Dini) Falliday Fest Challenge (FF16diniA).  Dina asked for cards made from die cutting a shape(s) from painter’s or masking tape, laying the die cut tape on watercolor paper, and creating a background around the masks using watercolors or sponged/stamped inks.  I used the ODBD Delightful Decorations Stamp Set to create my masks and watercolor around.

odbd-delightful-decorations_1

Stamps: SU Greetings of the Season (for sentiment)
Paper: Tim Holtz Watercolor Paper, Solar White
Accessories: ODBD Delightful Decorations, Spellbinders Astoria Labels Dies, Foam Tape, Crystal Drops, and SU Clear and Silver Tinsel Trim
Techniques: Water Coloring

Butterfly_1_1

God’s Blessings!

Stamping With Guneaux Designs By Beverly Polen


“In Him we have redemption through His blood, the forgiveness of our trespasses, according to the riches of His grace.”  Ephesians 1:7

Scented Stain Glass Window

Hello, friends!!  The card I am sharing today is a Scented Stained Glass Window card. I started developing the card in response to a faux stained glass challenge on Splitcoaststampers.  As I created the card, it evolved into more than a faux stained glass challenge response.

Scented Stained Glass Window

As I started thinking of other Splitcoaststampers challenges for the week, I decided to incorporate all of these challenges, but the faux stained glass would be the primary focus for the card.

MIX190 – Ky (Scrapacat) is the hostess of the challenge to create a card with faux stained glass. I began my window by stamping and coloring (with copics) a purple Gladiolus flower, which is from Our Daily Bread Designs. Upon completion, I used a MICRON pen to draw my wonky pieces of “glass”.  I used two greenish Copic markers to color the glass.

TLC630 – Judy (StampingQueenJAR) hosted a challenge to add texture to a card by using a technique and not an embellishment. The technique I used is the stain-glass window technique. The texture I added was a flavorful embossing powder. It smells like Vanilla and it is a retired Stampin’ Up! powder!

WT601 – Carla (Covington Crafter) hosted a challenge to create a card that “Mmmmm, Smells Good!” by adding or creating a scented embossing powder.  I used three layers of SU Vanilla Scented Embossing Power, and I was surprised that it had not lost its scent as it is old. I was wrong, mmmmmm, my card smells GOOD!

F4A343 – Shirley (wannabcre8tive) hosted a challenge to get “Swirly” by creating a card with swirls. The front panel, my hand-made cathedral window, is covered with swirls made from a Cuttlebug Swirls Embossing Folder.

Scented Stained Glass Window

Whee, that was a lot of work, but does my card ever smell good!  If interested in seeing all the wonderful comments made about this card, you can see them HERE!


SUPPLIES

GLADIOLUS  DOGWOOD MINI

  susweetsugarplum  gardengreen  Copic Sketch Markers  eleganteggplantink

Spellbinders Shapeabilities 'Ribbon Banners' Dies    Sakura Pigma Micron Pens (Set of 6)

suembossing-buddy  versamark   scotch-double-sided-foam-mounting-tape


Butterfly_1_1

God’s Blessings!

Stamping With Guneaux Designs By Beverly Polen


“See to it, brothers, that none of you has a sinful, unbelieving heart that turns away from the living God.  But encourage one another daily, as long as it is called Today, so that none of you may be hardened by sin’s deceitfulness.”  Hebrews 3:12-13

SU Botanical Builder Dies

Tomorrow is Tuesday, and that means another week has gone by since the last Color Challenge on Splitcoaststampers.  My card for tomorrow’s color challenge features the SU Botanical Builder Dies.  I think the floral dies are so pretty and can be combined in so many ways to create gorgeous flowers.

Vicki Dutcher (vdutchr) is the hostess for this week’s Color Challenge, and she asked us to use Stampin’ Up! colors of Tempting Turquoise, Real Red, and Emerald Envy. These colors are beautiful together!  Here is my card featuring the colors.

SU Botanical Builder Dies

To create the card, I began by cutting a Solar White card stock panel with the ODBD Majestic Medallion Die (the largest die).  Laying the die over the die cut, I used a Black Copic Multiliner to mark the edges.  Then I used the Saharan Screen Card Panel Die to cut out a Solar White stencil.  I laid the stencil over the Majestic Medallion die cut and, using SU Tempting Turquoise and Emerald Envy classic ink, I alternated sponging the inks across the stencil onto the other die cut.

SU Botanical Builder Dies2_1

The above photo shows the sponging, as well as a white embossed bird and birdcage. Vicki’s challenge included for dessert (i.e., extra points) the addition of a bird.  I also added red cardinals onto the sentiment piece that I made with the ODBD Ornate Ovals Dies (smallest die).  I added the sentiment, One-of-a-Kind, onto this piece in red ink.  The sentiment is from the Altenew One Of A Kind Stamp Set.  The following photo is of the sentiment.

SU Botanical Builder Dies3_1

For the foliage around the flowers, I used the ODBD Lovely Leaves Dies to create the leaves and sponged on Emerald Envy ink with different intensity so they would vary in color.  You can see the variations in the photo below.

SU Botanical Builder Dies7_1

After adhering the flowers to the card, I embellished them by placing Tempting Turquoise and/or Real Red candy dots in the centers.

I hope you are inspired by my card!  Thanks for stopping in and leaving comments!

SU Botanical Builder Dies4_1


SUPPLIES

Stamps:  Altenew One Of A Kind, SU Aviary (retired)

Paper:  SU Tempting Turquoise, Real Red, and Emerald Envy Card Stock and Neenah Solar White

Ink:  SU Tempting Turquoise, Real Red, and Emerald Envy Classic Ink, and  Black Copic Multiliner Pen

Accessories:  SU Botanical Builder Framelits Dies, Saharan Screen Card Panel, ODBD Majestic Medallion, ODBD Ornate Ovals, ODBD Lovely Leaves,  IO Cardinal Dies, SU Brights Candy Dots (retired), SU Heat and Stick Powder, SU Dazzling Diamonds Glitter VersaMark, and SU White Embossing Powder

SU Botanical Builder Dies6_1   Botanical Builder Framelits Dies Frantic Stamper Precision Die - Saharan Screen Card Panel

MAJESTIC MEDALLION DIES ORNATE OVALS DIES LOVELY LEAVES DIES

Impression Obsession - Die - Mini Cardinals  Dazzling Diamonds Stampin' Glitter VersaMark Pad White Stampin' Emboss Powder


SU Fifth Avenue Floral

God’s Blessings!

Stamping With Guneaux Designs By Beverly Polen


“The wrath of God is being revealed from heaven against all the godlessness and wickedness of men who suppress the truth by their wickedness, since what may be known about God is plain to them, because God has made it plain to them.”  Romans 1:18 & 19

ODBD Ornamental Crosses Sympathy Card

I find it difficult to make sympathy cards as, typically, there are a lot of emotions involved. However, I created this ODBD Ornamental Crosses Sympathy Card for a dear friend who lost a very special person in her life.  My heart breaks for her, but I know our Lord will carry her through this very difficult time!

ODBD Ornamental Crosses Sympathy Card

I used the Our Daily Bread Designs (ODBD) dies and sentiment stamp to create the card. The card base is a piece of White Linen Card Stock to which I adhered  two die cuts from the ODBD Layered Lacey Ovals.

ODBD Ornamental Crosses Sympathy Card

I die cut three crosses with the ODBD Ornamental Crosses dies and glued them together. I adhered the crosses to the purple die cut, and stamped the sentiment at the bottom.  The sentiment is from ODBD Faith Card Sentiments.

ODBD Ornamental Crosses Sympathy Card

Have a wonderful and blessed day!


SUPPLIES

Stamps:  ODBD Faith Card Sentiments

Paper:  White Linen Card Stock – Essentials by Ellen, SU Purple Card Stock

Ink:  StazOn Jet Black

Accessories:  ODBD Ornamental Crosses Dies, ODBD Layered Lacey Ovals Dies, Foam Tape

FAITH CARD SENTIMENTS   LAYERED LACEY OVALS DIES

ORNAMENTAL CROSSES DIES  


SU Fifth Avenue Floral

God’s Blessings!

Stamping With Guneaux Designs By Beverly Polen


Thomas said to Jesus, “Lord, we don’t know where you are going, so how can we know the way?” Jesus answered, “I am the way and the truth and the life.  No one comes to the Father except through me.”  John 14: 5&6