Stampin Up Postage Due

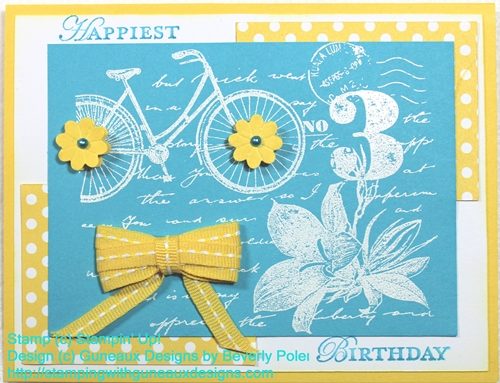
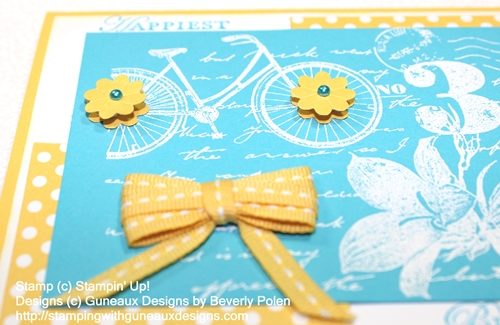
Are you enjoying my posts featuring the Stampin Up Postage Due Stamp Set (126397)?  I hope so as I am enjoying using the stamp set.

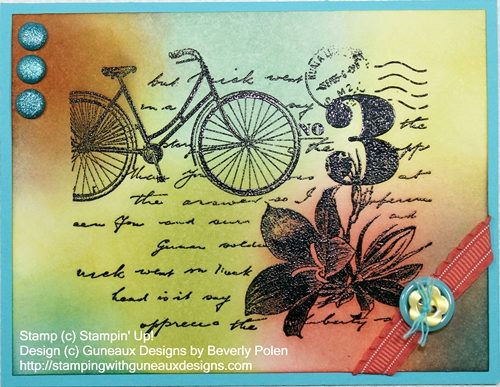
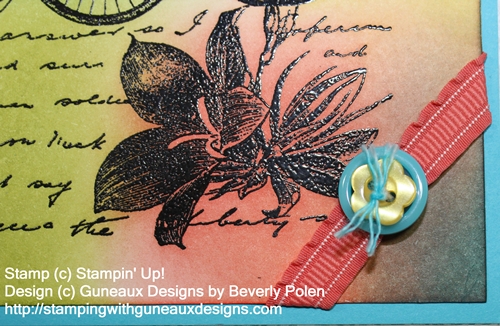
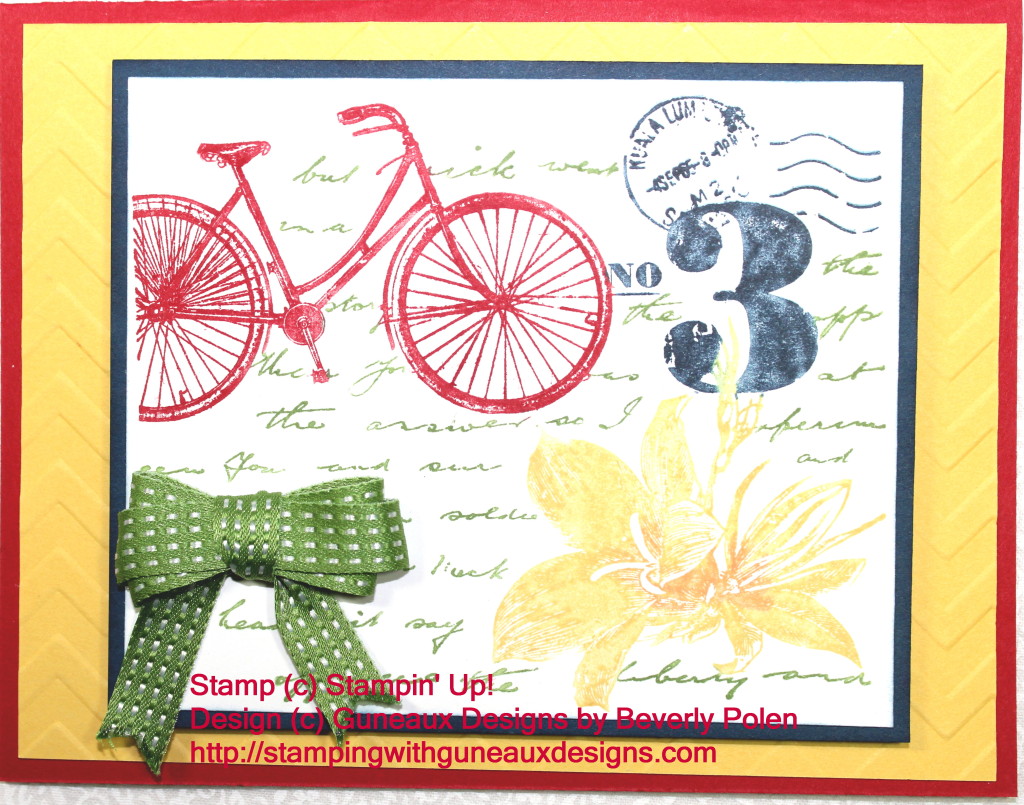
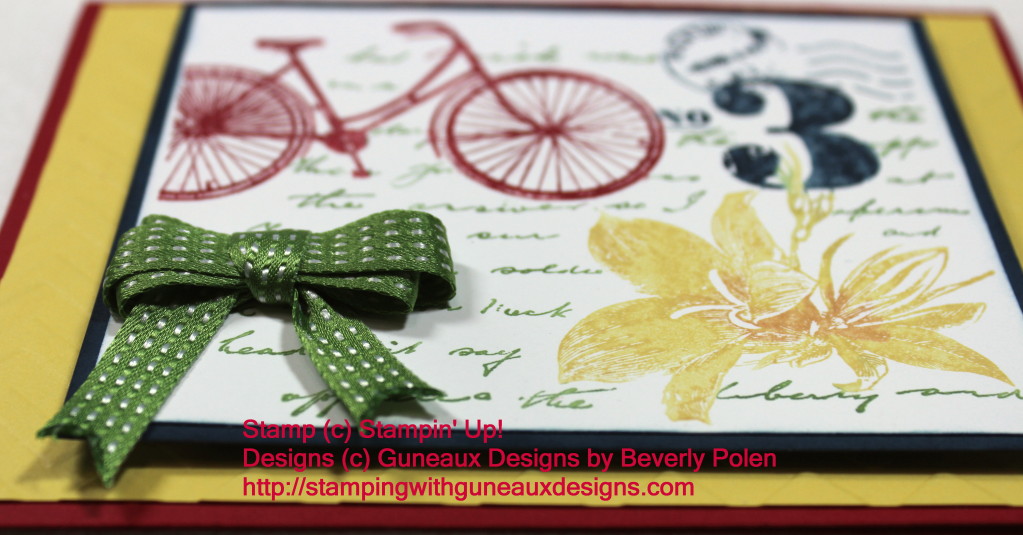
As a youngster (oh, how long ago), my first bicycle was red.  Reflecting on that, I decided to make the bicycle on the Stampin Up Postage Due stamp image red.  And, this card is different than the previous two as the stamped image is made with multiple colors.

STAMPIN UP PRODUCTS USED (includes Catalog item numbers):

Stamp Set:  Stampin Up Postage Due (126397)
Paper (Card Stock):  Real Red (102482), Daffodil Delight (119683), Midnight Muse (126843), and Whisper White (100730)
Ink (Stampin’ Write Markers):  Real Red (100052), Midnight Muse (126856), Daffodil Delight (119677), and Gumball Green (126856)
Accessories:  Big Shot Die-Cutting Machine (113439), Chevron Textured Impressions Embossing Folder (127749), Gumball Green 3/8″ Stitched Satin Ribbon (126848), and Stampin’ Dimensionals (104430)

INSTRUCTIONS:

1.  Cut card stock according to the following:

  • 8-1/2″ x 5-1/2″ piece of Real Red, folded in half to form card base,
  • 4″ x 5-1/4″ piece of Daffodil Delight,
  • 4-1/4″ x 3-9/16″ piece of Midnight Muse (this size can vary, depending on whether you want to cut the Whisper White card stock smaller or larger), and
  • 3-3/8″ x 4-1/16″ piece of Whisper White (this size can vary, depending on whether you want more white space around the stamped image).

2.  Place the Daffodil Delight Card Stock into the Chevron Textured Impression Embossing Folder, and run through the Big Shot Die-Cutting Machine.

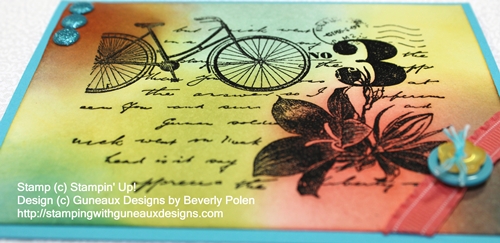
3.  Apply ink onto the stamp using Stampin’ Write Markers — color the bicycle Real Red, postage Midnight Muse, flower Daffodil Delight, and text Gumball Green.

4.  Stamp inked image onto the Whisper White card stock.

5.  Adhere the textured Daffodil Delight card stock to the Real Read card front.

6.  Adhere the stamped Whisper White card stock to the Midnight Muse card stock.

7. Place dimensionals on the back side of the Midnight Muse Card Stock (I double them to get more height).

8.  Cut a piece of Gumball Green ribbon, tie it into a bow, and attach to the bottom-left of the Whisper White card stock.

9.  Attached the Midnight Muse and Whisper White card stock onto the Daffodil Delight card stock.

10.  Sit back and enjoy your beauty!     

God’s Blessings!
Stamping With Guneaux Designs
by
Beverly Polen

Buy the Stampin Up Postage Due stamp set.  You’ll enjoy it!

Stampin Up Postage Due Stamp Set – Happy Birthday

Stampin Up Postage Due Stamp Set is one of the coolest new sets from the Annual Catalog.  I know this stamp set was designed to be “vintage” like; however, I am a “think outside of the box” type of person and that influences my art work. As I shared yesterday, I encourage you to not let the “vintage” like stamp set or the words, “postage due”, influence your creations when using this stamp set.  By that I mean, don’t believe that your creation with this stamp set has to be vintage or relate to “postage”.  Think outside of the box!

To that end, my second card share featuring the Stampin Up Postage Due Stamp Set is certainly not vintage or postage-related.  I wanted a card with Tempting Turquoise and Daffodil Delight colors as I love that color combination.  Here it is!

STAMPIN’ UP! SUPPLIES (with Catalog item numbers):

Stamp Set:  Stampin Up Postage Due (126397 – c) and Apothecary Art (125527 – c)

Paper:  Whisper White Card Stock (100730), Tempting Turquoise Card Stock (102067), Daffodil Delight Card Stock (119683), and Polka Dot Parade Designer Series Paper (126902 – daffodil delight)

Ink:  VersaMark Ink Pad (102283), Tempting Turquoise Classic Ink (126952), and Permanent Turquoise Marker (local craft store)

Accessories:  White Embossing Powder (109132), Heat Tool (129053), Boho Blossoms Punch (119858), Basic Pearls (119247), Daffodil Delight 1/4″ Stitched Grosgrain Ribbon (126872), Stampin’ Dimensionals (104430), and Adhesive of your choice

INSTRUCTIONS:

1.  Cut card stock or designer series paper according to the following:

  • 8-1/2″ x 5-1/2″ piece of Daffodil Delight Card Stock (fold in half to create the card base)
  • 5-1/4″ x 4″ piece of Whisper White Card Stock
  • 4-1/2″ x 3-1/4″ pieced of Tempting Turquoise Card Stock
  • two 2-5/8″ x 2″ of Polka Dot Parade Designer Series Paper (daffodil delight)

2.  Cover the bicycle stamp with VersaMark Ink and stamp it onto the Tempting Turquoise Card Stock.

3.  Cover with White Embossing Powder and set with the Heat Tool.

4.  Punch out four flowers of your choice from one of the designs of the Boho Blossoms Punch.

5.  Using Stampin’ Dimensionals, adhere together two flowers to create one flower (I double up the dimensionals).  Repeat with the other two punched out flowers.

6.  Using a turquoise permanent marker, color two Basic Pearls and attach to the center of the two flowers.

7.  Cut a piece of the Daffodil Delight 1/4″ Stitched Grosgrain Ribbon and tie it into a bow.

8.  Using Tempting Turquoise ink, stamp “Happiest” “Birthday” from the Apothecary Art Stamp Set onto the Whisper White Card Stock as shown in picture.

9.  Assemble the card as stated below (also reference picture):

  • Attach the two pieces of the Daffodil Delight designer series paper to the Whisper White Card Stock; one on the bottom-left and the other on the top-right as shown in picture.
  • Attach the Tempting Turquoise stamped card stock onto the center of the card front.
  • Attach the two flowers in the center of the bicycle wheels.
  • Attach the Daffodil Delight bow.

10.  Enjoy the card you made with the Stampin Up Postage Due stamp set!


 God’s Blessings!
Stamping With Guneaux Designs
by
Beverly Polen

 Check out the new My Digital Studio downloads!

Come back tomorrow for another Stampin Up Postage Due creation!

Stampin Up Postage Due

Do you allow the title of a stamp set to determine how you create with it, such as the Stampin Up Postage Due stamp set?  Does the word, postage, within the title tell you that your creation has to be postage-related?  How do you find it used mostly when you surf the Internet?  I have found many stampers allowing the title to impact their paper crafting and they tend to use more earth tones in their creations with a stronger focus on male-related projects.

In my card share today, I did not allow the Stampin Up Postage Due stamp set title to impact the way I created my card.  I focused more on the main stamp and the bicycle within that stamp.  From my perspective, the bicycle in the stamp is a female bike, and anything female-related influenced how I would create my card.  Thinking of a female, I think of bright colors; thus, bright colors make up on my card.

STAMPIN UP PRODUCTS (includes product item number):

Stamp Set:  Stampin Up Postage Due (c – 126397)

Paper:  Tempting Turquoise Card Stock (102067) and Whisper White Card Stock (100730)

Ink (Classic):  Summer Starfruit (126991), Calypso Carol (126983), Lucky Limeade (126984), Cajun Craze (126965), Island Indigo (126986), Pool Party (126982), Wisteria Wonder (126985), Tempting Turquoise (126952), and VersaMark (102283)

Accessories:  Brights Glimmer Brads – Tempting Turquoise (121006), Calypso Carol 3/8″ Ruffled Ribbon (122976), Brights Designer Buttons – Tempting Turquoise and Daffodil Delight (119747), Whisper White Bakers Twine (124262), Black Embossing Powder (109133), Heat Tool (129053),  Paper Piercing Tool  (126189), Stampin’ Pierce Mat (126199), and Stampin’ Sponges Wedges (101610)

INSTRUCTIONS:

  • Cover the bicycle stamp with VersaMark and stamp it onto a 5-1/4″ x 4″ piece of Whisper White Card Stock
  • Cover the VersaMark ink with the Black Embossing Powder and set with Heat Tool
  • Using Stampin’ Sponges, apply the above inks (or inks of your choice) in a circular motion onto the card stock (start the sponge off of the card stock and slowly move it onto the card stock)
  • Use the Paper Piercing Tool and Mat to punch three holes in the upper-left side of the colored card stock
  • Insert three Tempting Turquoise Glimmer Brads and spread the prongs
  • Cut a small piece of Calypso Carol Ruffled Ribbon
  • Thread the Bakers Twine into the larger button and then the smaller one
  • Before tying into a knot, insert the ribbon through the twine underneath the larger button
  • Tie a tight knot and separate the threads within the twine
  • Cover a sponge with Tempting Turquoise Ink and gently swipe the twine’s threads to apply the ink
  • Attach the buttons and ribbon along the bottom-right edge of the colored card stock
  • Cut an 8-1/2″ x 5-1/2″ piece of Tempting Turquoise Card Stock and fold in the center to create a card base
  • Attach the stamped and decorated card stock onto the front of the card base
  • Enjoy your creation!

NOTE:  Don’t forget that during the month of September, you get a free spool of the 2012-2014 In-Color 3/8″ Stitched Satin Ribbon for every $40 purchase of Stampin’ Up! products.  Spend $200 and get all 5 of the spools!


God’s Blessings!
Stamping With Guneaux Designs
by
Beverly Polen

My posts for the next couple of days will also focus on the Stampin Up Postage Due stamp set.  Come back to see those.