Flowering Flourishes Stamp Set & Tool Tip

Welcome to Guneaux Designs! Today I am sharing with you a card that features a new stamp set from the 2012 Stampin’ Up! Annual Catalog, the Flowering Flourishes Stamp Set.  I was so disappointed when Stampin’ Up! retired the Baroque Motifs Stamp Set; however, I am quite pleased with the Flowering Flourishes Stamp Set which is similar. The stamp set includes three “flourishes“, and the one on this card is the largest. I think it is so cute!  I will also share with you a tool tip regarding “photo corners”.

Happy Birthday Card

This picture gives you another view of the Flowering Flourishes stamp image: Happy Birthday Card - Flowering Flourishes

 STAMPIN’UP! SUPPLIES:

Stamp Sets:  Flowering Flourishes (126367) and Bring on the Cake (121958 – sentiment)

Paper: Gumball Green Card Stock (126840),Primrose Petals Card Stock (126841), and Whisper White Card Stock (100730)

Ink (Stampin’ Write Markers):  Gumball Green Marker, Primrose Petals Marker, Raspberry Ripple Marker, Midnight Muse Marker, and Summer Starfruit Marker (all in one package – 126856)

Accessories:Midnight Muse 3/8” Stitched Satin Ribbon (126847), Basic Pearls (119247), Curly Label Punch (119851) and 1-1/4”Square Punch

HOW TO MAKE THIS HANDMADE CARD:

  • Cut a 8-1/2″ x 5-1/2″ piece of Gumball Green Card Stock and fold it in the middle to create a card base.
  • Cut a 5-1/4″ x 4″ piece of Primrose Petals Card Stock and adhere it onto the front of the card base.
  • Cut a 5″ x 3-3/4″ piece of Whisper White Card Stock.
  • Using the above listed Stampin’ Write Markers, cover the flowering flourish stamp with Gumball Green, Primrose Petals, Raspberry Ripple, and Summer Starfruit ink (see picture for guidance).
  • Stamp the image onto the Whisper White Card Stock.
  • Fill in with ink the places on the stamped image where needed.
  • Use a permanent yellow marker and color three Basic Pearls.
  • Adhere the pearls onto the three flowers as shown in picture.
  • Underneath the stamped image, stamp the “Happy Birthday” sentiment from the Bring on the Cake stamp set.
  • Tie a piece of Midnight Muse 3/8″ Stitched Satin Ribbon into a bow and adhere it to the top-left of the stamp image.
  • Follow the information below to create the two corner pieces.
TOOL TIP: 
Remember when we had the Stampin’ Up! Photo Corner Punch to create corner decorations for our handmade cards?  I loved that punch and I miss it.  Well, I decided to look for another way to make attractive photo corner pieces. Therefore, I did, and this is how I did it.


1. Cut a piece of cardstock using the Curly Label Punch. 

Stampin' Up! Curly Label Punch

2. Place the corner of the long side of the curly label into the corner of the 1-1/4″ Square Punch, lining it up evenly and cutting it. Stampin' Up! Curly Label

 3. This is the result. Cut more and add them to the corners of your card.

 Photo Corners


God’s Blessings!

Stamping With Guneaux Designs


Stampin Up Comfort Cafe DSP and Apothecary Accents Framelits


Are you getting excited about the debut of the new Stampin’ Up! Catalog?  When it debuts on June 1, you’ll notice a lot of changes – good ones that is.  This project share features one of the beautiful, upcoming Designer Series Paper (DSP), the Stampin Up Comfort Cafe (126898) and a Framelits, Apothecary Accents Framelits (127003).  This card features two of the designs for the Stampin Up Comfort Cafe DSP. The key color for these designs is Cajun Craze.
 
TIP:  If you will note, you can see that I used the negative of the Stampin Up Comfort Cafe DSP that is cut out with the new Apothecary Accents Framelit  for the first card layer.  Try that when you get yours.  Also, I covered it with Crystal Effects (love that stuff!).
 

The picture above and below show the dimensional aspects of the card.

 
Other Stampin’ Up! products used are:
 
Perfectly Penned Stamp Set (122892) – sentiment
Adorning Accents Embossing Folders (125601) – the hearts
A ribbon that was featured in the last Holiday Mini, Very Vanilla Designer Velvet Ribbon
 
 God’s Blessings!
Stamping With Guneaux Designs
by
Beverly Polen
 
Stampin Up Comfort Cafe and Apothecary Accents Framelits

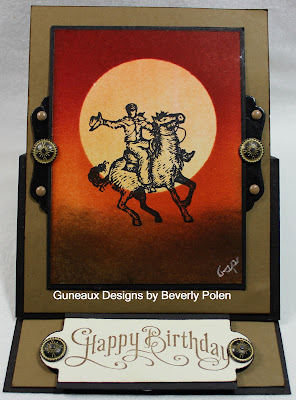
Stampin Up Out West Happy Birthday Card – Brayering

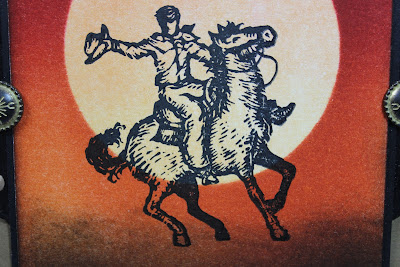
It has been a while since I’ve used my Stampin’ Up! brayer, so I decided to use it to create this card, featuring the Stampin Up Out West stamp set, for my special brother who has a birthday Saturday.  He is a horse lover and has had many beautiful, special horses in his lifetime.  Therefore, I wanted a horse stamp for the card.  I chose to use a retiring Stampin’ Up! stamp set, Out West, that met my need for a horse stamp.  The brayering on this card was inspired by Michelle Zindorf, who taught me how to use a brayer.  If you are interested in taking one of her classes (she travels all over the US), click here.

Stampin Up Out West
 As you can see, the card is an easel card.
Stampin Up Out West
Stampin Up Out West
Stampin’ Up! Products Used:
Stamp Set:  Stampin Up Out West
Ink:  More Mustard, Cajun Craze, Cherry Cobbler, Soft Suede, and Basic Black ink. Card Stock:  Whisper White, Soft Suede, and Basic Black Card Stock
Accessories:  Antique Brads and Decorative Label Punch
 
********************************
NEW $99 STAMPIN’ UP! STARTER KIT:  If you have wanted to become a Independent Stampin’ Up! Demonstrator, Stampin’ Up! is now offering a fully customisable Starter Kit for new recruits at a new lower price of $99!
The choice is yours to put together a kit with any of the current high-quality products–you can choose up to $125 worth of Stampin’ Up! products! You will also receive a business supplies pack (valued at $65) to create a kit with a total value of $190 that still ships for FREE! Previously, the contents of the Starter Kit were selected for you.
You will receive EIGHT of the new 2012-2013 Catalog to share with friends or use during a private Stampin’ Up! party!  Your commission starts at 20%!  There is NO risk, NO pressure, and NO penalty to drop!  If you are a Hobby Stamper who isn’t ready to build a stamping business, you are very welcome to join Guneaux Designs just to get 20% off of your stamp supplies!  If you are ready to build a business, you’ve come to the right place.  Give me a call (941-531-4513)!  If you have Skyping capabilities, don’t worry about living local to me.
 
 God’s Blessings!

Stamping With Guneaux Designs

Stampin Up Out West


Birthday Card Idea

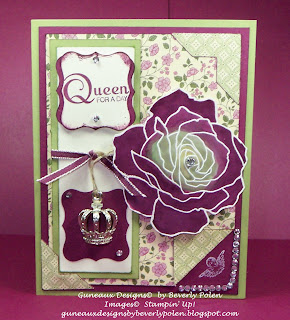
Looking for a Birthday Card idea?  This Birthday Card is one you can make for a special female.  This Stampin Up card is one I made for my daughter’s birthday.  It features the Stampin Up colors, Pear Pizzazz and Rich Razzleberry, which go together beautifully.

I used the Stampin Up Designer Series Paper (DSP), Springtime Vintage, for the primary layer of the card.  I love this DSP, and will be sad when it goes away at the end of the month (crossiBirthday Card - Springtime Vintage DSPng my fingers that it will be a carryover).  I turned up the lower-right side of the DSP to display both sides as they are equally beautiful.  Purchase Springtime Vintage before March 31!

This Birthday Card features four Stampin Up stamp sets:  Fifth Avenue FloralYou’re a Gem, Clearly for You, and Curly Cute.  I used the water coloring technique on the Rich Razzleberry flower from the Fifth Avenue Floral stamp set.  The Pear Pizzazz and So Saffron Classic Stampin’ Inks were used for the center of the flower.  I really like how it turned out.

Birthday Card - Springtime Vintage DSPOther Stampin Up products used for this greeting card are:

Curly Label Punch, Trinket Crowns, Basic Rhinestones Jewel Accents, Rich Razzleberry Taffeta Ribbon, and Linen Thread.

As usual, buy the Stampin Up products by placing your cursor over the green links.  You’ll be taken directly to the product.

God’s Blessings!
Guneaux Designs by Beverly Polen
Stampin Up Demonstrator in Florida
FIRM RELIANCE ON DEVINE PROVIDENCE!
Hope you like this birthday card idea!