Blending Inks Technique – Stampin Up

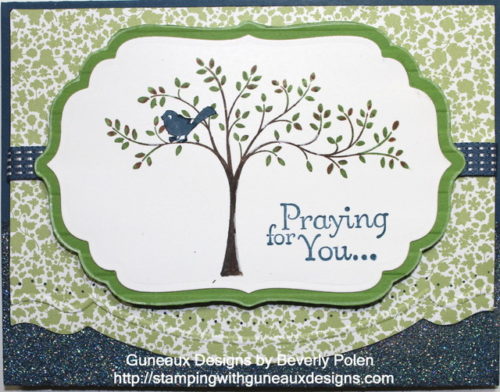
Today’s post is about blending inks to create beautiful artwork.  This technique is very easy and you can quickly create very attractive cards using the technique, such as the following  three cards.

What is blending inks?   Looking at the cards below, it seems obvious, right?  Regardless, let me share that it is selecting and blending two or more inks to create subtle shades and colors to your paper crafting artwork.

Blending Inks

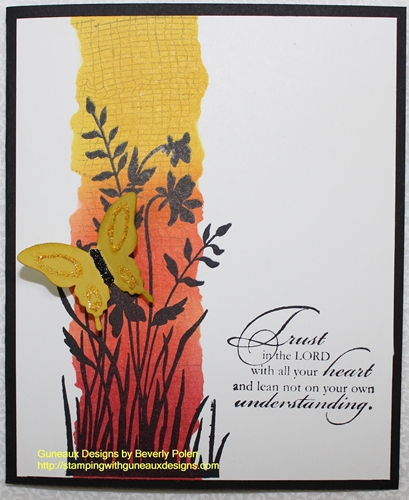
I have selected one of the three cards to provide you with instructions on the blending inks technique.


 STAMPIN’ UP! SUPPLIES:

Stamp Sets:  Just Believe (120453), Trust God (126702)  [love this stamp set], and a Background Stamp of your choice (I used a retired Stampin’ Up stamp)

Paper:  Basic Black Card Stock (121045) and Whisper White Card Stock (100730)

Ink (Classic):  Summer Starfruit (126991), Calypso Carol (126983), Primrose Petals (126858), Crumb Cake (126975), and Jet Black StazOn (101406)

Accessories:  Stamping Sponge wedges (101610), Elegant Butterfly Punch (127526), and Post-It Notes or scrap card stock


 Instructions for the blending inks technique are below the two following pictures.

INSTRUCTIONS:

  • Cut a piece (the size depends on the stamp image used) of Whisper White Card Stock (mine is 4″ x 4-7/8″)
  • Tear the edges of the sticky side of two Post-It Notes, being careful to leave some of the sticky edge available
  • Place the torn Post-It Notes onto the Whisper White Card Stock as shown in the below picture with the opening between the Notes closer to the left side of the card stock

Now you are ready to start blending inks according to the following:

  • Cover a sponge wedge (or blending tool) with Summer Starfruit ink and apply in a circular motion to the upper 1/3 of the opening in the card stock, being careful to avoid lifting the edges of the Post-It Notes
  • Cover a sponge wedge with Calypso Carol ink and apply in a circular motion to the middle 1/3 of the card stock below the Summer Starfruit ink
  • Blend the edges of the two inks (see picture of card), producing a different shade of color
  • Cover a sponge wedge with Primrose Petals ink and apply to the bottom 1/3 of the card stock, blending it with the Calypso Carol ink to create a different shade of color
  • Cover a background stamp with Crumb Cake ink and stamp over the three colors you’ve just blended
  • Remove the Post-It Notes

At this point, you’ll decorate the card stock according to the following:

  • Cover the largest stamp image from the Just Believe Stamp Set  (a floral silhouette) with Jet Black StazOn ink and stamp the image over the blended inks
  • Cover a sentiment from the Trust God Stamp Set with Jet Black StazOn ink and stamp the sentiment on the lower-right side of the card stock
  • Cut an 8-1/2″ x 5-1/4″ piece of Basic Black Card Stock and fold in the middle for a card base
  • Attach the decorated piece of Whisper White Card Stock to the Basic Black card base
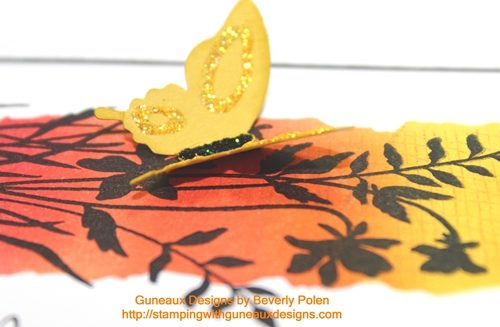
  • Using the Elegant Butterfly Punch, cut out a butterfly, decorate it as desired, and attach to the card

You have just learned the Blending Inks Technique!

God’s Blessings!
Stamping With Guneaux Designs
Beverly Polen

Use the blending inks technique to create quick and easy cards!

Labels Collection Framelits – Thoughts and Prayers

I could not do without the Stampin’ Up! Labels Collection Framelits, as well as all of the Stampin’ Up!’s framelits, as well as the Thoughts and Prayers stamp set.  To me, the Labels Collection Framelits and all of the other framelits are must-have tools for creating paper crafts. The Labels Collection Framelits may be designed to cut certain stamp cut images, but they certainly may be used for other purposes.

The card share for you today features the Labels Collection Framelits and Thoughts and Prayers Stamp Set.  To use the  Labels Collection Framelits, you will need the Big Shot, its multipurpose platform (Tab 1), and standard cutting pads.  Below are instructions for making this card.


STAMPIN UP PRODUCTS:

STAMPS:  Thoughts and Prayers (127805) ; PAPER:  Midnight Muse Card Stock (126843), Gumball Green Card Stock (126840), Whisper White Card Stock (100730), and Twitterpated Designer Series Paper (125406); INK: Soft Suede Stampin’ Write Marker (119703), Gumball Green Stampin’ Write Marker (126856), Midnight Muse Classic Stampin’ Pad (126860), and White Gel Pen (105021); ACCESSORIES: Labels Collection Framelits (125598), Strips Embossing Folder (123128), Adorning Accents Embossing Folders (125601), Adorning Accents Edgelits (125595), Essentials Paper Piercing Pack (126187), VersaMark Pad (102283), Dazzling Diamond Stampin’ Glitter(102023), Heat and Stick Powder (100625), Heat Tool (129053), Stampin’ Pierce Mat (126199), Paper-Piercing Tool (126189), and Midnight Muse 3/8″ Stitched Satin Ribbon (126847)

INSTRUCTIONS:

Card Base:

1.  Cut a 8-1/2″ x 5-1/2″ piece of Midnight Muse Card Stock and fold it in half.

2.  Stamp the VersaMark Pad onto the bottom 1″ of the front of the card base.

3.  Apply Heat and Stick Powder over the VersaMark Ink and heat set with the Heat Tool.

4.  Apply the Dazzling Diamond Stampin’ Glitter over the Heat and Stick Powder and heat set again.

First Layer:

5.  Cut a 4″ x 5-1/4″ piece of the green design (see picture) from the Twitterpated DSP.

6.  Assemble a sandwich to run through the Big Shot in this order:  a) multipurpose platform on Tab 1, b) Cutting Pad, c) DSP piece, d) Adorning Accents Edgelit, and e) Cutting Pad.  Run through  the Big Shot.

7. Place the piece of DSP inside the Adorning Accents Embossing Folder aligning it just above the cut created with the Adorning Accents Edgelit.  Create a Big Shot sandwich with the multipurpose platform on Tab 2 and run through the Big Shot.

8.  Place the DSP onto the Paper-Piercing Mat, lay the same design (i.e., that used with the embossing folder) from the Essentials Paper-Piercing Pack onto the DSP, and pierce the DSP with the Paper-Piercing Tool following the design grid.

Center Piece:

9.  Cover the tree stamp image from the Thoughts and Prayers with ink:  trunk and branches – Soft Suede; leaves – Gumball Green.  Stamp the tree image onto Whisper White Card Stock.

10.  Place the 3rd largest frame from the Frames Collection Framelits onto the Whisper White Card Stock ensuring it is centered over the tree image.  Create a Big Shot sandwich with these items and cut out the image.

11.  Using the Midnight Muse Classic Stampin’ Pad, stamp the sentiment, Praying for You, onto the bottom-right corner.

Center Piece Mat:

12.  Place a piece of Gumball Green Card Stock into the Strips Embossing Folder and run through the Big Shot (on Tab 2).

13.  Place the same frame from the Frames Collection Framelits onto the Gumball Green Card Stock.  Trace around the frame with a pencil.  Cut out the frame and use the White Gel Pen around the edge.  Adhere the Whisper White Card Stock with image onto the mat.

Assemble Card:

14.  Adhere a piece of the Midnight Muse Ribbon across the DSP.

15.  Adhere the DSP onto the card base front.

16.  Adhere the matted centerpiece to the DSP and enjoy your card.


God’s Blessings!

Stamping With Guneaux Designs

Beverly Polen