How to Make a Center Step Card – Happy Birthday

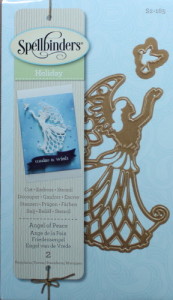
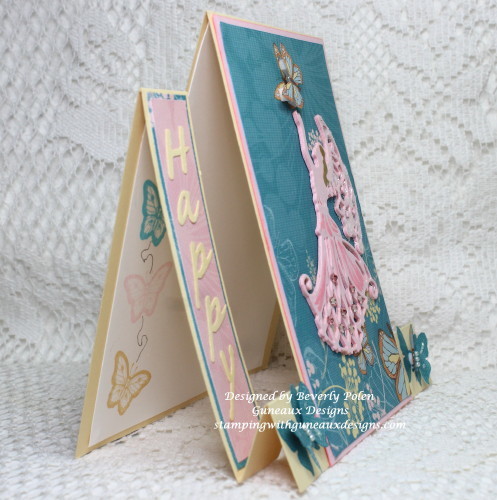
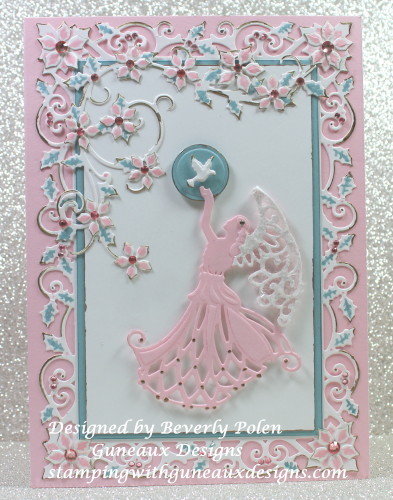
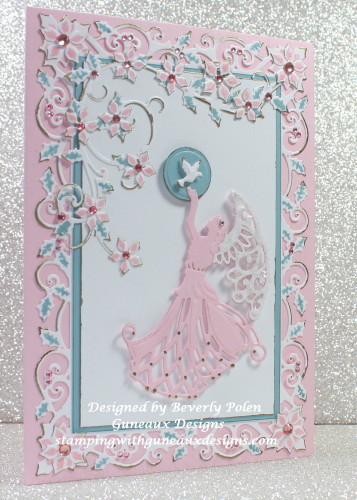
The purpose of this post is to provide a tutorial on how to make a center step card. The card shown in the post is a Happy Birthday card that I made for my little angel granddaughter.  I refer to her as my angel, thus I thought the Spellbinders Holiday Angel of Peace Dies would work perfectly for my center step card.

How to make a Center Step Card
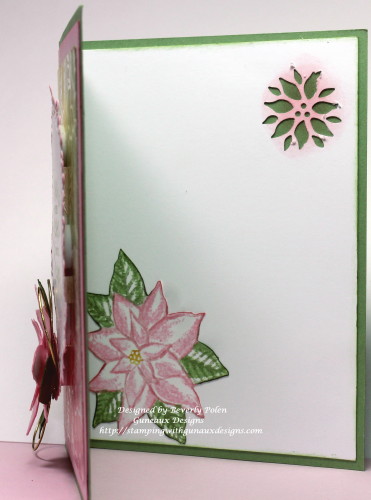
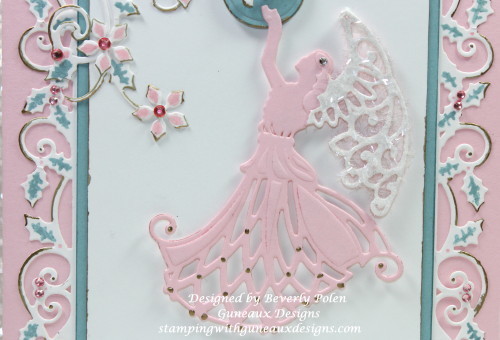
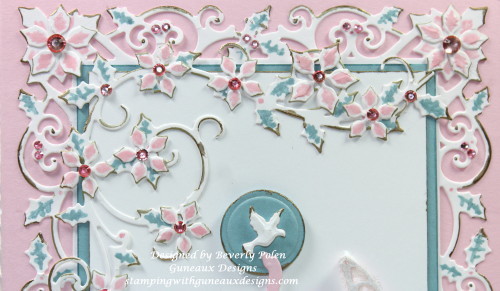
The following pictures are closeups of card sections.  You will note that the angel’s wings are covered with a tinsel glitter, which is Martha Stewart’s Crystal Tinsel Glitter (discontinued).

How to make a Center Step CardHow to make a Center Step Card

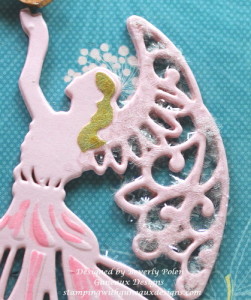
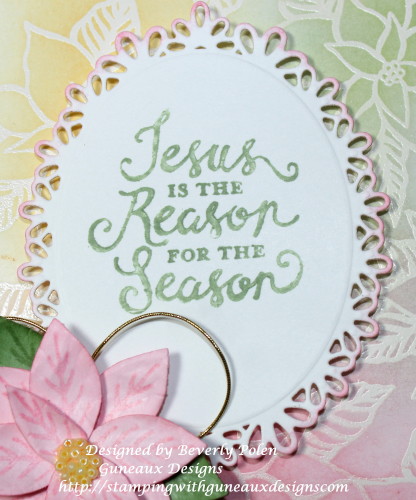
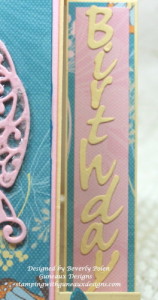
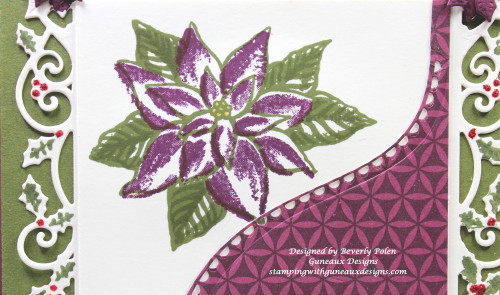
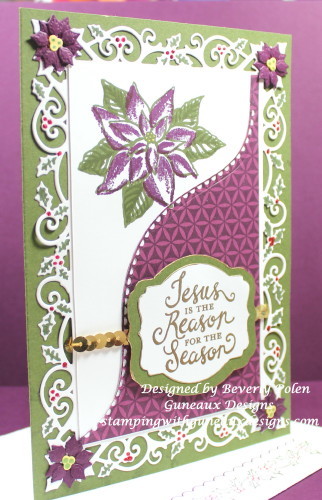
These pictures are closeups of the Happy Birthday sentiment on the left and right sides of the card and the Spellbinders Angel of Peace Dies.

How to make a Center Step CardHow to make a Center Step CardSpellbinders Holiday Angel of Peace


TUTORIAL ON HOW TO MAKE A CENTER STEP CARD

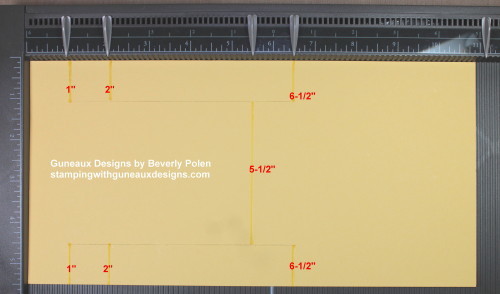
STEP 1: Using a paper trimmer/cutter, cut an 11″ x 5-1/2″ piece of card stock.

How to Make a Center Step Card

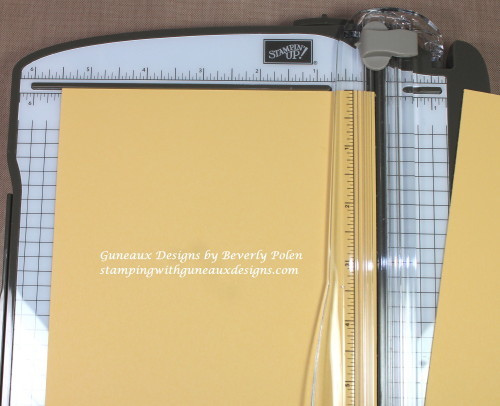
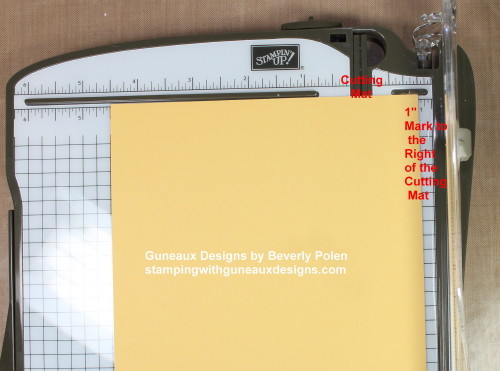
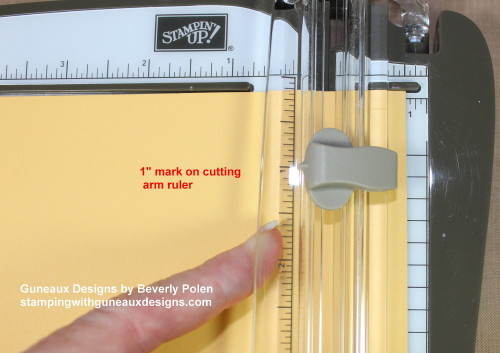
STEP 2:  Leave the 11″ x 5-1/2″ cut piece of card stock on the trimmer, moving the right side to the 1″ mark on the right side of the cutting mat (i.e., the rubber channel that the blade slides through when cutting).

NOTE:  The terms used for a trimmer depends on the type of trimmer used (e.g., Guillotine cutter, Bypass trimmer, etc.).  Thus, in this tutorial,  I have used terms that are applicable to my paper trimmer. Follow the directions for use of your type of trimmer.

How to Make a Center Cut Card

STEP 3:  Using the ruler on the cutting arm, move the cutting blade down to the 1″ mark. Lay the cutting arm down on the paper.

How to Make a Center Step Card Happy Birthday

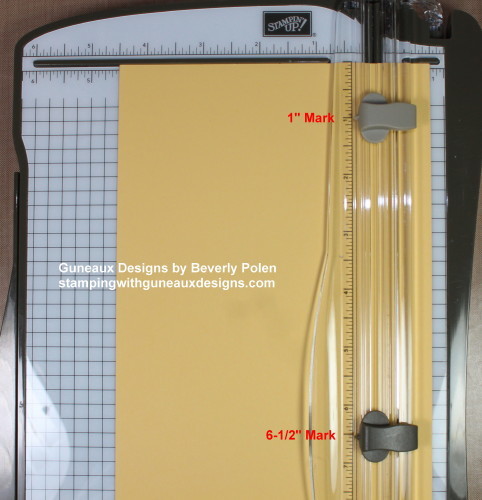
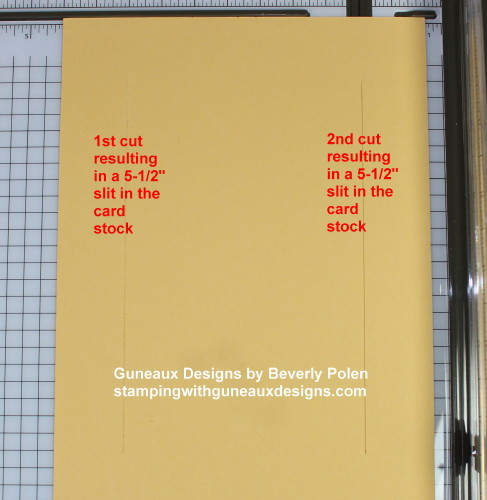
STEP 4:  Cut from the 1″ mark on the cutting arm ruler down to the 6-1/2″ mark.  This provides a 5-1/2″ slit on the card stock.

how-to-make-a-center-step-card-happy-birthday/

STEP 5:  Turn the card stock over with the 5-1/2″ slit on the left side.  Place the card stock at the 1″ mark that is to the right of the cutting mat.

http://stampingwithguneauxdesigns.com/how-to-make-a-center-step-card-happy-birthday/

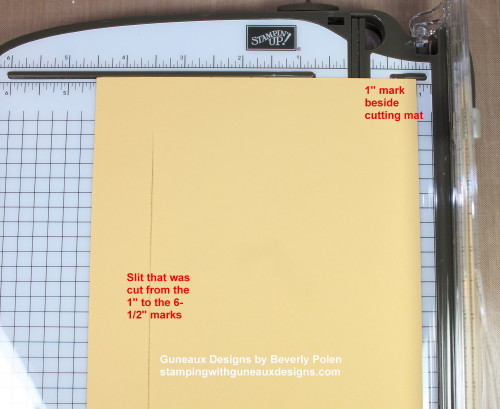
STEP 6:  Before cutting, move the cutting blade on the cutting arm down to the 1″ mark (same as STEP 3).

STEP 7:  Cut from the 1″ mark down to the 6-1/2″ mark.  This provides a second 5-1/2″ slit on the card stock.

http://stampingwithguneauxdesigns.com/how-to-make-a-center-step-card-happy-birthday/

STEP 8:  Put the trimmer away and get out your paper scoring tool to score the piece of card stock.

STEP 9:  Place the card stock onto the scoring tool with the 5-1/2″ side and slits to the far left on the tool.

http://stampingwithguneauxdesigns.com/how-to-make-a-center-step-card-happy-birthday/

STEP 10:  Score at the 1″, 2″, and 6-1/2″ marks, but ONLY from the top of the card stock down to the slit at the top, and from the slit at the bottom to the edge of the card stock. Your score lines will be 1″ long at the top and bottom, avoiding the area where the two slits are located (see picture below STEP 11).

STEP 11.  Score at the 5-1/2″ mark beginning at the first slit down to the second slit.

http://stampingwithguneauxdesigns.com/how-to-make-a-center-step-card-happy-birthday/

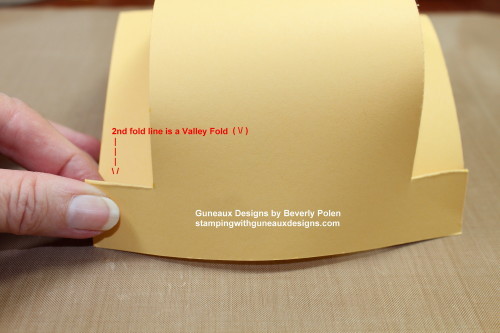
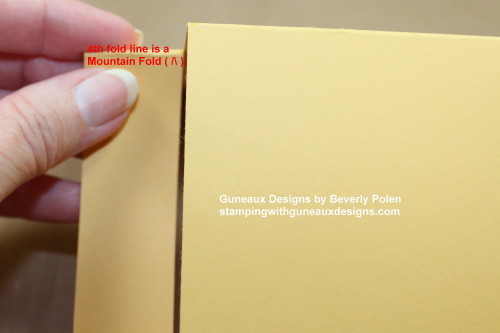
STEP 13:  Remove your card stock from the scoring tool and fold it according to the following:

  • Fold at the first score marks (i.e., the 1″ score line on both sides) into a mountain fold (i.e. the folded crease is facing up).

How to Make a Center Step Card

  • Fold at the second score line (i.e., the 2″ score line on both sides) into a valley fold (i.e., the folded crease is facing down).

How to Make a Center Step Card

  • Fold  the 5-1/2″ score line into a mountain fold.

How to Make a Center Step Card

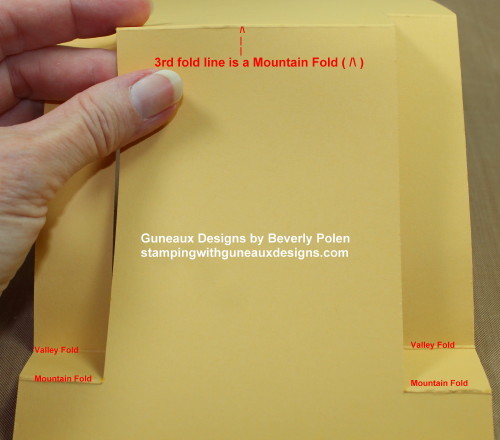
  • Fold the 6″ score line into a mountain fold.

How to Make a Center Step Card

How to Make a Center Step Card

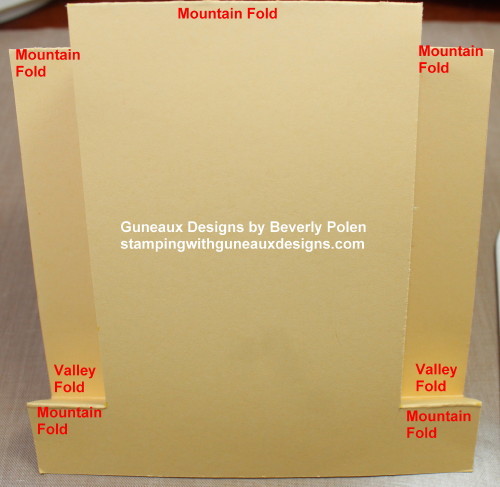
STEP 14:  Now you can create a center step card base and decorate it according to your desires.

Hopefully my tutorial is easy to follow.  If you have any questions or comments, please feel free to leave them in the comment area (i.e., either at the end of this post or at the conversation bubble to the right of this post title).


Swallowtail Butterfly

God’s Blessings!

Stamping With Guneaux Designs by Beverly Polen

How to make a Center Step Card

HOW TO MAKE A CENTER STEP CARD

Reason For The Season Christmas Card

Presenting to you today is a Reason for the Season Christmas Card made with Bohemian Designer Series Paper and the Stampin’ Up! Reason for the Season Stamp Set.  I used the color combination of Mossy Meadow and Blackberry Bliss  to create the card. I think the color combination is gorgeous. What do you think?  (After viewing the card, leave a comment or question in the “bubble” to the right of the post title.)

Reason for the Season Christmas Card

Stampin' Up! Bohemian DSP

Stampin’ Up! Bohemian Designer Series Paper (#138446)

Reason for the Season Stamp Set

Stampin’ Up! Reason for the Season Stamp Set (#139730)

Spellbinders 5x7 Holly Frame


How did I create this Reason for the Season Christmas Card?  Here are my steps:

  • To create the Reason for the Season Christmas Card, I used my Big Shot Die Cutting Machine to cut out the holly border for the first layer of the card.  The holly border is a die cut from Spellbinders Holiday 5 x 7 Holly Frame Dies (S6-040). While the holly border die cut remained in the die, I used Mossy Meadow and Real Red markers (Stampin’ Up!’s) to color the holly leaves and berries. (Later I used Red Stickles glitter glue on the berries.)  
  • Notice the Blackberry Bliss poinsettias on the four corners of the holly frame (see above pic). They were created also with the Spellbinders Holiday 5 x 7 Holly Frame Dies.  If you have been visiting my site, you have noticed that I am using these dies a lot lately. They are so intricate, cut so well, and create gorgeous die cuts.

Reason for the Season Christmas Card

  • At the top-left of the card, I stamped a Blackberry Bliss poinsettia with Mossy Meadow leaves.  These stamps are from the Stampin’ Up! Reason for the Season Stamp Set.  After stamping the poinsettia, I used a Spellbinders Curved Borders Two die and the Blackberry Bliss design from the Stampin’ Up! Bohemian Designer Series Paper to create the curved border that separates the Blackberry Bliss poinsettia from the sentiment.
  • The Jesus is the Reason for the Season sentiment, which is also a stamp from the Stampin’ Up! Reason for Season Stamp Set, was stamped on a piece of Whisper White Card Stock.  I embossed the sentiment with Gold Embossing Powder and added a touch of gold (from a Uni-Ball Gel Pen) around the rim of the sentiment. I used the retired Stampin’ Up! Deco Labels Framelits to cut out the sentiment and a Mossy Meadow mat. Behind the sentiment is a row of Stampin’ Up! Gold Sequin Trim (#132983).

Reason for the Season Christmas Card

  • On the card’s inside, I used a holly and berry stamp from the OutlinesRubberStamp.com (gone out of business), to stamp a border.  I used a sentiment from the retired Stampin’ Up! stamp set, Christ is Born.  Because the card is 5 x 7, there is plenty of white space for a personal note despite the stamp images that I added.

Reason for the Season Christmas Card

Thank you for stopping by, and have a wonderful week!


Butterfly

God’s Blessings!

Stamping with Guneaux Designs

By

Beverly Polen

Reason for the Season Christmas Card

REASON FOR THE SEASON CHRISTMAS CARD

Spellbinders Holiday Angel of Peace Christmas Card

Spellbinders Holiday Angel of Peace Christmas Card

I am so enjoying making Christmas cards with Spellbinders dies, and today I have for you a Spellbinders Holiday Angel of Peace Christmas Card.  

Spellbinders Holiday Angel of Piece Christmas Card

I think it is beautiful!  This year I am enjoying making Christmas cards in pink.  I created this Spellbinders Holiday Angel of Peace Christmas Card  with the Stampin’ Up! Pink Pirouette Card Stock (11135), Stampin’ Up! Whisper White Card Stock (100730), and Stampin’ Up! Baja Breeze Card Stock (retired).

Spellbinders Holiday Angel of Peace Christmas Card

The above is a closeup of the beautiful angel created with the Spellbinders Holiday Angel of Peace (S2-185) die.  The angel is the primary element on the card; therefore, I gave the card the title of Spellbinders Holiday Angel of Peace Christmas Card. Also featured on the card is the Spellbinders Holiday 5 x 7 Holly Frame (S6-040) dies as well as Spellbinders Holiday Holly Tags (S4-559) dies (on the inside of the card).

I created the angel’s wings with Whisper White Card Stock, and then I added Martha Stewart’s Crystal Tinsel Glitter.  I added some metallic gold ink on the bottom portion of the angel, as well as on several areas of the holly frame die cuts.

Spellbinders Holiday Angel of Peace Christmas Card

I love the dove that I made with one of the dies from Spellbinders Holiday Angel of Peace dies.  I added metallic gold ink to the wings and tail of the dove.  And to spotlight the dove, I added a circular piece of Baja Breeze Card Stock.

Have you noticed the “bling” on the card?  I enhanced the poinsettias on the holly frame die cuts with rhinestones that I colored pink using a Copic light pink alcohol marker (RV21).

Spellbinders Holiday Angel of Peace Christmas Card

The inside of the card has a die cut made with the Spellbinders Holiday Holly Tags. Weaved through the die cut is a piece of Stampin’ Up! Pink Pirouette Ribbon.

Below are pictures of the Spellbinders dies that I used.


Spellbinders Holiday Angel of Peace_1Spellbinders Holiday Holly TagsSpellbinders 5x7 Holly Frame

Click HERE to see my other pink Christmas Card.

Butterfly

God’s Blessings!

Stamping With Guneaux Designs

By

Beverly Polen

Spellbinders Holiday Angel of Peace Christmas Card

Spellbinders Holiday Angel of Peace Christmas Card

Home for Christmas Designer Series Paper Blue Poinsettia

It is a delight to share with you my Stampin’ Up! Home for Christmas Designer Series Paper Blue Poinsettia Christmas card.

Home For Christmas Designer Series Paper - Blue Poinsettia

Stampin’ Up! Home for Christmas Designer Series Paper:

Home for Christmas Designer Series Paper Blue Poinsettia
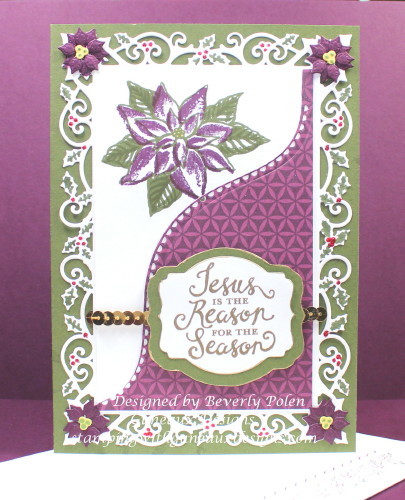
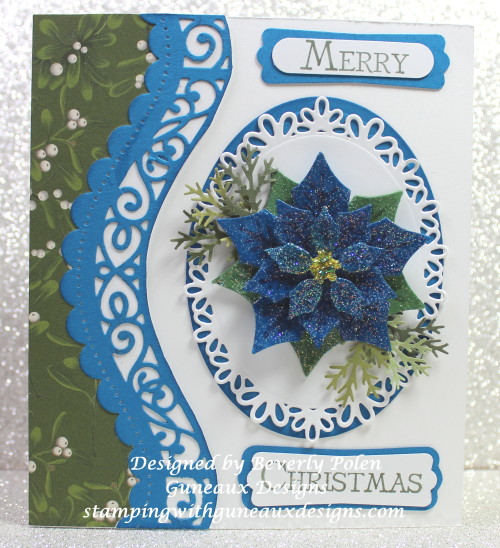
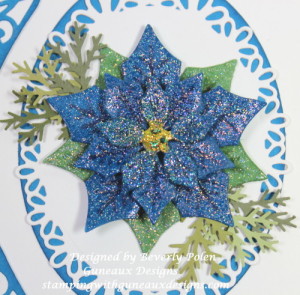
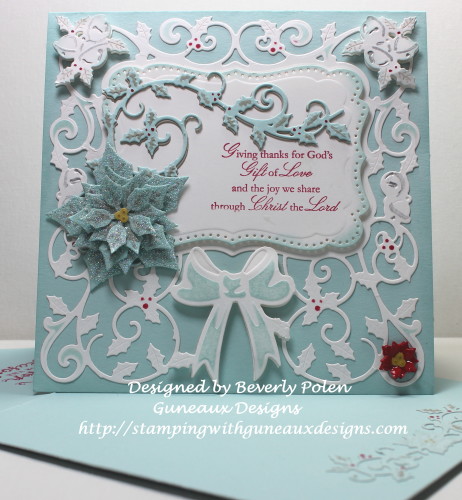
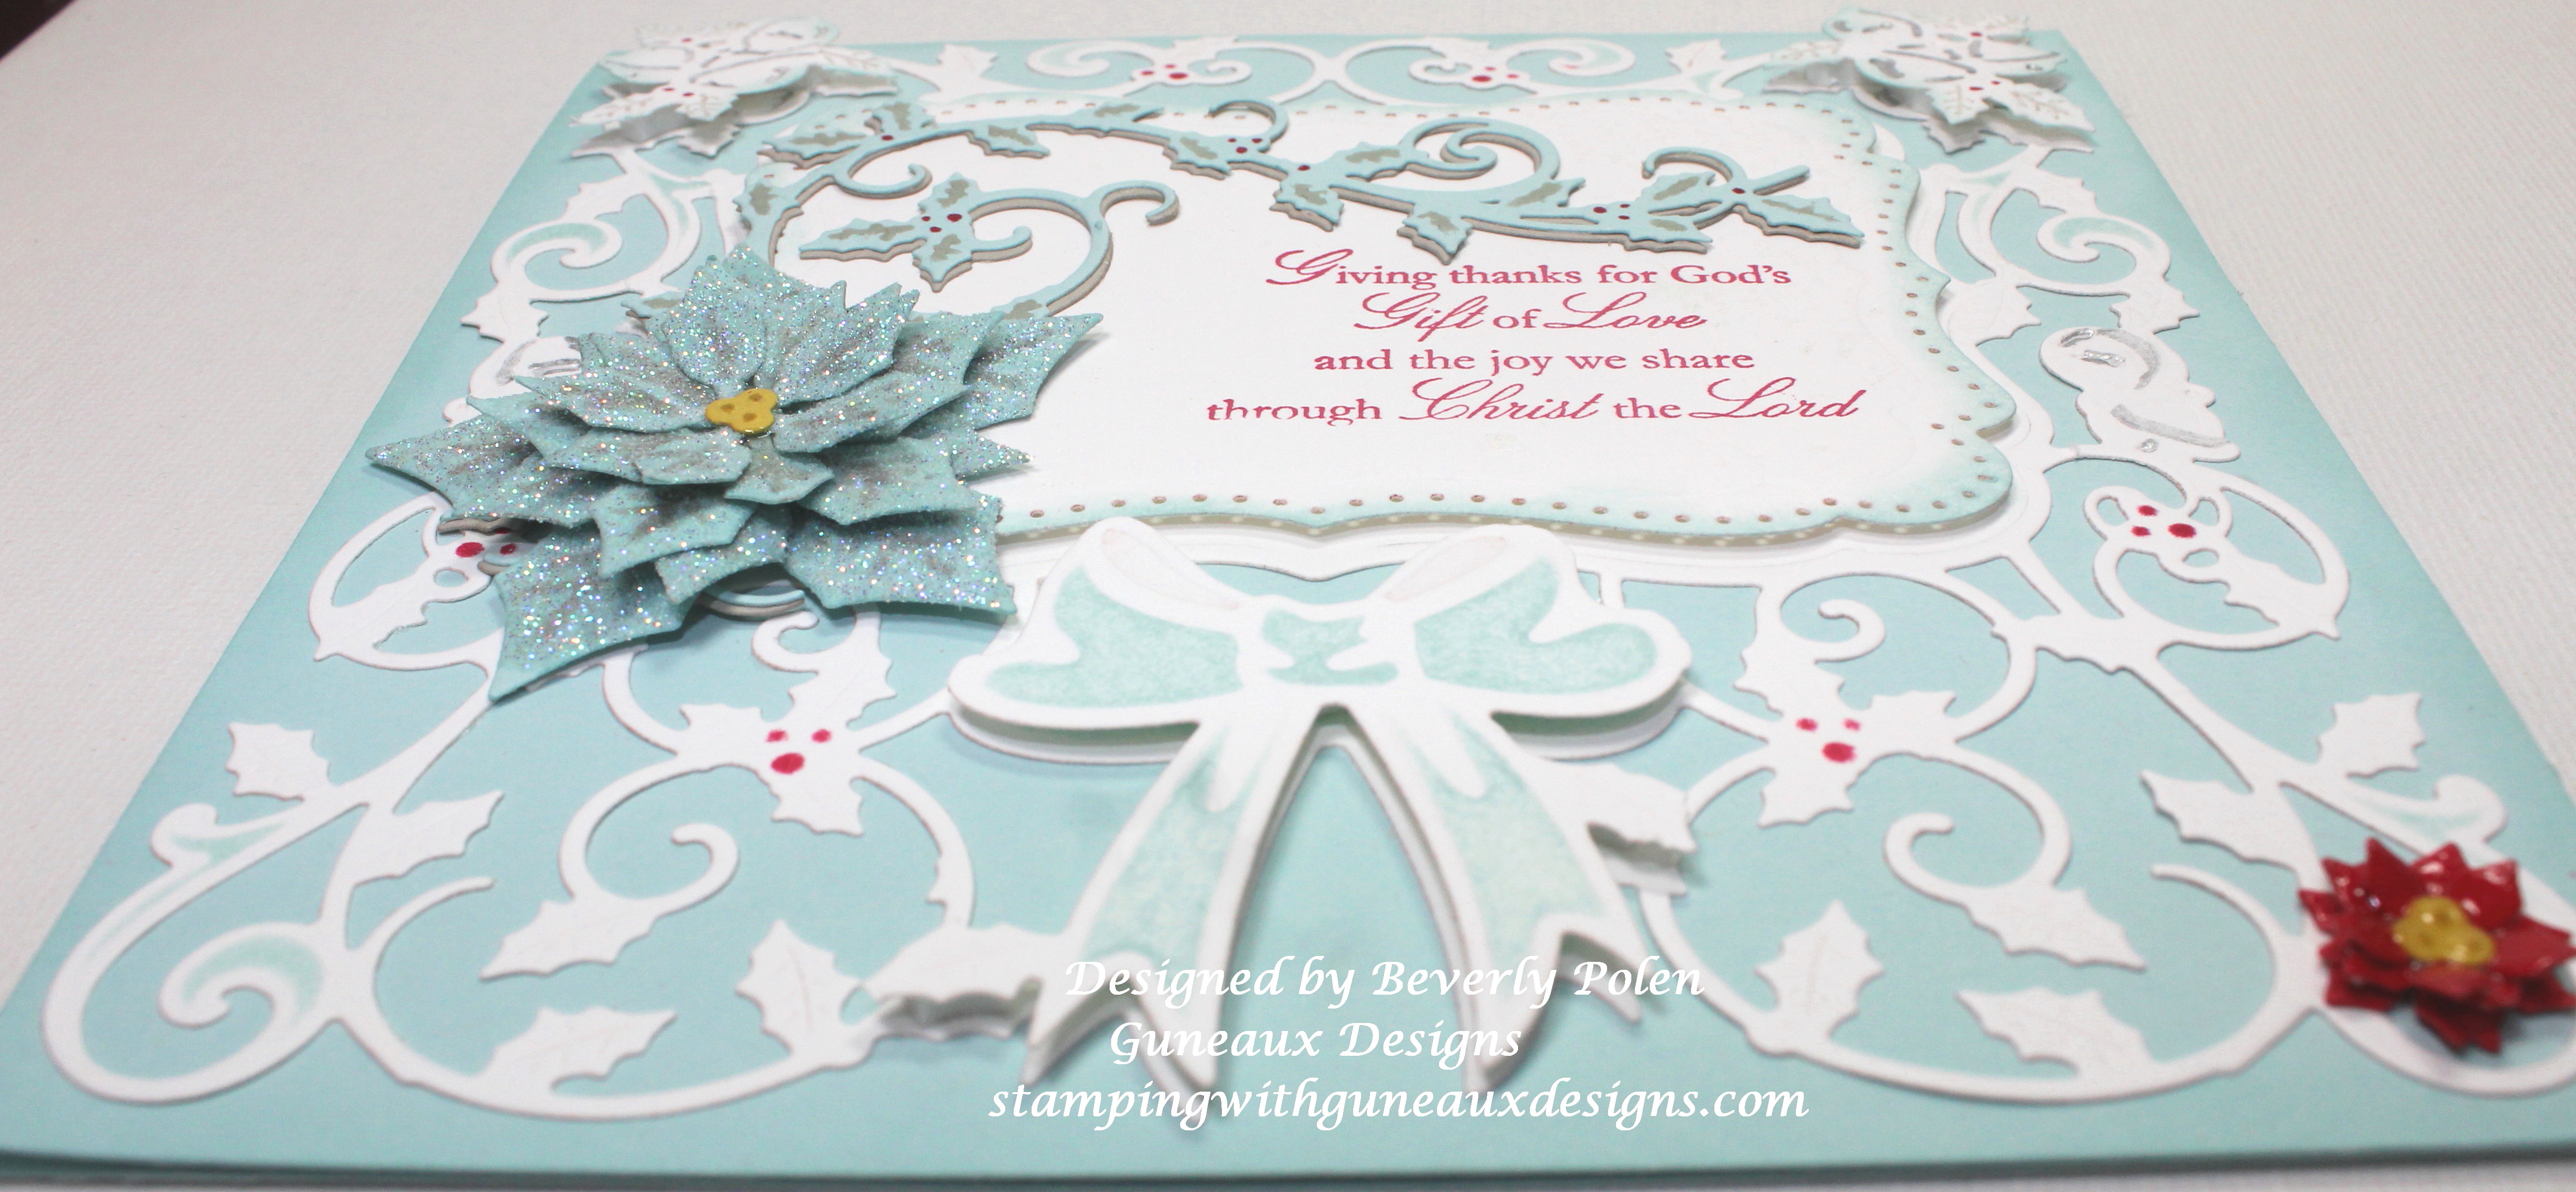
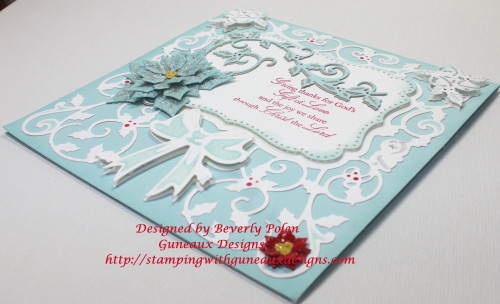
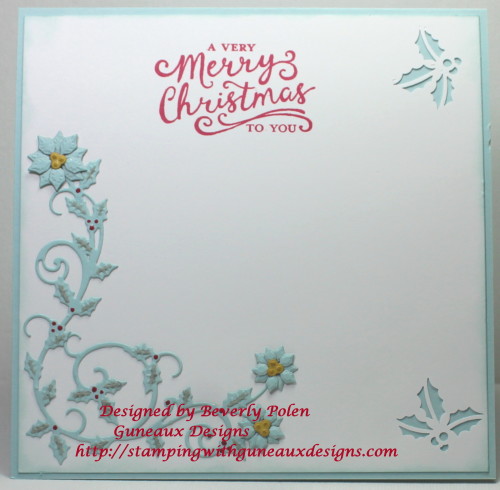
Have you seen blue poinsettias?  Here’s a picture of a group of them.  Aren’t they pretty? They are beautiful to me, but maybe that is because I love the color blue.  I guess there are a lot of colors of poinsettias.

blue_poinsettia

Back to my card!  The card measures 4-3/4″ x 5-1/2″ which is an odd size.  I made it this size so I could get on the card the elements I wanted.  Besides the Home for Christmas Designer Series Paper, the card also features Spellbinders Layered Poinsettia dies and Spellbinders Curved Borders Two dies.  For the left side of the card, I used the mistletoe design from the Stampin’ Up! Home for Christmas Designer Series Paper, Spellbinders Curved Borders Two Dies, and Stampin’ Up! Pacific Point Card Stock.

This picture is a closeup of the poinsettia that I created with the Spellbinders Layered Poinsettia dies.  I embossed the poinsettia with Stampin’ Up!’s Iridescent Ice Embossing Powder (101930).  I added a small amount of yellow and green glitter glue (i.e., Ranger Stickels) onto the center of the flower.  To further enhance the poinsettia, I added some “branches” behind the flower.  I used Martha Stewart’s Branch Medium Punch to create the branches.  The poinsettia sits upon an oval floral die cut from the Spellbinders Oval Floral dies.

Home For Christmas Designers Series Paper-Blue Poinsettia

I used the Spellbinders Curved Borders Two dies also for the inside of the card. Instead of using the Pacific Point Card Stock, as I did on the card front, I used the mistletoe design from the Home for Christmas Designer Series Paper when using the Curved Borders dies.

Home for Christmas Designer Series Paper Blue Poinsettia

Home for Christmas Designer Series Paper Blue Poinsettia

Select the pictures you want to pin onto www.pinterest.com before leaving!

I love hearing from you!  Please feel free to ask questions or leave comments!

Butterfly

God’s Blessings!

Stamping With Guneaux Designs

By

Beverly Polen

Home for Christmas Designer Series Paper Blue Poinsettia

Reason for the Season Pink Poinsettia

Hi, Stampers!  I have for you today a Pink Poinsettia card featuring the Stampin’ Up! Reason for the Season Stamp Set.  Do you like pink poinsettias?  I think they are very pretty.  Therefore, the color pink was my driving force when creating this card.  Plus, I like thinking outside the box and not going with the “normal”.  It’s more exciting!

Reason for the Season Pink Poinsettia

The card’s primary layer is a piece of Stampin’ Up!’s Whisper White Card Stock (100730) on which I stamped the poinsettia stamp from the Stampin’ Up! Reason for the Season stamp set.  I covered the poinsettia stamp with Versamark Ink, stamped it randomly around the card stock, and heat embossed the images using white embossing power.

Using Rose Red, Wild Wasabi, and So Saffron Stampin’ Up! Classic Inks, I sponged the inks over the embossed poinsettias.  I used the Festive Flower Builder Punch to make the pink poinsettia that sits at the bottom left of the card.  (NOTE:  You can get the Stampin’ Up! Reason for the Season Stamp Set and the Festive Flower Builder Punch as a “bundle” and save 15% on the cost.)  I embellished the poinsettia with yellow beads and a piece of gold elastic cord.

Reason for the Season - Pink Poinsettia

For the card’s sentiment, I ran a piece of whisper white card stock and a Spellbinders Nestabilities Oval Floral template (S6-028) through my Big Shot to produce the oval cutout. Using Wild Wasabi Classic Ink, I stamped the sentiment, “Jesus is the Reason for the Season” (from the Reason for the Season stamp set) onto the oval.

Reason for the Season Pink Poinsettia

TAKE TIME TO ENJOY OTHER CARD CREATIONS WHILE ON THE SITE!

Supplies Used for the Reason for the Season Pink Poinsettia project:

Stamps:  Stampin’ Up! Reason for the Season Stamp Set (139730)

Paper:  Stampin’ Up! Card Stock –  Whisper White (100730), Wild Wasabi (108641), and Pink Pirouette (111351)

Ink:  Stampin’ Up! Classic Ink – Rose Red (126954), Wild Wasabi (109014), So Saffron (126957), and Versamark

Accessories:  Stampin’ Up! Festive Flower Builder Punch (139682), Sizzix Big Shot, Spellbinders Nestabilities Oval Floral Template, Yellow Beads, Gold Elastic Cord, and White Embossing Powder

Reason for the Season Stamp SetStampin' Up! Festive Flower Builder PunchSpellbinders Nestabilities Oval Florol


Butterfly

God’s Blessings!

Stamping With Guneaux Designs

By

Beverly Polen

Reason for the Season Pink Poinsettia

Spellbinders Decorative Holly Frame and 5×7 Holly Frame

This is my first Christmas card for 2015, and it features the Spellbinders Decorative Holly Frame die set as well as the Spellbinders 5″x7″ Holly Frame die set.  Yes, the names of the dies seem one in the same.  However, they are two separate die sets, as you can see near the bottom of this post.  I think the card is very attractive. What do you think?

Spellbinders Decorative Holly Frame and 5X7 Holly Frame

The size of the Christmas card is 6″ x 6″ as the frame from the Spellbinders Decorative Holly Frame die set is too large to fit on a smaller sized card.

I think the Stampin’ Up! Soft Sky card stock is beautiful and the perfect color for this card. The splashes of red on the card make it pop!  Do you agree?  I used Stampin’ Up! Whisper White Card Stock for the Spellbinders Decorative Holly Frame cutout, and embossed it in several places with Stampin’ Up! Soft Sky ink. Notice the raised elements on the card in the following picture.  To get some dimension on the card, I recut the die and created duplicate bells at the top and the ribbon at the bottom of the card.

Spellbinders Decorative Holly Frame and 5x7 Holly Frame

Maybe you can see the raised elements better in the picture below.

Spellbinders Decorative Holly Frame and 5x7 Holly Frams

I made the Soft Sky poinsettia with Spellbinders Shapeabilities Layered Poinsettia dies. I used the Spellbinders 5×7 Holly Frame die set to create the small red poinsettia at the bottom-right of the card.  I also used this die set to create the holly vine that rests on top of the sentiment.  In an attempt to create a shadow of the holly vine, I recut the holly vine using the Stampin’ Up! Sahara Sand Card Stock.  I glued it underneath the Soft Sky holly vine, allowing 1/16″ of the Sahara Sand holly vine to show.  The sentiment on the card front is from a retired Stampin’ Up! stamp set, Come to Bethlehem.

The inside of the card is embellished with another Soft Sky holly vine that I attached to the Whisper White Card Stock.  The inside sentiment comes from the Stampin’ Up! Reason for the Season (139730) stamp set.

Spellbinders Decorative Holly Frame and 5x7 Holly Frame

The pictures below are of the Spellbinders Decorative Holly Frame and the Spellbinders 5×7 Holly Frame dies.

Spellbinders Decorative Holly Frame

Spellbinders 5x7 Holly Frame


Do you feel kind today?  Please leave comments or questions for me!  Thank You!

Butterfly

God’s Blessings!

Stamping With Guneaux Designs
by
Beverly Polen

Spellbinders Decorative Holly Frame and 5x7 Holly Frame