Ornament Keepsakes Stamp Set and Snow Festival Designer Series Paper

Here is my latest creation – a Christmas card featuring the Ornament Keepsakes Stamp Set and Snow Festival Designer Series Paper.  The card also features a rosette.

 Ornament Keepsakes Stamp Set

Closeup of the ornament and rosette Ornament Keepsakes Stamp Set

Side view of the ornament and rosette Ornament Keepsakes Stamp Set

Stampin’ Up! Supplies (unless otherwise noted) used to make the card featuring the Ornament Keepsakes Stamp Set:

Stamp SetOrnament Keepsakes Stamp Set (128051) and Greetings of the Season Stamp Set (128033)

Paper:  Baja Breeze Card Stock (111352), Cherry Cobbler Card Stock (119685), Whisper White Card Stock (100730), and Snow Festival Designer Series Paper (126908)

Ink:  Gumball Green Classic Ink (126861) and Cherry Cobbler Classic Ink (126966)

Accessories:  Stampin’ Up! Simply Scored Scoring Board (122334), Border Punch of your choice, 1-1/4″ Large Circle Punch (119861), Hot Glue, Holiday Ornaments Framelits (127816), Big Shot Die-Cutting Machine (113439), Corner Punch (119871), VersaMark (102283), Heat and Stick Powder (100625), Dazzling Diamonds (102023), and Heat Tool of your choice

Ornament Keepsakes Clear-Mount Stamp SetSnow Festival Designer Series PaperSimply Scored Scoring ToolGreetings of the Season Clear-Mount Stamp Set

       SU 1-1/4" Circle Punch Holiday Ornaments Framelits DiesBig Shot Die-Cut Machine - by Stampin' Up!


Instructions for making the card featuring the Ornament Keepsakes Stamp Set:

  • Cut an 8-1/2″ x 5-1/2″ piece of Baja Breeze Card Stock and fold it in the middle to create the card base,
  • Cut a 4″ x 5-1/4″ piece of the ornament design from the Snow Festival Designer Series Paper and round the edges with the 3/16″ Corner Punch,
  • Cut a 1-1/2″ x 11″ piece of Cherry Cobbler Card Stock and score it at every 1/4″,
  • OPTIONAL:  Using a border punch of your choice, punch along one of the 8-1/2″ side,
  • Accordion fold the card stock and adhere the ends together,
  • Punch a 1-1/4″ circle from Cherry Cobbler Card Stock with the 1-1/4″ Circle Punch,
  • With the accordian folded card stock standing up, use your fingers to push down the card stock,
  • Holding the card stock down and using hot glue, attach the 1-1/4″ circle on top and let dry,
  • Cover an ornament stamp (see picture of card) with Gumball Green Classic Ink and stamp onto a piece of Whisper White Card Stock,
  • Cut out the ornament with the appropriate Holiday Ornaments Framelits,
  • Cover the ornament with VersaMark and apply Heat and Stick Powder,
  • Heat set the powder, add Dazzling Diamonds, and heat set again, 
  • If a mat for the ornament is desired, lay the framelit onto Baja Breeze Card Stock, trace around the framelit, and cut out the mat,
  • Adhere the mat to the ornament (I covered the mat with Dazzling Diamonds),
  • Adhere the rosette to the DSP (I used hot glue),
  • Adhere the ornament on top of the rosette (I used hot glue),
  • Cover the “Merry Christmas” sentiment in Cherry Cobbler Classic Ink (from the Greetings of the Season set) and stamp onto Whisper White Card Stock,
  • OPTIONAL:  Decorate the sentiment,
  • Adhere the sentiment to the bottom of the DSP, and
  • Adhere the decorated DSP to the Baja Breeze card base. 

 If you follow these instructions but have a question, please don’t hesitate to leave your question in the comment section.

God’s Blessings!
Stamping With Guneaux Designs
by
Beverly Polen
Enjoy the Ornament Keepsakes Stamp Set and the Greeting Card!


Peace on Earth Christmas Card 2012 – Stamping With Guneaux Designs

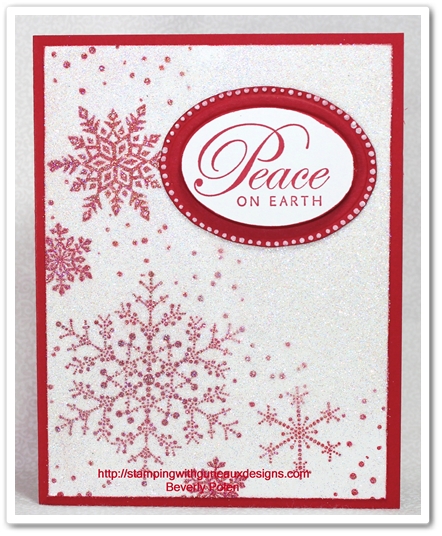
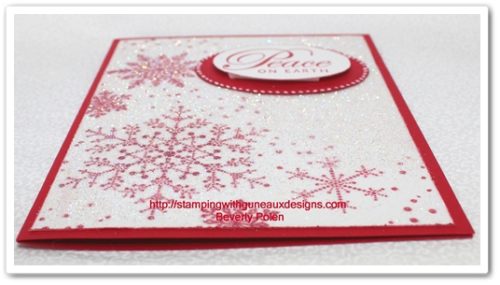
Have you finished making your Christmas cards for this year?  If not, I have a Peace on Earth Christmas Card for you that is an extremely easy Christmas card to make.

Snowflakes are so beautiful on Christmas cards, don’t you think so?  I have two retired Stampin’ Up! snowflakes stamp sets so I didn’t purchase the beautiful Snowflake Soiree stamp set in the current Holiday Catalog.  I decided to use the two sets that I have to create this card.  You can use any snowflake stamp set to create the same card.

Are you thinking that snowflakes are not red?  That’s the beauty of paper crafting.  You can create artwork the way you want it and it doesn’t have to reflect reality.

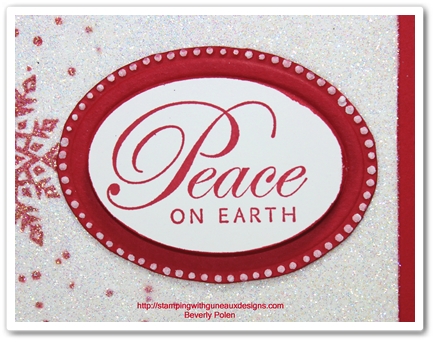
This is a closeup of the sentiment on the Peace on Earth Christmas Card.

Supplies used to make the Peace on Earth Christmas Card:

Stamp Sets:  Snowflake Spot (retired), Snowflakes (retired), and Greetings of the Season

 Ink:  Real Red Classic (126949)

Paper:  Whisper White Card Stock (100730) and Real Red Card Stock (102482)

Accessories:  VersaMark (102283), Heat and Stick Powder (100625), Dazzling Diamonds (102023), Heat Tool of your choice, Oval Designer Frames Embossing Folder (123130), Extra Large Oval Punch (119859), Stampin’ Dimensionals (104430), and White Gel Pen (105021)

Instructions for making the Peace on Earth Christmas Card:

  • Cut a 4″ x 5-1/4″ piece of Whisper White Card Stock,
  • Randomly stamp snowflakes in Real Red Classic Ink onto the Whisper White Card Stock (see picture),
  • Cover the card stock with VersaMark,
  • Cover the card stock with the Heat and Stick Powder and heat set,
  • Cover the card stock with Dazzling Diamonds and heat set,
  • Using the Oval Designer Frame Embossing Folder, emboss the frame onto a piece of Real Read Card Stock,
  • Cut out the embossed frame,
  • Using the White Gel Pen, apply ink on the dots around the frame (see picture),
  • Stamp the sentiment in Real Red Ink onto a piece of Whisper White Card Stock,
  • Cut out the sentiment with the Extra Large Oval Punch,
  • Attach the sentiment onto the embossed frame with Dimensionals,
  • Adhere the sentiment onto the upper-right of the Whisper White Card Stock (see picture), and
  • Cut a 8-1/2″ x 5-1/2″ piece of Real Red Card Stock, fold in half, and adhere the decorated Whisper White Card Stock.

God’s Blessings!
Stamping With Guneaux Designs
by
Beverly Polen
Enjoy the Peace on Earth Christmas Card!

Stampin Up Ornament Keepsakes

I think that the Stampin Up Ornament Keepsakes (128051) stamp set and its matching Holiday Ornaments Framelits (127816) are my favs in the Stampin Up Holiday Catalog.  I love any Christmas-related rubber stamp, but I especially love ornament rubber stamps.  The card I am sharing today features both of the Stampin Up products.

Stampin Up Ornament Keepsakes

This picture is a closeup of the ornaments. Stampin Up Ornament Keepsakes

This picture’s intent is to provide a closeup of the Dazzling Diamonds added to the center of the snowflakes. 

Stampin Up Ornament Keepsakes Christmas Card

This picture provides a dimensional view. Stamping Up Ornament Keepsakes Christmas Card

SUPPLIES USED FOR THE STAMPIN UP ORNAMENT KEEPSAKES CHRISTMAS CARD:

 Stamp Sets Stampin Up Ornament Keepsakes (128051) and Come to Bethlehem (120591)


Ornament Keepsakes Clear-Mount Stamp Set
Ornament Keepsakes
Come To Bethlehem - Clear-Mount Stamp Set - by Stampin' Up!

Come To Bethlehem


Paper:  Whisper White Card Stock (100730), Brush Gold Card Stock (102935), and Always Artichoke (105119)

Ink:  VersaMark (102283)

Accessories:  Big Shot Die Cutting Machine (113439), Embossing Buddy (103083), Gold Stampin’ Embossing Powder (109129), Dazzling Diamonds Stampin’ Glitter (102023), White Stampin’ Embossing Powder (109132), Heat Gun of your choice, and two retired products – Snow Burst Embossing Folder and Gold Elastic Cord

Holiday Ornaments Framelits Dies

Holiday Ornaments Framelits


 INSTRUCTIONS FOR MAKING THE STAMPIN UP ORNAMENT KEEPSAKES CHRISTMAS CARD:

  • Cut an 8-1/2″ x 5-1/2″ piece of Brush Gold Card Stock, score it down the middle, and fold for card base.
  • Cut a 3-3/4″ x 5″  piece of Whisper White Card Stock, place inside a textured embossing folder (I used the retired Snow Burst), and run it through the Big Shot Die Cutting Machine.
  • Center the appropriate Holiday Ornament Framelit (shown in above picture at the bottom left) onto the center of the embossed Whisper White Card Stock and run it through the big shot.
  • Cover with VersaMark Ink the appropriate Ornament Keepsakes stamp (shown in above picture at the top left) and stamp onto Whisper White Card Stock (do this twice).
  • Cover with Gold Embossing Powder and set with the Heat Gun.
  • Using the appropriate framelit, cut out the two ornaments.
  • Center the embossed Whisper White Card Stock over the center of the Brush Gold card base (use temporary adhesive to keep it in place).
  • Cover with VersaMark the word, Merry, on the “Merry Christmas” sentiment stamp from the Come to Bethlehem stamp set and stamp it in the area shown in the first picture above.
  • Do the same with the word “Christmas” and stamp in below the “Merry” that you just stamped onto the card base.
  • Remove the Whisper White embossed card stock.
  • Cover both words with White Embossing Powder and set with the Heat Gun.
  • Using a gold marker, ink around the ornaments and the Whisper White card stock.
  • Adhere the Whisper White card stock to the card base.
  • OPTIONAL:  Cut two small pieces of Always Artichoke card stock and using scissors, cut at an angle down both sides of each piece to create a branch.  Add glue and dazzling diamonds in the middle to create snow.
  • Use twine, cord, or other thread and attach to each ornament, and attach dimensionals to the back side of each.
  • If you made the branches, use dimensionals to attach at the top of the Whisper White card stock, wrap the cord (attached to the ornaments) around the branches according to the picture.
  • Remove the paper from the dimensionals and adhere the ornaments to the card front as shown in the first picture above.
God’s Blessings!
Stamping With Guneaux Designs
by
Beverly Polen
Enjoy your Christmas card made with Stampin Up Ornament Keepsakes stamp set!

Stampin Up Ornament Keepsakes Bundle

The Stampin Up Ornament Keepsakes Bundle (129950) consisting of the ornaments stamp set and Holiday Ornaments Framelits  (127816) are wonderful for creating this year’s Christmas cards.  Couple the Stampin Up Ornament Keepsakes Bundle with the Snow Festival DSP  (126908) and you have a beautiful and simple Christmas card like the one I am sharing today.

Stampin Up Ornament Keepsakes Bundle

I love the Snow Festival DSP as it provides such easy ways to make beautiful cards.  The Baja Breeze and Primrose Petals colors in the design from the DSP that I chose to use are so pretty together.

Stampin Up Ornament Keepsakes Bundle

The following picture provides a closeup of the ornament and Primrose Petals 3/8″ Stitched Satin Ribbon (126844) bow.  The Merry Christmas sentiment that I stamped on the ornament is from the  Come to Bethlehem stamp set (120591).  I used VersaMark (102283) on the stamp and embossed the sentiment with White Embossing Powder (109132).

Stampin Up Ornament Keepsake Bundle

 Stampin Up Ornament Keepsakes Bundle

If you want easy Christmas cards to make this year, use the Snow Festival DSP!  It’s great for that purpose.

Thanks for stopping by and I hope you enjoyed the card!

Stampin Up Supplies Used (other than those mentioned above):

Paper:  Baja Breeze (111352) and Whisper White Card Stock (100730)

Ink:  Primrose Petals Classic Ink (126858)

Accessories:  Sticky Strip (104294) and Dimensionals (104430)

God’s Blessings!
Stamping With Guneaux Designs
by
Beverly Polen 

Snow Festival DSP – Cascading Card – Stamping With Guneaux Designs

The Stampin’ Up! Snow Festival DSP (126908) has such gorgeous designs with which to create many cute cards.  I don’t know which design I like best!

I love the Christmas themes, gorgeous owls, snowflakes, houses, ornaments, and all of the little designs within the Snow Festival DSP (126908).  One sheet of the DSP provides 16 different 3″ squares that can be used  as a card front.  I used that paper to create my card share for today.

Here’s the card I made, a cascading card, and it is my very first one!  I had a blast making it.

Snow Festival Designer Series Paper

The below picture is a  view of the left side of the card.  From this picture you can see the Snow Festival DSP design that I used on the front side of the panels of the cascading card.

Snow Festival DSP

This is a view of the right side, showing the design I used for the back side of the panels.

Stampin Up Snow Festival DSP

This is the back of the card where I will write my Christmas note to the recipient (my grandchild): Snow Festival DSP

This is a closeup of the front of the card:

Snow Festival DSP

I cut from one of the squares mentioned above the “Merry Christmas” sentiment.  I trimmed the corners and covered it with Crystal Effects (101055).  Love, love the owl that rests upon the sentiment.

The following pictures are closeups of the embellishments that I attached to the top of the panels of the cascading card.  Snow Festival DSP

 (I cut out the owls from the Snow Festival DSP — so cute!)

 Snow Festival DSP

 (The ornaments are from the Stampin’ Up! Ornaments Keepsakes Stamp
Set (128051), which were cut using the Holiday Ornaments Framelits (127816).)


God’s Blessings!
Stamping With Guneaux Designs
by
Beverly Polen

The special time of the year that we Stampin’ Up! crafters look forward to will begin on January 22, 2013.  What is that??  SALE-A-BRATION!! It will end on March 22, 2013!  Put this on your calendar!!


Candlelight Christmas DSP

The Stampin’ Up! Candlelight Christmas DSP has, for the most part, beautiful designs with which you can make gorgeous paper crafts.  However, personally the brown designs seem less like Christmas to me.  Despite my perception, there are certainly ways to use the brown designs to create very attractive cards. 

So what is a good way to use the browns from the Candlelight Christmas DSP to create an attractive card?  As I shared in my  October 25 post, use such designs as secondary elements on your project.  For example, the card below features one of the brown designs from the Candlelight Christmas DSP, however, the design is in the background.  If it were in the foreground, the card would seem less attractive to me.  But, again, it’s a personal choice.  

Candlelight Christmas DSP

This card features a poinsettia stamp that I’ve had for years.  I decided to use the stamp to create my primary focus on the card.

Candelight Christmas DSP

 Here is a closeup of the poinsettia.  I just have not found a poinsettia stamp that I like as much as I do this one.  I used a permanent marker to color yellow one Large Basic Pearl (125577) and eight Basic Pearls (119247) for the center of the poinsettia.  I also used glitter glue to embellish the flower.

Candlelight Christmas DSP

This picture is a closeup of the sentiment from the Stampin’ Up Greetings of the Season stamp set (128033) that I stamped on Very Vanilla Card Stock (101650) in Early Espresso (119680) and Real Red (100052) inks (Stampin’ Write Markers).  I used one of the Apothecary Accents Framelits (127003) to cut out the sentiment and matted it with Early Expresso Card Stock (119686).  The sentiment is embellished with a Basic Pearl which I colored brown with a permanent marker.

Candlelight Christmas DSP

Click to check out more Guneaux Designs projects using the Candlelight Christmas DSP:

Click to check out many other paper crafts designed with the Candlelight Christmas DSP!

God’s Blessings!
Stamping With Guneaux Designs
by
Beverly Polen