Stampin Up Box Card – Holly Berry DSP

Stampin Up Box Card – Holly Berry DSP

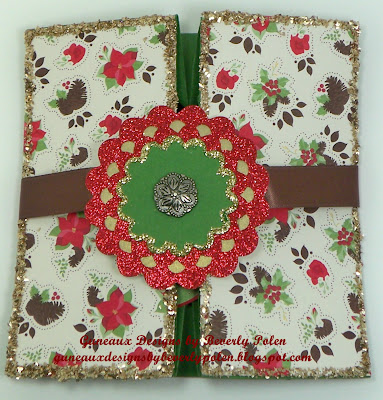
I am excited to share with you my Holly Berry DSP Stampin Up box card that is made with the Stampin Up Holly Berry Bouquet Specialty Designer Series Paper (DSP) and Pines & Poinsettias stamp set.
Stampin Up Box Card - Holly Berry DSP

Inside the box card are several gifts tags to be used when wrapping presents.  The tags were made with several of Stampin’ Up! stamp sets.

Stampin Up Box Card - Holly Berry DSP

The sentiment in the bottom of the box is from the Stampin Up God’s Blessings stamp set.

Other Stampin’ Up! products used in making the Stampin Up box card are:

Card Stock:  Garden Green,Brushed Gold, and Red Glimmer Paper
Ink:  Real Red, Chocolate Chip, and Garden Green
Accessories:  Chocolate Chip 5/8″ Satin Ribbon,Perfect Pennants Bigz L Die, 1-3/4″ Scallop Circle Punch, Antique Brads , and Champagne Glitter Glass

Purchase the project products by clicking on the links above.
God’s Blessings!
Guneaux Designs by Beverly Polen
Stampin’ Up! Demonstrator in FL
FIRM RELIANCE ON DIVINE PROVIDENCE!

How to Make a Waterfall Card

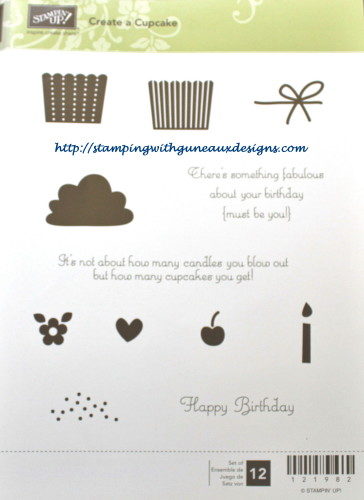
Have you wanted to learn how to make a waterfall card?  I hope so, as today I have for you a How to Make a Waterfall Card Tutorial!  The waterfall card shown here is a Happy Birthday card that features the Stampin’ Up! Create a Cupcake Stamp Set (121982).

HOW TO MAKE A WATERFALL CARD TUTORIAL

1. Select your card stock, designer series papers (DSP), brads, stamp sets, jewels, etc., that you want to use to create your waterfall card.

2. Cut and fold in the middle a 5-1/2″ x 8-1/2″ piece of card stock to form a 4-1/4″ x 5-1/2″ card base on which the waterfall construction will be attached.  Set to the side.

3. Using card stock and DSP, create the first and second layers for the card. Do not adhere them to the card base until the last step as you’ll need to attach the waterfall construction to these layers BEFORE adhering them to the card base.

4. Cut a 3/4″ x 4″ piece of card stock.

5. Cut a 2-1/4″ x 8-1/2″ piece of card stock of a different color.

6. Cut four 2-3/4″ square pieces of card stock, four 2-1/2″ square pieces of a different color of card stock, and four 2-1/4″ square pieces of Whisper White card stock. The pieces from the two colored card stock will form the mat for the Whisper White card stock that will contain your desired stamp images, punched items, etc.

7. Score the 8-1/2″ piece of card stock at the 1-1/2″, 2″, 2-1/2″, 3″, and 3-1/2″ measurements.

8. To adhere the piece of card stock cut in Step 4, turn the scored piece of card stock (henceforth called template) vertically so the score lines are below the top.  Attach Sticky Strip to the very top of the card stock (I added two pieces just to ensure good adhesion as the constructed waterfall will be heavy).

9. Remove the red tape and horizontally attach the 3/4″ x 4″ piece of card stock from Step 4 to the very edge of the template. Ensure it is centered.

10. Punch a hole at both ends of the 3/4″ x 4″ piece of card stock to add brads. The brads need to be substantial as they will attach the waterfall construction to the card base (you could actually wait until you’re ready to attach the waterfall construction to the card base before you insert the brads).

11. Using the square pieces of card stock from Step 6 and stamps, punches etc., create the waterfall pieces (i.e., the matted pieces of card stock  and stamped image(s) that will be added to the template – see example).


12. (a) Begin constructing the waterfall. The waterfall for this card will flow vertically; therefore turn the template so it is vertical and add the squares in a vertical fashion. If you want the waterfall to flow horizontally, turn the template horizontally and add the squares to the template in a horizontal fashion. (The following picture is turned horizontally just to identify the “areas” of the template.)


(b) Place adhesive in Area 1 (see the two pictures). Beginning with the matted square that you want to be LAST in the waterfall, adhere it to the template.

13. Place adhesive in Area 2 and add the matted square that you want to be the NEXT TO THE LAST waterfall piece. Continue until you’ve attached all four waterfall pieces, with the front piece added to area 4.

14. Fold the template at the top score line at area 4 so it falls behind the constructed waterfall and the tab falls at the bottom (see picture). Decorate the tab if so desired.

14. If you already attached the brads, you may need to remove them so you can line up the waterfall construction piece onto the card layers (created in step 3). Based on the punched holes on the horizontal 3/4″ x 4″ piece of card stock, identify and mark where to punch holes into the card layers, and punch them. Insert the brads through the waterfall construction piece and the card layers, turning down the brads’ extensions. Do NOT add adhesive any where on the completed waterfall piece or it will not work.

15. Adhere the card layers and waterfall piece to the front of the card base.

16. Pull the tab vertically and watch your waterfall in action.  ENJOY!


God’s Blessings!
Guneaux Designs by Beverly Polen

Zentangle Maple Leaf

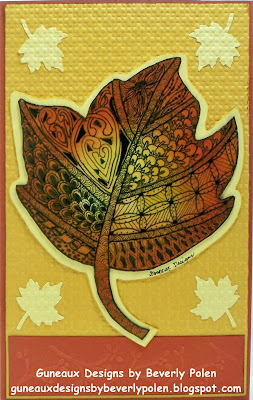
I love creating art using zentangling, therefore, I have for you today a Zentangle Maple Leaf card.  Actually, the correct action word is tangling when speaking of performing the art. 

I think the fall time of the year is so beautiful, and I don’t get to experience the beautiful transformation of trees while living in Florida. To create my own feel of the fall, I made this Zentangle Maple Leaf card.

 Zentangle Maple Leaf

 
I used eight different, official Zentangle® patterns on the maple leaf. The fun of zentangling is that you can create your own patterns if desired; however, I choose official patterns.
 
For some history about Zentangle®, it is a new form of art created by Maria Thomas and Rick Roberts. Because I am not a Certified Zentangle® Teacher, I prefer not to attempt to teach how to zentangle. However, you can learn more about this new art on Maria and Rick’s website, http://www.zentangle.com.
 
As for the Stampin’ Up! products used for the card, they are:
 
 
To purchase Stampin’ Up! products, click here or on the links above. Hope you enjoy the card!
 
God’s Blessings!
Stamping With Guneaux Designs
by
Beverly Polen
Stampin’ Up! Demonstrator in FL
guneauxdesignsbybeverlypolen.stampinup.net
Enjoy the Zentangle Maple Leaf Card!

Zentangle Pumpkin

10-9-11 UPDATE: I just discovered that my Zentangle Pumpkin was featured as an article for last weeks’ “roundup” on a Certified Zentangle® Teacher’s website, Tangle Harmony! I don’t know the teacher, but what an honor to have my Zentangle Pumpkin be featured! This is so exciting!!

___________________________

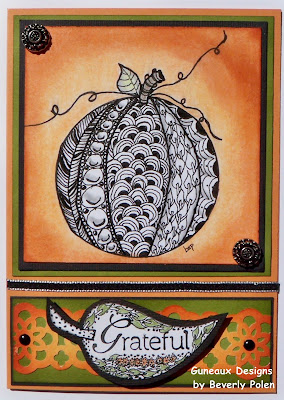
My project share today is another Stampin’ Up! Greeting Card featuring the art of Zentangle®! The main element on this card is the pumpkin, which I drew and included several Zentangle® patterns. I hope you like it as much as I do. I’m really getting into tangling, and I think it adds a nice touch to Stampin’ Up! products. Have you tried tangling yet?

 ZENTANGLE PUMPKIN 

Zentangle Pumpkin

If you have an interest in learning the art of Zentangle® to include on your Stampin’ Up! crafts, google the word “zentangle” and you’ll find lots of patterns. Unfortunately I can’t instruct you on the patterns I used on both the pumpkin and sentiment, but I certainly can share the Stampin’ Up! products that I used.

Speaking of Stampin’ Up! products, did you know that Stampin’ Up! rubber stamps were listed in the October 2011 issue of the Creating Keepsakes magazine as one of the TOP 10 MUST HAVES? Gosh, did they ever get that right!!

Supplies:

Stamp Set: Always Thankful (page 19 of the Holiday Mini Catalog)
Cardstock: Peach Parfait, Old Olive, Basic Black, and Whisper White
Ink: Peach Parfait, Tangerine Tango, Cajun Craze, and Basic Black
Accessories: Antique Brads, Brads-Neutrals (Basic Black), Lace Ribbon Border Punch, Leaves #2 Die, and Basic Black Taffeta Ribbon

Buy the Stampin’ Up! products for this project by clicking on the links above. You’ll be taken directly to the product on my on-line store.

God’s Blessings!
Stamping With Guneaux Designs
by Beverly Polen
Stampin’ Up! Demonstrator in FL
 
Hope you enjoy the Zentangle Pumpkin! 

Stampin Up Simply Scored Tool

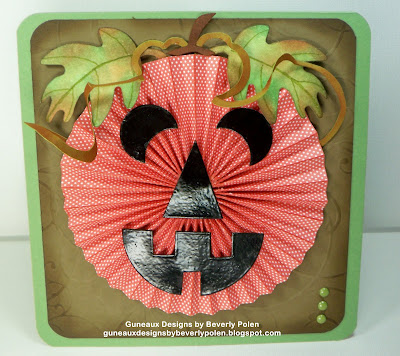
STAMPIN UP SIMPLY SCORED TOOL.  Thanks for stopping by to see my Stampin’ Up! Greeting Card feature for today!  It is a Happy Halloween greeting card that highlights the new Stampin Up Simply Scored Tool.  I had fun making the card and I think it is so cute!  What do you think?

Stampin Up Simply Scored Tool

FRONT VIEW

The card’s base is Wild Wasabi Cardstock, topped with Soft Suede Cardstock that I ran through the Big Shot, using one of theStampin’ Up! Backgrounds1 Texturz Plates.

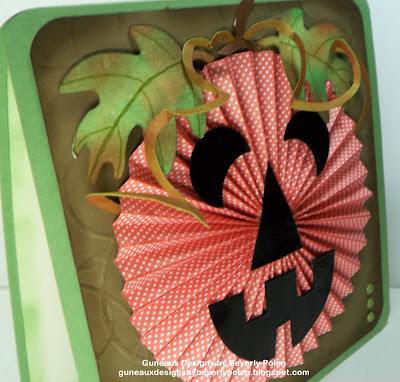
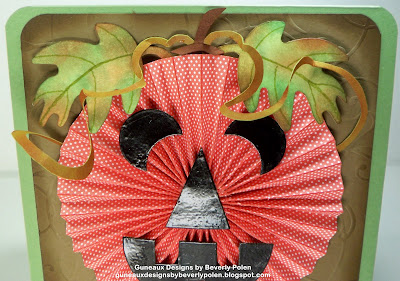
The primary element on the card is the pumpkin that I made using the new and MUST HAVE Stampin Up Simply Scored Tool and a Calypso Coral design from the Stampin Up Berry  Blossoms Designer Series Paper (DSP).  Cutting two 2″ x 9″ strips of the DSP, I used the scoring tool to score the DSP at every 1/2″ on one side.  I then turned the DSP over and scored  at every 1/2″, starting 1/4″ from the first score line on the front side (do this for both pieces).  After scoring, the scores lines will be 1/4″ apart.  I folded the score lines in an accordion fashion and glued the ends of both pieces together to form the pumpkin.

The pumpkin’s face is made with Black Cardstock that I embossed with Stampin Up Black Embossing Powder to give it a shine.   I used the 1-1/4″ Circle Punch to make the pumpkin’s eyes, cutting a portion from them.  The nose was made with the Petite Pennants Punch, and the mouth with the 2-1/2″ Circle Punch (I cut the circle in half and cut sections for the teeth).  What do you think of the face?

Stampin Up Simply Scored Tool

SIDE VIEW

I share the side view to provide a better view of the 3-D parts of the card.

The inside of the card includes the sentiment,“Happy Halloween” from the new Stampin’ Up! Hand-Penned Holidays Stamp Set.

Stampin Up Simply Scored Tool

CLOSE UP OF LEAVES AND VINES

I cut the leaves with Whisper Whitecardstock and theStampin’ Up! Leaves #2 Originals Die.  Using  Stampin’ Up! Sponge Daubers, I colored the leaves with Certainly Celery, Pear Pizzazz, and Garden Green Ink.  Then I used Cajun Craze Ink on selected spots of the leaves.

For the vines, I used the 1-1/4″ Circle Punch to cut a circle from Wild Wasabi cardstock.  I covered it with Cajun Craze ink.  Starting from the outside of the circle and moving toward the middle, cutting in a circle motion.  I then pulled the circle apart to create the pumpkin vines.

If you haven’t seen the Stampin Up Simply Score Tool yet, here is a picture.  If you haven’t already, you should buy this product as it works very efficiently.  It’s the best scoring tool that I have used.  And the three place markers that are included with the tool make it so easy to make repetitive scores as you use them to mark your correct score lines.  No mistakes made with this tool!!  Buy it; you’ll love it too.

Stampin Up Simply Scored Tool
It is quite simple to purchase the products used for this project.  Just place your cursor over the product names in my post and  left double click.  The products will come up for purchase at my 24/7 Stampin’ Up store.

God’s Blessings!
Guneaux Designs by Beverly Polen
Stampin’ Up! Demonstrator in FL
Beverly@stampingwithguneauxdesigns.com
http://stampingwithguneauxdesigns.com
FIRM RELIANCE ON DIVINE PROVIDENCE!
HAVE GREAT FUN MAKING STAMPIN’ UP GREETING CARDS AND PAPER CRAFTS!

SU Paisley Petals Purse and Greeting Cards

My friends, I have another Stampin’ Up! Paisley Petals Purse and Greeting Cards personally-designed for you.  I am so enjoying my new line of creations using the Paisley Petals Designer Series Paper (DSP).  It has been great fun creating purses lately.  Today I’ll discuss the purse and show closeups of it, and the rest of the week I’ll discuss the greeting cards.

This purse measures 8″ x 7-1/2″ x 1″, and it easily holds the three matching cards.  Actually, it will hold at least five, depending upon the embellishments added to the cards.

The handle of the purse was made by braiding two strands of Baja Breeze Seam Binding and one strand of Very Vanilla Seam Binding.  The purse front is made with Baja Breeze Card Stock, Paisley Petals DSP, and Baja Breeze DSP Patterns (unavailable).  The center piece of the purse is embellished with three Baja Breeze Vintage Flowers and several Basic Pearls Jewel Accents.


On the side of the purse are a Trinket Key and Vanilla Pearl Simply Adorned Bauble that are attached with Baja Breeze Seam Binding and part of the handle that was made with one of the Lots of Tags Stampin’ Up! Sizzlits.

The last picture shows the inside of the purse that is designed with the reverse side of the Baja Breeze DSP Patterns that is on the front and sides of the purse.  I hope you’ve enjoyed my personally-designed purse!

I am looking forward to my next purse design!
 If you would like to purchase any Stampin’ Up! Products, click HERE.
 TODAY AND TOMORROW ARE THE LAST TWO DAYS OF SALE-A-BRATION!
God’s Blessings!
Guneaux Designs by Beverly Polen
Stampin’ Up! Demonstrator in Florida
FIRM RELIANCE ON DIVINE PROVIDENCE