Christmas Tree Angel Topper

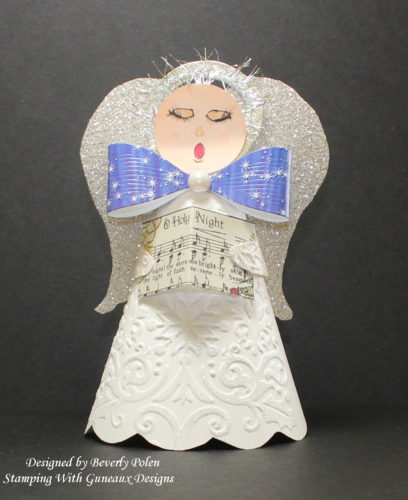
Hello, and thanks for stopping by!  Today I have for you a beautiful Christmas Tree Angel Topper.  I made it for one of Splitcoaststampers Falliday Fest Challenges, FF16annsforte3, to make an angel card or ornament angel using Ann Forte’s provided template.  I created my angel as an ornament.  (Click HERE for the template.)

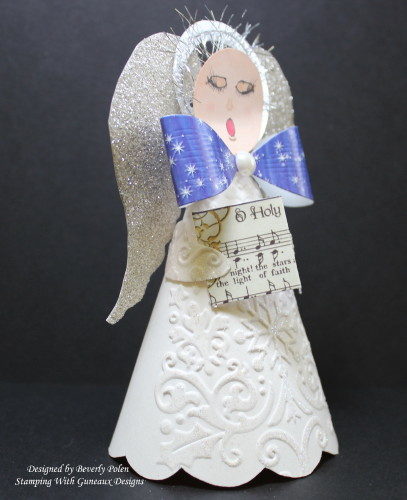
christmas-tree-angel-topperI cut out all the pieces from Ann’s template using SU Shimmery White Card Stock, Silver Foil, and Silver Glimmer Paper.  I used a Christmas Tree Embossing Folder to emboss the angel’s body and then added the SU Heat and Stick Powder and SU Dazzling Diamonds Glitter (can’t see this in the photo).

I glued the body together, attaching the Silver Glimmer wings onto the back.  As for the job of creating a face, well, let me say I have MANY faces on my crafting table.  After a while, I gave up and used the one that is attached to the silver foil and tinsel halo.  I used ODBD paper to create the bow and added a SU basic pearl to its center.  I cut a 1” x 2” piece of ODBD paper for the sheet music that the angel is holding in her hands.

christmas-tree-angel-topper-2_1


Paper: SU Shimmery White, SU Silver Foil, SU Silver Glimmer Paper, and ODBD Christmas Card Collection 2015 and 2016

Ink: Copics

Accessories: Ann Forte’s Angel Template, Cuttlebug Christmas Tree EF, SU Silver Trim Tinsel, VersaMark, SU Heat and Stick Powder, and SU Dazzling Diamonds Glitter


Butterfly_1_1

God’s Blessings!

Stamping With Guneaux Designs By Beverly Polen

Firm Reliance on Divine Providence! 

During Jesus’ ministry, He instructed us to love our enemies.  He said:  “But I tell you who hear me:  Love your enemies, do good to those who hate you, bless those who curse you, pray for those who mistreat you.” Luke 6:27-28

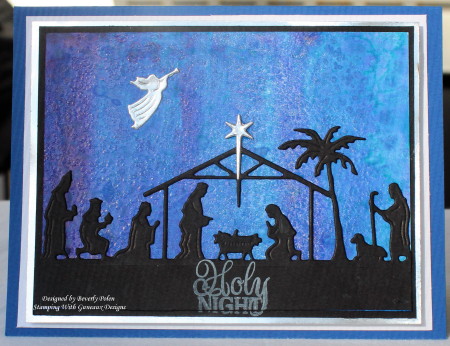
ODBD Holly Night Nativity Scene

Hello, my friends!  Thank you for stopping in to see my latest card featuring the ODBD Holly Night Nativity Scene.  I made this card for the Splitcoaststampers Falliday Fest Challenge, FF16UnderstandBlueB, to use the salted watercolor technique on a card (link to a tutorial is below).

nativity-scene_1

I am sccod-buttono blessed by Our Daily Bread Designs, Angie Crockett, as she selected this card for the ODBD Customer Card of the Day!  I am so grateful to ODBD for such an honor!!


Stamps: ODBD Delightful Decoration (sentiment)

Paper: Solar White, SU Glossy White, Basic Black, Silver Foil, and Brilliant Blue Card Stock

Ink:   SU Brilliant Blue, Ballet Blue, and Whisper White (sentiment)

Accessories: ODBD Holy Night Dies, Water, Silver Watercolor Brushes, Salt, and Foam Tape

Techniques: Salted Watercolor  (Click HERE for a tutorial)


Butterfly_1_1

God’s Blessings!

Stamping With Guneaux Designs By Beverly Polen


Paul’s Charge to Timothy:  “Command those who are rich in this present world not to be arrogant nor to put their hope in wealth, which is so uncertain, but to put their hope in God, who richly provides us with everything for our enjoyment.  Command them to do good, to be rich in good deeds, and to be generous and willing to share.”  1 Timothy 6:17-18

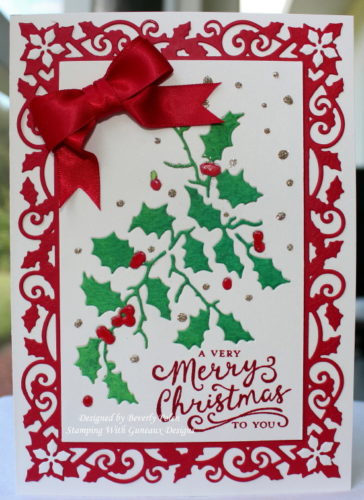
FF16hbrown, Holly Jolly Christmas

This card is my submission for Holly’s (Hbrown) Falliday Fest Challenge, FF16hbrown, on Splitcoaststampers. She asked to see creations with holly leaves and berries.  Thus, my card is titled Holly Jolly Christmas!

holly-jolly-christmas_1

Using a piece of SU Shimmery White Card Stock and Tim Holtz Mixed Media Christmas Dies, I die cut the holly and berries. I had not used this die before, so I was surprised that the die cuts were in several pieces verses one piece. I had hoped to die cut holly and berries from green and red card stock and just drop them into the negative panel in one piece. Well, that didn’t work out.

Therefore, I decided to use a piece of watercolor paper and brushos to achieve a green panel to slip behind the negative panel. That would require that I glue down all of the cuts on the white panel to the green panel. My fingers got sticky just thinking about gluing down all those cuts.

I decided to take another approach. I used another panel of shimmery white card stock and cut out the holly and berries with the Tim Holtz die again (discarded the white cutouts). Then I added a piece of foam adhesive to the back of the panel and pressed down the negative pieces. I die cut the holly again, using the green brushos panel. Because I had added the foam adhesive to the back of the negative white panel, I could easily adhere all the holly and berry pieces to the negative panel. SUCCESS!

To finish the card, I added the panel to the red holly frame die cut, added a bow, and glued glitter in various places! Glad I’m finished with this card!!

Stamps: SU Reason for the Season (sentiment)
Paper: SU Shimmery White, Real Red, and Watercolor Paper
Paper Size: 5×7
Ink: SU Real Red
Accessories: Tim Holtz Mixed Media Christmas Dies, Spellbinders Holly Frame Die, Brushos, Foam Adhesive, SU Real Red Ribbon, Glossy Accents, and SU Glitter

Butterfly_1_1

God’s Blessings!

Stamping With Guneaux Designs By Beverly Polen


“Keep watch over yourselves and all the flock of which the Holy Spirit has made you overseers. Be shepherds of the church of God, which he bought with his own blood..”  Acts 20:28

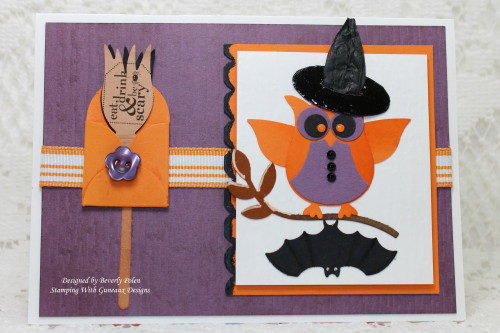
FF16naturecoastcrafter, Owl Punch

Since it’s Halloween, I’ll post a card I did for a Splitcoaststampers Falliday Fest Challenge, FF16naturecoastcrafter, Owl Punch.  Obviously, I am featuring the Stampin’ Up! (SU) Owl Punch, and my owl is decorated with a witch hat that I made with the old, retired SU Waffle Paper.  Remember that?

owl-and-bat_1

I had to compliment the Stampin’ Up! Owl by adding the SU Bat, hanging upside down. Can’t you imagine that combination in a real wildlife scenario?  Actually, some say they can co-exist peacefully, and others say not. Can you imagine an alert bat’s “radar” not picking up on an owl’s presence?  I’m sure it goes both ways.  Regardless, my Owl and Bat co-exist quite peacefully!

Stamps: SU Cute by the Inch and MDS Eat, Drink, and be Scary
Ink: Chocolate Chip, Pumpkin Pie, Going Gray, and White Gel Pen
Paper: Perfect Plum, Pumpkin Pie, Soft Suede, Basic Black, Whisper White, Creamy Caramel 
Accessories: SU Owl, Bitty Bat, Petal Card, Two-Step Bird, Scallop Edge Border, and Build A Bear Kooky Spooky Punch/Die; Crystal Effects (Owl’s eyes); Perfect Plum Designer Button; Adhesives; Black and Clear Embossing Powder; and Black Designer Jewels (buttons on owl’s vest).

Butterfly_1_1

God’s Blessings!

Stamping With Guneaux Designs By Beverly Polen

Firm Reliance on Divine Providence! 

Jesus went upon a mountainside and sat down.  His disciples came to Him, and He began to teach them.  He said:   “Enter through the narrow gate. For wide is the gate and broad is the road that leads to destruction, and many enter through it. But small is the gate and narrow the road that leads to life, and only a few find it.”  Matthew 7:13-14

Splitcoaststampers Falliday Fest Challenges

I have made 30 cards and some projects for the Splitcoaststampers Falliday Fest Challenges, and I plan to post a few at a time.  The Splitcoastsampers Falliday Fest Challenges include creating 30 cards and 10 projects following supplied tutorials.  There will be little details shared here on some projects; therefore, and if you want to CASE a card or project, please feel free to leave a comment asking for the details and I’ll get them to you. Here we go:

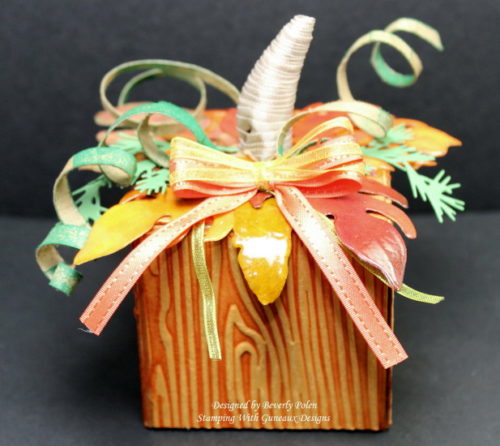
 1.  FF16punchboardpumpkin
pumpkin-box_1

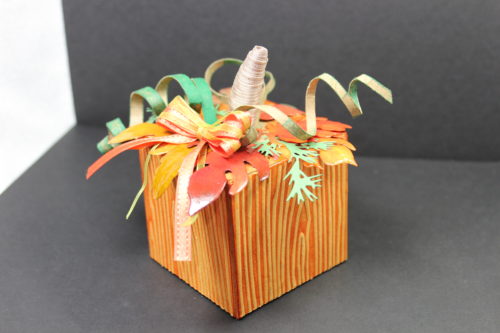
This pumpkin box is for the SCS Falliday Fest Tutorial #1 to create a pumpkin box.

Using the SU Score Board, I scored, cut, and assembled the box and covered the four sides with an orange card stock that was embossed with the SU Woodgrain EF that I covered with Pumpkin Pie Ink. I then sponged Pumpkin Pie Ink on the four corners of the box.

Not having any burlap ribbon, I used SU Crumb Cake Seam Binding to form the stem for the pumpkin. I rolled and glued, rolled and glued, and rolled and glued the binding until I had 2″ for the stem. I manipulated the top to curve it somewhat to the right. I then adhered it to the box top.

Using a leaf die, I cut and colored three types of leaves, and embossed and added them to the box top. I also added two mini holiday greens within the leaves.

I cut three thin strips of crumb cake card stock, selectively added crumb cake and emerald envy ink, and twirled them with a quilling tool. I added these to the box top.

I made a multiple loop bow with two SU ribbons and added it to the box top.


Stamps: None

Paper: SU Baked Brown Sugar, Light Orange (from stash), Neenah Solar White

Ink:  SU Pumpkin Pie, Crumb Cake, Emerald Envy, and Copics

Accessories: SU Scoring Board, SU Woodgrain EF, Tim Holtz Holiday Greens Die, Leaves Die, SU Lucky Limeade Ribbon, SU Tangerine Tango Ribbon, SU Crumb Cake Seam Binding, Glue Dotsimg_3432

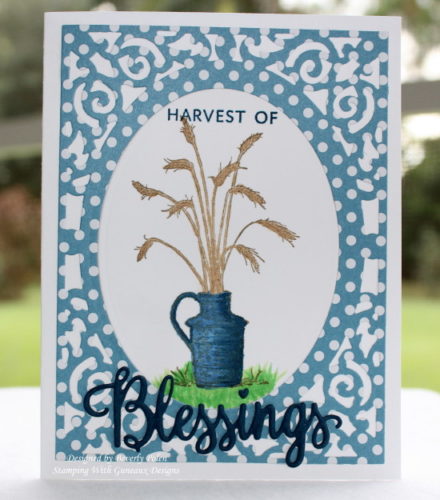
2)  FF16stampmommaA, Always Thankful

harvest-of-blessings_1

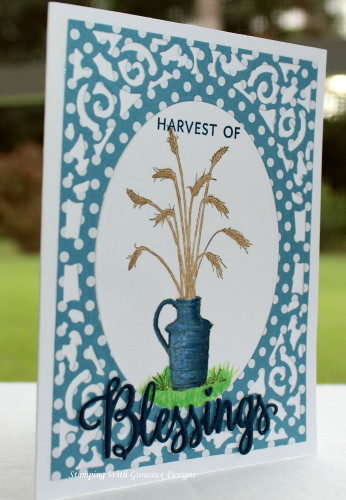
Lori Craig (stamp_momma), a host for a Falliday Fest Challenge, asked participants to create a thanksgiving card and include wheat in the image. This card is my submission to her challenge.

I had to search for a wheat related stamp, and this is the only one I found among my many stamps. It is from a retired SU Always Thankful Stamp Set, and it’s the first time I’ve used it. I colored the image with copics.

I used the Spellbinders A2 Filigree Delight Dies to cut out the image and cut a frame for the image from polka dots DSP. I added my sentiment which is a stamp, Harvest Of, and die cut, Blessings, from ODBD.


Stamps: SU Always Thankful, ODBD Many Blessings

Paper: Solar White Card Stock and SU Polka Dot DSP

Ink: Copics and SU Not Quite Navy

Accessories: ODBD Many Blessings Die, Spellbinders A2 Filigree Delight Dies

harvest-of-blessings-side-view_1


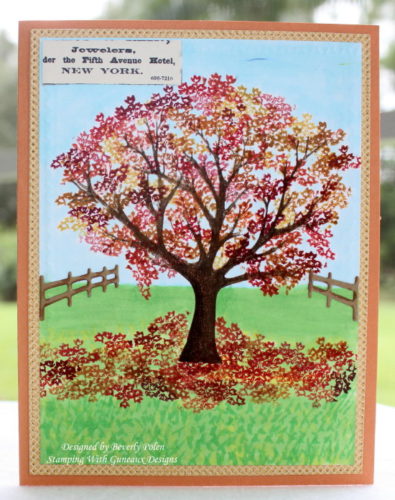
3)  FF16UnderstandBlueA, NY Fall

forever-young-fall_1
This card is my submission to Lydia (UnderstandBlue) Falliday Fest Challenge (FF16UnderstandBlueA) to make a card with the brilliant colors of a New York fall AND include print – newsprint, book pages, or text.  The following photo was my inspiration.

 (Photograph: Courtesy Creative Commons/Flickr/Chris Ford)

To qualify for the challenge, I added a small piece of “newsprint” regarding NY. The fence was inspired by the above mentioned photo. The fall tree had no leaves, so I cut a piece of a mini stamp from a SU Happy Seasons fall tree stamp and stamped leaves on the tree and grass. I had to stamp the leaves probably a hundred times! {sore arm today}


Stamps: SU Forever Young and SU Happy Seasons

Paper: Solar White, Autumn Spice DSP, SU Newsprint DSP, and SU Orange Card Stock

Ink: Fall Colors of SU Markers and Copics

Accessories: IO Fence Dies, Foam Tape


Butterfly_1_1

God’s Blessings!

Stamping With Guneaux Designs By Beverly Polen


“In Him we have redemption through His blood, the forgiveness of our trespasses, according to the riches of His grace.”  Ephesians 1:7