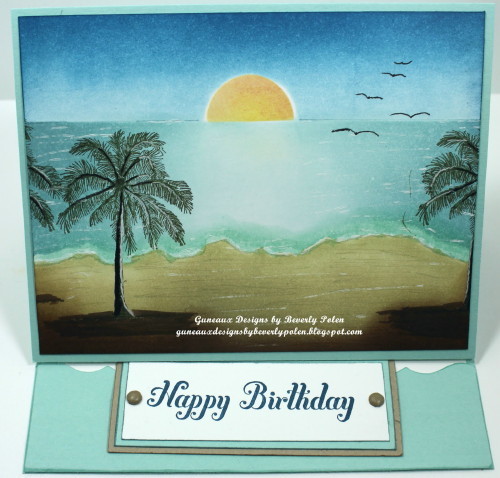
Happy Birthday Easel Card, Brayer Beach Scene

Happy Birthday Easel Card – Brayer Beach Scene

Happy Birthday Easel Card, Brayer Beach Scene

Having spent the holidays on a Caribbean cruise with special friends, I decided to create a beach scene with the color of the Caribbean Sea for a Happy Birthday Easel Card.  Today is the birthday of one of the special friends, and I made this card for him.  I hope his day includes many blessings and plenty of cake and ice cream!

The beach scene was created by using a Brayer Art Tool and various Stampin’ Up! inks.  The Stampin’ Up! ink colors I used are:

The palm trees were made with a stamp image from Plant Hope.  The sentiment, Happy Birthday, is from the Bring on the Cake stamp set.  Enjoy!


God’s Blessings!
Stamping With Guneaux Designs By Beverly Polen

Christmas Poem by Beverly Polen

Christmas Poem

Today, I want to share with you a poem I wrote that relates to our military men, women, and children.  May God richly bless them on this day and every day!

“TWAS THE DAY BEFORE CHRISTMAS”  

Twas the day before Christmas while in the store,

The children were crying as their Daddy was away at war,

“I want this for Daddy” was one of their cries,

“Maybe this will put a smile in his big brown eyes.”

“Daddy will be home soon,” Mommy declared,

As she bowed her head, asking for that blessing in a pray.

Oh how painful to observe such a sight,

My heart was saddened for all the children whose parents are absent tonight.

May we pray for all the men and women who protect our freedom,

And share our blessings with their lonely children.

May God wrap his protective arms around the Americans at war,

And lift their spirits as our mighty flag soars.

Let us remember the reason for the season,

As we give thanks that the wars are not on our shores.

When we gather around the gifts and food galore,

May we bow our heads in thanks for God’s precious blessing,

The one who laid in a manger, many years before.


I hope you enjoy my heart-felt Christmas Poem.  May all be blessed with a Merry Christmas and Happy New Year, and let us be joyful for our great country, the U.S.A.!


God’s Blessings!

Stamping With Guneaux Designs

By

Beverly Polen


Pine Cone Christmas Ornament

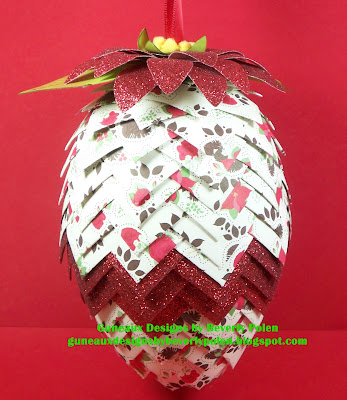
I have for you today a beautiful Pine Cone Christmas Ornament that I made.

Pine Cone Christmas Ornament

I recall being on vacation in South Carolina around 2001 and seeing some very LARGE pine cones. I had never seen such large cones before. I bagged up a bunch and took them home (Northern Virginia) to decorate for Christmas.

This Stampin’ Up! Pine Cone Christmas Ornament reminds me of those large pine cones.  The Pine Cone Christmas Ornament is my significant Stampin’ Up! 3-D item for Christmas 2011.  It is 7″ in length and 4-1/2″ in width. I am so pleased with the way it turned out.

Once again, I used the Holly Berry Bouquet Specialty Designer Series Paper (DSP), my favorite Stampin’ Up! DSP for the holidays.  It took hours for me to make the pine cone, and it required MANY 1″ x 2″ pieces of the DSP and MANY straight pens. But it is so worth it!

Pine Cone Christmas Ornament

I used the Stampin’ Up! Red Glimmer Paper for three rows around the cone, and for the poinsettia that rests on top of the cone.

God’s Blessings!

Stamping With Guneaux Designs
by
Beverly Polen

I hope you have enjoyed my Pine Cone Chistmas Ornament!

How to Make a Waterfall Card

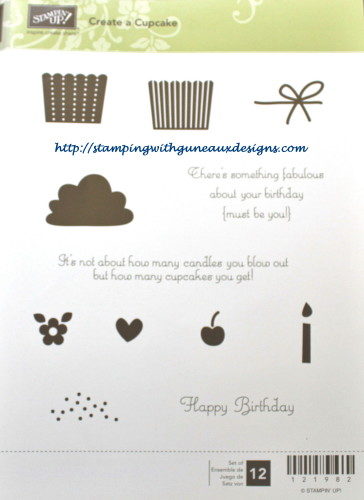
Have you wanted to learn how to make a waterfall card?  I hope so, as today I have for you a How to Make a Waterfall Card Tutorial!  The waterfall card shown here is a Happy Birthday card that features the Stampin’ Up! Create a Cupcake Stamp Set (121982).

HOW TO MAKE A WATERFALL CARD TUTORIAL

1. Select your card stock, designer series papers (DSP), brads, stamp sets, jewels, etc., that you want to use to create your waterfall card.

2. Cut and fold in the middle a 5-1/2″ x 8-1/2″ piece of card stock to form a 4-1/4″ x 5-1/2″ card base on which the waterfall construction will be attached.  Set to the side.

3. Using card stock and DSP, create the first and second layers for the card. Do not adhere them to the card base until the last step as you’ll need to attach the waterfall construction to these layers BEFORE adhering them to the card base.

4. Cut a 3/4″ x 4″ piece of card stock.

5. Cut a 2-1/4″ x 8-1/2″ piece of card stock of a different color.

6. Cut four 2-3/4″ square pieces of card stock, four 2-1/2″ square pieces of a different color of card stock, and four 2-1/4″ square pieces of Whisper White card stock. The pieces from the two colored card stock will form the mat for the Whisper White card stock that will contain your desired stamp images, punched items, etc.

7. Score the 8-1/2″ piece of card stock at the 1-1/2″, 2″, 2-1/2″, 3″, and 3-1/2″ measurements.

8. To adhere the piece of card stock cut in Step 4, turn the scored piece of card stock (henceforth called template) vertically so the score lines are below the top.  Attach Sticky Strip to the very top of the card stock (I added two pieces just to ensure good adhesion as the constructed waterfall will be heavy).

9. Remove the red tape and horizontally attach the 3/4″ x 4″ piece of card stock from Step 4 to the very edge of the template. Ensure it is centered.

10. Punch a hole at both ends of the 3/4″ x 4″ piece of card stock to add brads. The brads need to be substantial as they will attach the waterfall construction to the card base (you could actually wait until you’re ready to attach the waterfall construction to the card base before you insert the brads).

11. Using the square pieces of card stock from Step 6 and stamps, punches etc., create the waterfall pieces (i.e., the matted pieces of card stock  and stamped image(s) that will be added to the template – see example).


12. (a) Begin constructing the waterfall. The waterfall for this card will flow vertically; therefore turn the template so it is vertical and add the squares in a vertical fashion. If you want the waterfall to flow horizontally, turn the template horizontally and add the squares to the template in a horizontal fashion. (The following picture is turned horizontally just to identify the “areas” of the template.)


(b) Place adhesive in Area 1 (see the two pictures). Beginning with the matted square that you want to be LAST in the waterfall, adhere it to the template.

13. Place adhesive in Area 2 and add the matted square that you want to be the NEXT TO THE LAST waterfall piece. Continue until you’ve attached all four waterfall pieces, with the front piece added to area 4.

14. Fold the template at the top score line at area 4 so it falls behind the constructed waterfall and the tab falls at the bottom (see picture). Decorate the tab if so desired.

14. If you already attached the brads, you may need to remove them so you can line up the waterfall construction piece onto the card layers (created in step 3). Based on the punched holes on the horizontal 3/4″ x 4″ piece of card stock, identify and mark where to punch holes into the card layers, and punch them. Insert the brads through the waterfall construction piece and the card layers, turning down the brads’ extensions. Do NOT add adhesive any where on the completed waterfall piece or it will not work.

15. Adhere the card layers and waterfall piece to the front of the card base.

16. Pull the tab vertically and watch your waterfall in action.  ENJOY!


God’s Blessings!
Guneaux Designs by Beverly Polen

Zentangle Maple Leaf

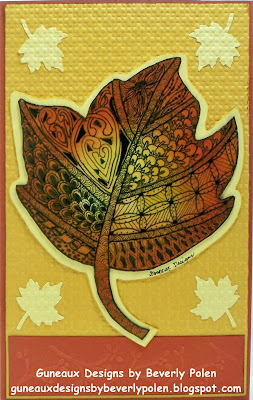
I love creating art using zentangling, therefore, I have for you today a Zentangle Maple Leaf card.  Actually, the correct action word is tangling when speaking of performing the art. 

I think the fall time of the year is so beautiful, and I don’t get to experience the beautiful transformation of trees while living in Florida. To create my own feel of the fall, I made this Zentangle Maple Leaf card.

 Zentangle Maple Leaf

 
I used eight different, official Zentangle® patterns on the maple leaf. The fun of zentangling is that you can create your own patterns if desired; however, I choose official patterns.
 
For some history about Zentangle®, it is a new form of art created by Maria Thomas and Rick Roberts. Because I am not a Certified Zentangle® Teacher, I prefer not to attempt to teach how to zentangle. However, you can learn more about this new art on Maria and Rick’s website, http://www.zentangle.com.
 
As for the Stampin’ Up! products used for the card, they are:
 
 
To purchase Stampin’ Up! products, click here or on the links above. Hope you enjoy the card!
 
God’s Blessings!
Stamping With Guneaux Designs
by
Beverly Polen
Stampin’ Up! Demonstrator in FL
guneauxdesignsbybeverlypolen.stampinup.net
Enjoy the Zentangle Maple Leaf Card!

Stampin’ Up! Sweetheart – Heartfelt Thanks

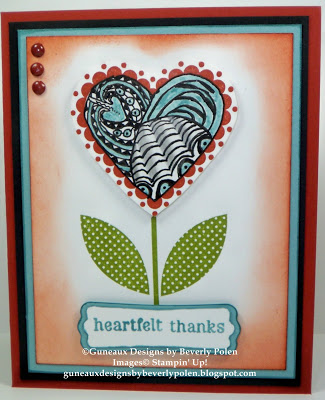
It is Friday and I am sharing my last feature of a Stampin’ Up! Greeting Card featuring doodling (or zentangling), for a while.  I hope you have enjoyed this week’s projects.  I have enjoyed zentangling the greeting cards.  Today’s card share is a “heartfelt thanks” to you for supporting me this week with my art.  I greatly appreciate your emails and comments.

This card spotlights three stamp images from the Stampin’ Up! Sweetheart Stamp Set.  I’ve had this stamp set for some time, and today is the first time I’ve used it.  I really like the outcome.

Stampin' Up! Sweetheart - Heartfelt ThanksFor the card base, one stamp image, and sponging, I used one of my favorite colors in card stock and ink –  Cajun Craze.  I also used Basic Black, Baja Breeze, and Whisper White card stock (respectively) for the first, second, and third card layers.

If you would like to leave a comment about this week’s projects, please do so.  If you would like to purchase any of the products used for this project, just click on the links and you’ll be taken directly to the on-line product for purchase.
******************

While there is still time left in July, take advantage of the Stampin’ Up! July offer and join my business for just $99. This is the perfect option for you if you’re already a fan of Stampin’ Up! and own many of its products. This limited time Starter Kit—valued at $185—comes with the products listed HERE.

As an added bonus, when you join the Stampin’ Up! family in July, you’ll get a FREE Christmas Keepsake project kit—a $40 value! What’s more fun that stamping with friends?

If you’re interested in becoming a Stampin’ Up! demonstrator, click HERE.

God’s Blessings!
Guneaux Designs by Beverly Polen
Stampin’ Up! Demonstrator in Florida