How to Make a Waterfall Card

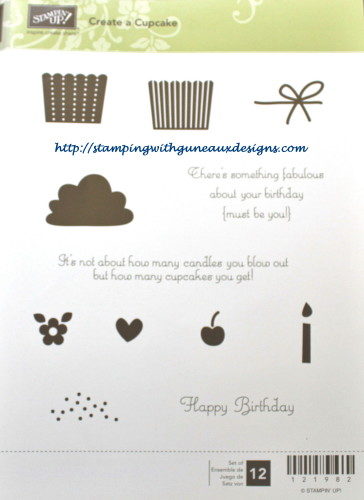
Have you wanted to learn how to make a waterfall card?  I hope so, as today I have for you a How to Make a Waterfall Card Tutorial!  The waterfall card shown here is a Happy Birthday card that features the Stampin’ Up! Create a Cupcake Stamp Set (121982).

HOW TO MAKE A WATERFALL CARD TUTORIAL

1. Select your card stock, designer series papers (DSP), brads, stamp sets, jewels, etc., that you want to use to create your waterfall card.

2. Cut and fold in the middle a 5-1/2″ x 8-1/2″ piece of card stock to form a 4-1/4″ x 5-1/2″ card base on which the waterfall construction will be attached.  Set to the side.

3. Using card stock and DSP, create the first and second layers for the card. Do not adhere them to the card base until the last step as you’ll need to attach the waterfall construction to these layers BEFORE adhering them to the card base.

4. Cut a 3/4″ x 4″ piece of card stock.

5. Cut a 2-1/4″ x 8-1/2″ piece of card stock of a different color.

6. Cut four 2-3/4″ square pieces of card stock, four 2-1/2″ square pieces of a different color of card stock, and four 2-1/4″ square pieces of Whisper White card stock. The pieces from the two colored card stock will form the mat for the Whisper White card stock that will contain your desired stamp images, punched items, etc.

7. Score the 8-1/2″ piece of card stock at the 1-1/2″, 2″, 2-1/2″, 3″, and 3-1/2″ measurements.

8. To adhere the piece of card stock cut in Step 4, turn the scored piece of card stock (henceforth called template) vertically so the score lines are below the top.  Attach Sticky Strip to the very top of the card stock (I added two pieces just to ensure good adhesion as the constructed waterfall will be heavy).

9. Remove the red tape and horizontally attach the 3/4″ x 4″ piece of card stock from Step 4 to the very edge of the template. Ensure it is centered.

10. Punch a hole at both ends of the 3/4″ x 4″ piece of card stock to add brads. The brads need to be substantial as they will attach the waterfall construction to the card base (you could actually wait until you’re ready to attach the waterfall construction to the card base before you insert the brads).

11. Using the square pieces of card stock from Step 6 and stamps, punches etc., create the waterfall pieces (i.e., the matted pieces of card stock  and stamped image(s) that will be added to the template – see example).


12. (a) Begin constructing the waterfall. The waterfall for this card will flow vertically; therefore turn the template so it is vertical and add the squares in a vertical fashion. If you want the waterfall to flow horizontally, turn the template horizontally and add the squares to the template in a horizontal fashion. (The following picture is turned horizontally just to identify the “areas” of the template.)


(b) Place adhesive in Area 1 (see the two pictures). Beginning with the matted square that you want to be LAST in the waterfall, adhere it to the template.

13. Place adhesive in Area 2 and add the matted square that you want to be the NEXT TO THE LAST waterfall piece. Continue until you’ve attached all four waterfall pieces, with the front piece added to area 4.

14. Fold the template at the top score line at area 4 so it falls behind the constructed waterfall and the tab falls at the bottom (see picture). Decorate the tab if so desired.

14. If you already attached the brads, you may need to remove them so you can line up the waterfall construction piece onto the card layers (created in step 3). Based on the punched holes on the horizontal 3/4″ x 4″ piece of card stock, identify and mark where to punch holes into the card layers, and punch them. Insert the brads through the waterfall construction piece and the card layers, turning down the brads’ extensions. Do NOT add adhesive any where on the completed waterfall piece or it will not work.

15. Adhere the card layers and waterfall piece to the front of the card base.

16. Pull the tab vertically and watch your waterfall in action.  ENJOY!


God’s Blessings!
Guneaux Designs by Beverly Polen

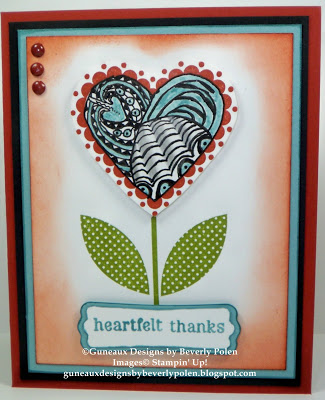
Stampin’ Up! Sweetheart – Heartfelt Thanks

It is Friday and I am sharing my last feature of a Stampin’ Up! Greeting Card featuring doodling (or zentangling), for a while.  I hope you have enjoyed this week’s projects.  I have enjoyed zentangling the greeting cards.  Today’s card share is a “heartfelt thanks” to you for supporting me this week with my art.  I greatly appreciate your emails and comments.

This card spotlights three stamp images from the Stampin’ Up! Sweetheart Stamp Set.  I’ve had this stamp set for some time, and today is the first time I’ve used it.  I really like the outcome.

Stampin' Up! Sweetheart - Heartfelt ThanksFor the card base, one stamp image, and sponging, I used one of my favorite colors in card stock and ink –  Cajun Craze.  I also used Basic Black, Baja Breeze, and Whisper White card stock (respectively) for the first, second, and third card layers.

If you would like to leave a comment about this week’s projects, please do so.  If you would like to purchase any of the products used for this project, just click on the links and you’ll be taken directly to the on-line product for purchase.
******************

While there is still time left in July, take advantage of the Stampin’ Up! July offer and join my business for just $99. This is the perfect option for you if you’re already a fan of Stampin’ Up! and own many of its products. This limited time Starter Kit—valued at $185—comes with the products listed HERE.

As an added bonus, when you join the Stampin’ Up! family in July, you’ll get a FREE Christmas Keepsake project kit—a $40 value! What’s more fun that stamping with friends?

If you’re interested in becoming a Stampin’ Up! demonstrator, click HERE.

God’s Blessings!
Guneaux Designs by Beverly Polen
Stampin’ Up! Demonstrator in Florida

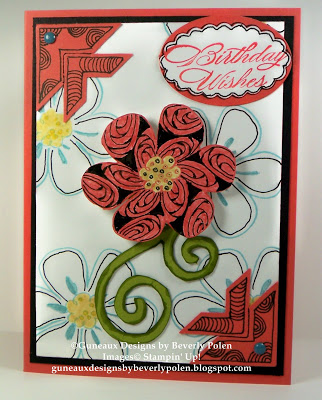
Stampin’ Up! Flower Fancy – Doodling

This is my fourth “doodled” Stampin’ Up! Greeting Card share for this week.  This card features one of the stamp images from the Stampin’ Up! Flower Fancy Stamp Set.  Using one of the floral images covered with the new In-Color, Cylpso Coral ink, I stamped the image on Whisper White cardstock and, after doodling, colored in the white spaces with the Cylpso Coral Stampin’ Write Marker that is from the 2011-2013 In-Color Collection. I love the new In-Colors!

Stampin' Up! Flower_Fancy_Doodling

I cut out the doodled flower and placed it on whisper white card stock that I had stamped the same image on, but with Baja Breeze ink.  I doodled a stem for the flower on Lucky Limeade card stock and cut and pasted it under the flower.  Because the doodling is in black ink, I added Basic Black cardstock as a layer to the card and used the Cylpso Coral card stock as the card’s base.  The sentiment, Birthday Wishes, is from the Stampin’ Up! Bring on the Cake Stamp Set.

Don’t forget to come back for the next doodling card tomorrow.

******************

While you’re visiting, take advantage of the Stampin’ Up! July offer and join my team for just $99. This is the perfect option for you if you’re already a fan of Stampin’ Up! and own many of its products. This limited time Starter Kit—valued at $185—comes with the products listed HERE.

As an added bonus, when you join the Stampin’ Up! family in July, you’ll get a FREE Christmas Keepsake project kit—a $40 value! What’s more fun than stamping with friends?

If you’re interested in becoming a Stampin’ Up! demonstrator, click HERE.

God’s Blessings!
Guneaux Designs by Beverly Polen
Stampin’ Up! Demonstrator in Florida

FIRM RELIANCE ON DIVINE PROVIDENCE!

HAVE GREAT FUN MAKING STAMPIN’ UP! GREETING CARDS!

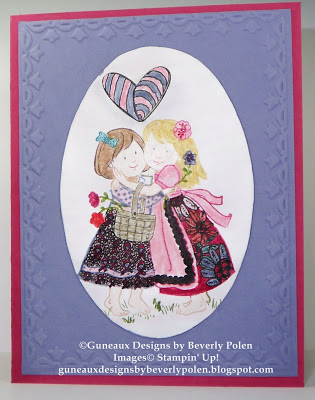
Stampin’ Up! The Nicest Things – Doodling

Today’s Stampin’ Up! Happy Birthday Greeting Card is dedicated to one of my sisters, Berneice, who passed away several years ago from breast cancer at the very young age of 36.  Her birthday is today.  Happy Birthday, Berneice!  You are greatly missed!

This card, the third card this week that I’ve added doodling, features the Stampin’ Up! The Nicest Things Stamp Set.  I love how the little girls are gently touching each other and expressing their love.  I hope you can see the breast cancer ribbons in the little girl’s dress.

Stampin' Up! The Nicest Things - DoodlingThe card base is Rose Red Cardstock and the first layer is the new Wisteria Wonder Cardstock.  This layer is embellished with the Stampin’ Up! Framed Tulips Embossing Folder.  Various Stampin’ Write Markers were used for coloring the little girls and their dresses.  That’s all, folks, for the description of this card.  Hope you enjoy it!

Don’t forget to come back for the next doodling card this week.

******************
While you’re visiting, take advantage of the Stampin’ Up! July offer and join my team for just $99. This is the perfect option for you if you’re already a fan of Stampin’ Up! and own many of its products. This limited time Starter Kit—valued at $185—comes with the products listed HERE.

As an added bonus, when you join the Stampin’ Up! family in July, you’ll get a FREE Christmas Keepsake project kit—a $40 value! What’s more fun that stamping with friends?If you’re interested in becoming a Stampin’ Up! demonstrator, click HERE.
God’s Blessings!
Guneaux Designs by Beverly Polen
Stampin’ Up! Demonstrator in Florida


HAVE GREAT FUN MAKING STAMPIN’ UP! GREETING CARDS!

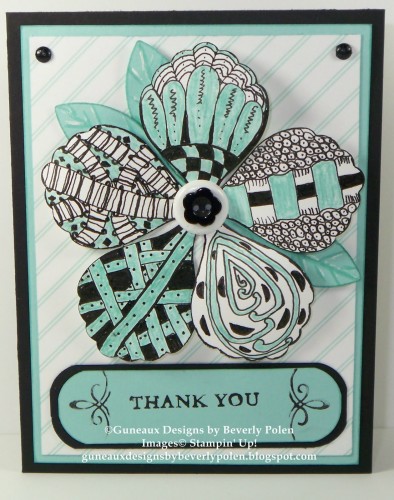
Stampin’ Up! Blossom Petals Punch – Doodling

Today is my second feature of doodling a Stampin’ Up! Greeting Card – a Thank You cardThis card spotlights the Stampin’ Up! Blossom Petals Punch and the wonderful, new Stampin’ Up! color, Pool Party from the 2011-2013 In-Color Collection.

As you know, doodling is drawing shapes that have no real meaning and can be abstract in form.  Therefore, I cannot explain how I doodle.  But I will say, just let your pen take you where ever you feel it should go and draw shapes that you enjoy – diamonds, Xs, squares, flowers, petals, circles, rectangles, squiggly lines, straight lines, wavy lines, and so on.  I encourage you to try it.  It’s very relaxing, and I think it enhances Stampin’ Up! products.

Stampin' Up! Blossom Petals Punch - Doodling

The card base is Stampin’ Up! Basic Black Cardstock, the second layer is the beautiful Pool Party Cardstock, and the third layer is from My Digital Studio, 2011-2013 In-Color Playful Patterns.  Other Stampin’ Up! products used for this project are:

Elegant Thank You Stamp Set
5/8″ Whisper White Brad from the Neutrals Assortment
Basic Black Designer Button from the Neutrals Collection
Basic Black Brad from the Neutrals Collection

I think I like this card better than the one I shared on Monday.  What do you think?

Don’t forget to come back for the next doodling card this week.

                                     ******************
While you’re visiting, take advantage of the Stampin’ Up! July offer and join my team for just $99. This is the perfect option for you if you’re already a fan of Stampin’ Up! and own many of its products. This limited time Starter Kit—valued at $185—comes with the products listed HERE.

As an added bonus, when you join the Stampin’ Up! family in July, you’ll get a FREE Christmas Keepsake project kit—a $40 value! What’s more fun that stamping with friends?

If you’re interested in becoming a Stampin’ Up! demonstrator, click HERE.

God’s Blessings!
Guneaux Designs by Beverly Polen
Stampin’ Up! Demonstrator in Florida
FIRM RELIANCE ON DIVINE PROVIDENCE!
HAVE GREAT FUN MAKING STAMPIN’ UP! GREETING CARDS!

Stampin’ Up! Fabulous Florets – Doodling

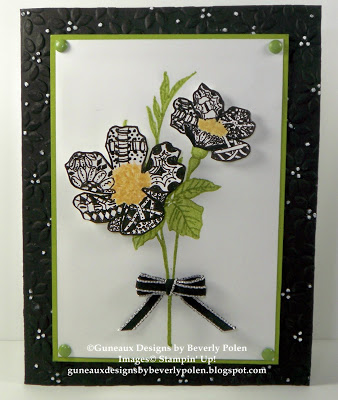
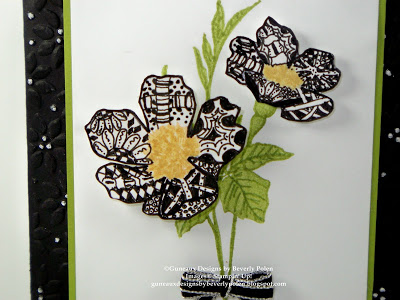
This week’s postings will feature Stampin’ Up! greeting cards featuring doodling.  I’ve enjoyed doodling for some time, and it’s a good stress reliever.  Today’s card spotlights doodling on two of the stamp images from the Stampin’ Up! Fabulous Florets Stamp Set.  Because I doodled in black ink, the card is basically black and white.  When I started to make the card, I thought of a friend who I met last year on the Auto Train while traveling from Florida to Virginia.  She loves black and white cards.  So this card is dedicated to you, Ginny!

Stampin' Up! Fabulous Florets_Doodling

Here’s a closeup of my doodling:

Stampin' Up! Fabulous Florets Doodling

The base for the card is Stampin’ Up! Basic Black Cardstock that I embellished with the Stampin’ Up! Petals-A-Plenty Embossing Folder.  I highlighted the flower centers with a White Gel PenThe first card layer is made with the new, beautiful Stampin’ Up! cardstock color, Lucky Limeade, from the new In-Color CollectionThe top layer is Stampin’ Up! Whisper White Cardstock.  The three-loop bow was made from Stampin’ Up! Basic Black 1/8″ Taffeta Ribbon.  You may purchase the Stampin’ Up! products used in this project by clicking on the links within the post.  They will take you directly to the product.

I encourage you to try this technique.  You’ll find it very fun and relaxing.

Don’t forget to come back for the next doodling card this week.

******************

While you’re visiting, take advantage of the July Stampin’ Up! offer and join my team for just $99. This is the perfect option for you if you’re already a fan of Stampin’ Up! and own many of its products. This limited time Starter Kit—valued at $185—comes with the products listed HERE.

As an added bonus, when you join the Stampin’ Up! family in July, you’ll get a FREE Christmas Keepsake project kit—a $40 value! What’s more fun that stamping with friends?  If you’re interested in becoming a Stampin’ Up! demonstrator, click HERE.

God’s Blessings!
Guneaux Designs by Beverly Polen
Stampin’ Up! Demonstrator in Florida
FIRM RELIANCE ON DIVINE PROVIDENCE!
HAVE GREAT FUN MAKING STAMPIN’ UP! GREETING CARDS!