
How to Assemble Art Impressions Santa Flutter Set
Have you purchased any of the new Art Impressions Flutter Stamp and Die sets? They can be difficult to assemble. I think that the Art Impressions Santa Flutter Set recently released is more difficult than the ones I used from the Art Impressions spring 2018 release. I struggled with the Santa Flutter and decided to provide a tutorial on how to assemble the Art Impressions Santa Flutter Set.
I submitted this card today for a color challenge on Splitcoaststampers.
Matthew 7:1-5
Jesus said, “Do not judge, or you too will be judged. For in the same way you judge others, you will be judged, and with the measure you use, it will be measured to you. Why do you look at the speck of sawdust in your brother’s eye and pay no attention to the plank in your own eye? How can you say to your brother, ‘Let me take the speck out of your eye,’ when all the time there is a plank in your own eye? You hypocrite, first take the plank out of your own eye, and then you will see clearly to remove the speck from your brother’s eye.”
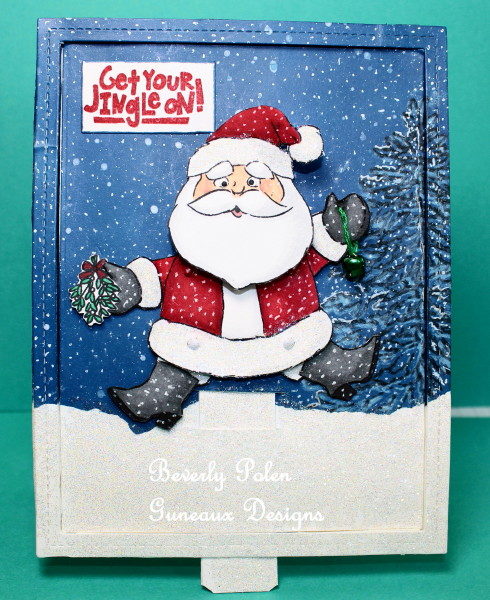
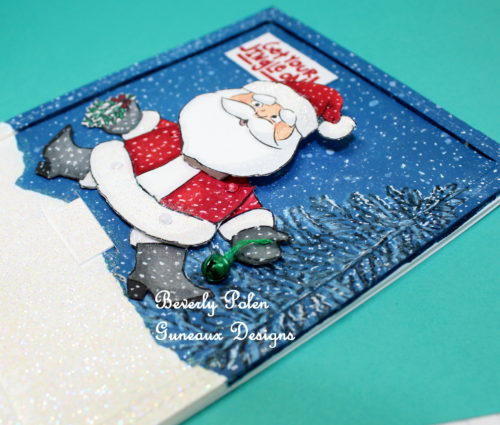
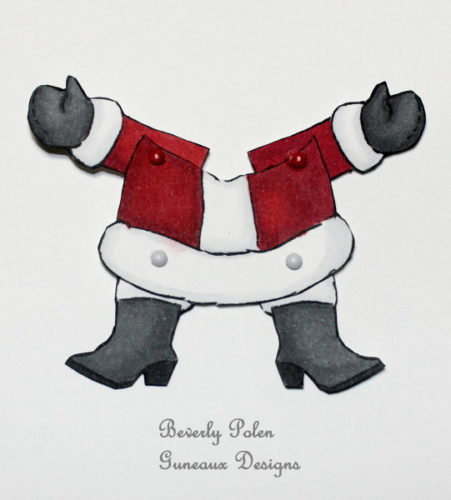
Before providing the tutorial, I will provide additional photos of the finished project. The following photo is of the Santa with his arms and legs in the down position.
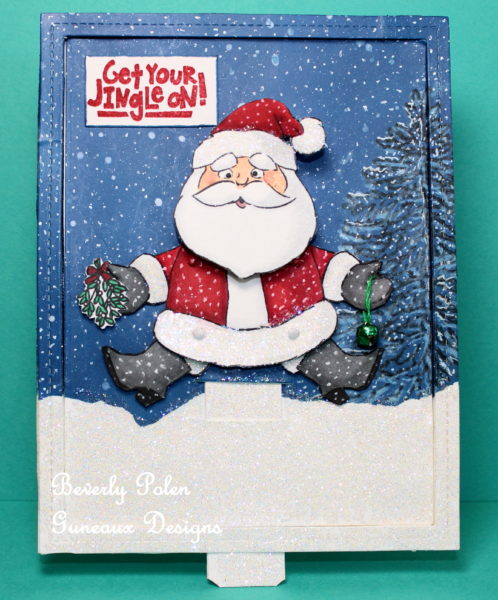
This photo is of the Santa with his arms and legs in the up position.
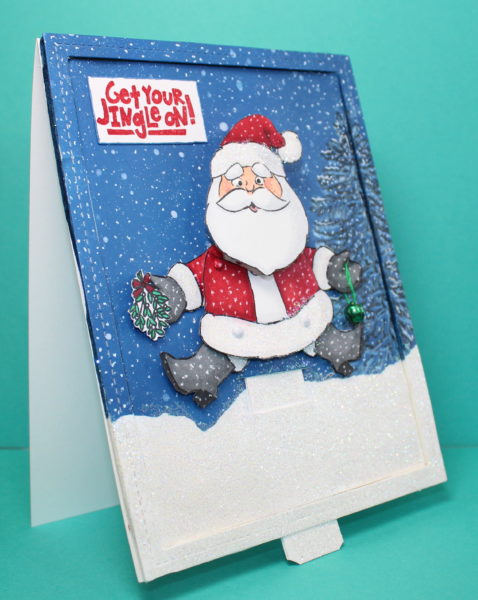
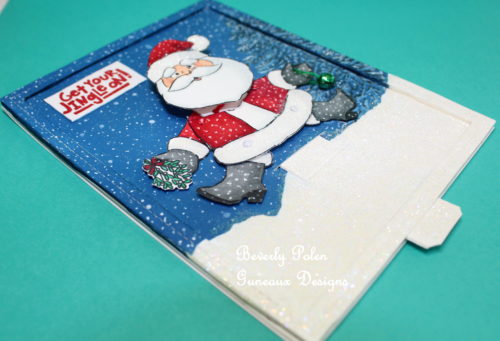
This is a side view of the card.
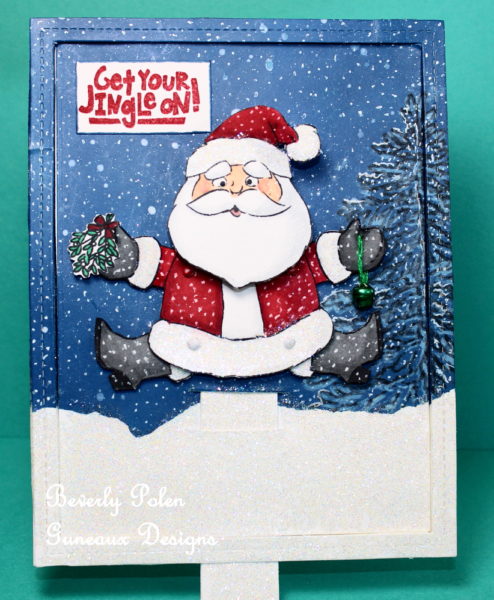
The next two are additional photos.
In this photo, you may be able to see the head is raised. That is because of the added action wobble on the head.
TUTORIAL FOR HOW TO ASSEMBLE ART IMPRESSIONS SANTA FLUTTER SET
- Stamp, color, and die cut the pieces for the fluttering Santa. I colored Santa and his parts with the following Copic Sketch Markers
- E00, 02, 11, and 04 (face); N4 and 5 (mittens and boots); C00 and 01 (shading on the hat, mustache, beard, and the white part on the sleeves, bottom of jacket, and top of boots), and R46, R29, and R27 (hat and outfit).
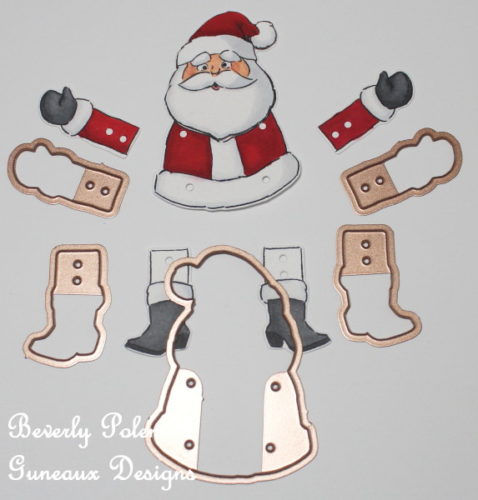
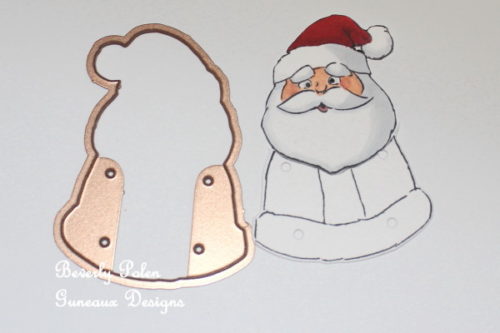
- OPTION: If an action wobble will be used for Santa’s head, as I did, you can either 1.) stamp, color (with the same copics listed above), and die cut another Santa body and fussy cut Santa’s head, or 2.) fussy cut Santa’s head from the original. SKIP IF A WOBBLE WILL NOT BE USED.
- Turn over Santa’s body and place the arms and legs onto the back, matching the holes in the arms and legs with the holes in the body. Insert four brads through the front of the body into the first holes on the arms and legs. Spread the brads’ prongs to attach the limbs. (Do not spread the prongs too tightly or the arms and legs will not move.)
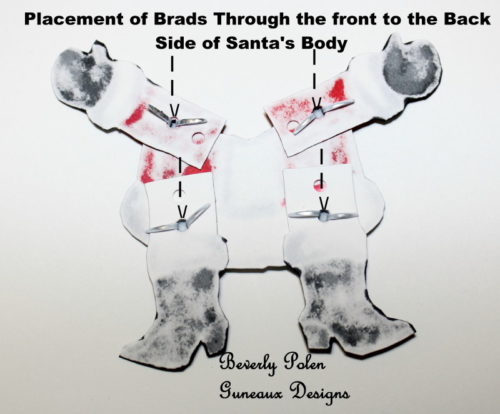
(I colored the white brads for the arms with a red Copic Sketch Marker to match Santa’s outfit.)
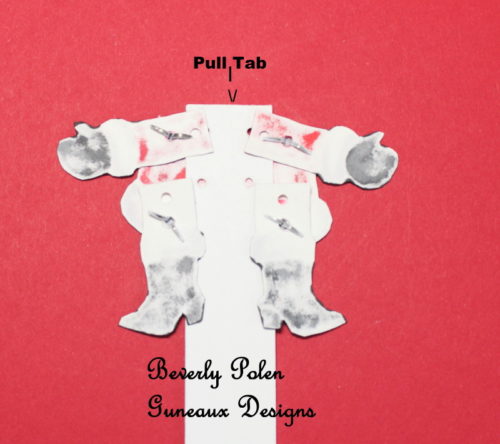
- Cut a 3/4″ x 4″ piece of white cardstock to create a pull tab to move Santa’s arms and legs up and down. Use the tiny die from the set to punch two sets of tiny holes. The first set will be 1/4″ down from the top of the tab, and the second set 1/2″ down from the first set.

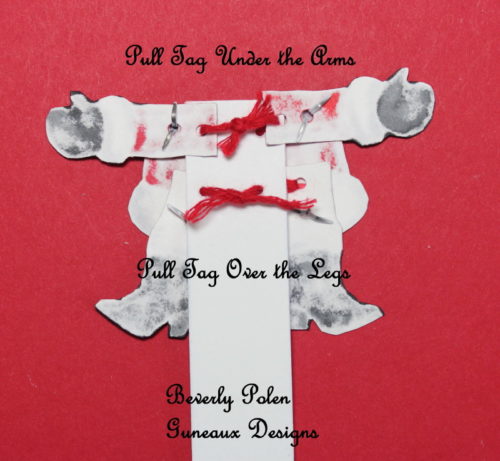
- Lay the pull tab underneath the arms and legs on the back of Santa’s body. (I had to make a change; therefore, see *NOTE below before proceeding.)
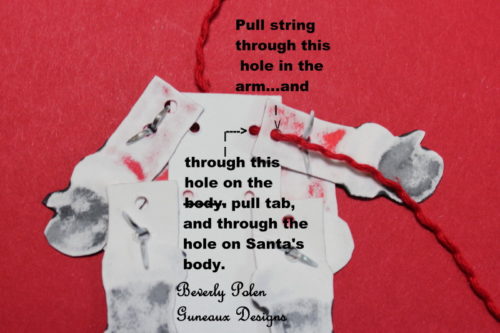
- Cut two 6″ pieces of string or twine. Insert the first piece down the hole in an arm, into the hole on the pull tab, and through the hole on the front of Santa’s body.
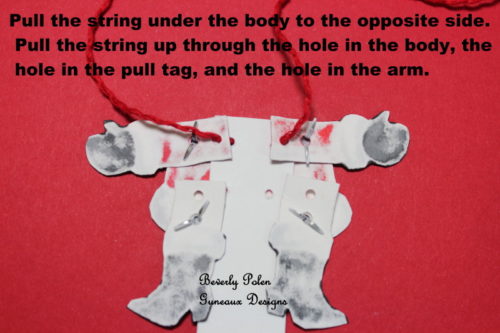
- Pull the string under the body of Santa to the opposite side. Push the string through the hole on Santa’s body, up through the hole in the pull tab, and through the hole in the opposite arm.
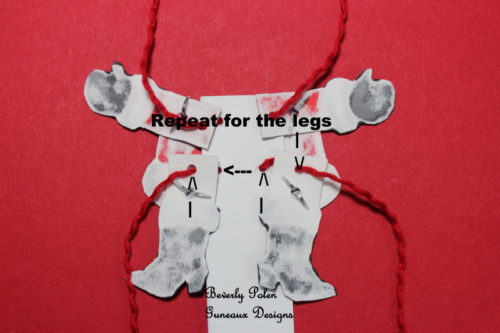
- Repeat this process for the legs of Santa.
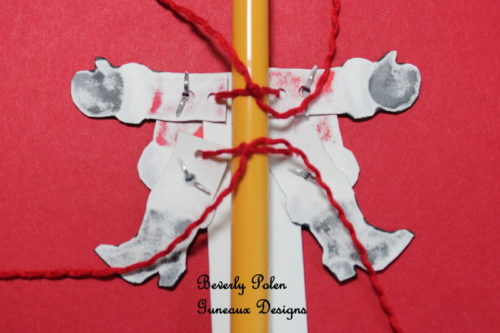
- Lay a pencil across the string and pull tab.
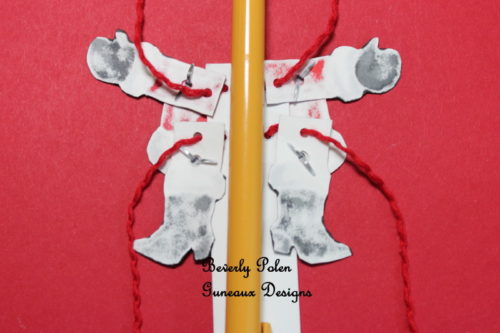
- Tie each string across the pencil into a double knot and remove the pencil. Adjustments may be necessary to get the limbs to move. If so, adjust the twine to tighten or loosen it, or lay the pull tab under the arms and over the legs (see *NOTE below). Then cut the strings to shorten them.
NOTE
After I assembled the Santa, I untied the strings and moved the pull tab over the legs in order for the tab to not obstruct the legs when it is pulled. Please remember this when viewing photos and following instructions.
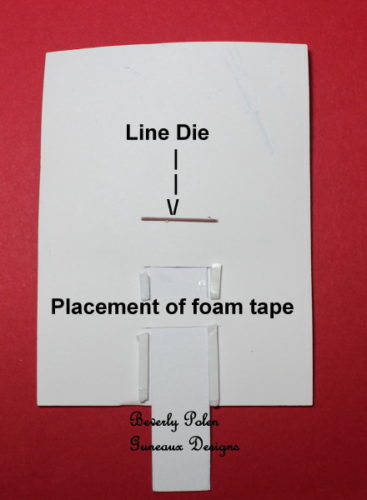
- Add two small pieces of foam tape to the sides of the body (see placement identified in the photo below) being careful to not obstruct the arms and legs from moving. The tape is for attaching the body to cardstock.

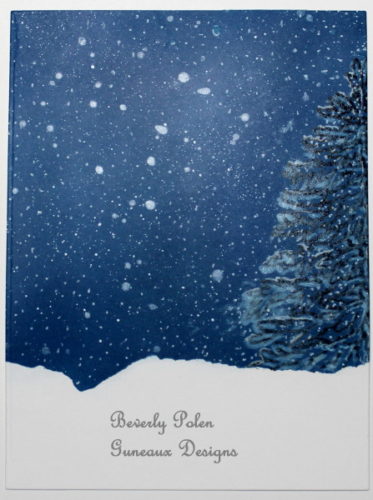
- Create a panel on which Santa will be placed. I created this panel by sponging onto Neenah Solar White Cardstock the Distress Oxide Inks listed in the supplies. Stamped a tree from the Hero Arts MMK October 2018 onto the side of the panel in various inks. Used a White Pen, Copic Opaque White Ink, and Hero Arts Shimmer Mist to create snow over the background. Added snow to the Santa with the same products.
- Determine the placement of two cut slits on the cardstock to weave the pull tab through. Cut the slits with the “Line Die” that comes with the set of dies and weave the pull tab through the slits.
- Placement is determined by where you want the “flutter Santa” to be located. If you are not sure, follow the AI instructions located on the back of the card that comes with the stamp set. I cut three slits to get Santa’s body lower on my panel and the pull tab through to the back of the panel.

- Place a short strip of foam tape beside both sides of the pull tab, but not on the tab itself. This prevents the tab from moving side to side when being pulled.
- Finish decorating as desired and enjoy your new “Flutter” card.
Supplies
Stamps: Art Impression Santa Fluter Stamps, Hero Arts MMK October 2018 (mistletoe)
Paper: Neenah Solar White
Ink: Distress Oxides (Broken China, Salty Ocean, and Faded Jeans); Hero Arts Sapphire Ink, Hero Arts White Ink, Copic Opaque White Ink, Copic Alcohol Ink (listed in the body of the post)
Accessories: Art Impressions Santa Flutter Dies, Lawn Fawn Stitched Rectangle Frames, Paint Brush, White Pen, Hero Arts Shimmer Mist, Tim Holtz Distress Micro Glaze, Ranger Blending Tool, Hero Arts Twine, Bell
 God’s Blessings!
so cute and beautiful Bev
Gr Karin
WOW, that is a great tutorial, Bev. What a fun card and you have colored Santa up to perfection. Looks like a lot of work, but using the tutorial will help lots o folks out. Thanks for sharing.
Cute and fun… my kind of card… Awesome tutorial Bev… well done
WHAT AN EXCELLENT TUTORIAL, Bev! I commented on this over at SCS I believe.
I LOVE the snowy background, the tree, & scene you’ve created for Santa! I also think the Santa image is ADORABLE! I’ve had this notion to collect some Santa’s here lately! This would be a PERFECT one for my collection! LOVE that he is interactive also! SUCH A FUN CARD!!!! AND Inky Hugs from me for your friendship! 😉
This is so cute! Saw your card at Split coast but wanted to have a closer look. You are so detailed with your instructions…thanks for sharing.
This is an adorable Santa! Love the snowy background!
How fun is this and thanks for the directions too! He’s just adorable. I’ve never made an interactive card like this. This is fantastic!
A super card Bev, such a fun Santa, thank you for the step by step instructions.
Pauline – Crafting with Cotnob
x
Oh now that is the CUTEST Santa I’ve seen!! Love the wonderful blue sky snowy background you’ve created for him too!! Beautifully colored my friend! HUGS
I just love his expression and how you did the snow, interactive cards are a lot of work but so fun for those receiving it!
Oh how fun and cute Bev! I love that adorable interactive Santa and your stunning snowy background!! Awesome card!
Hugs, Tammy
Love the background colors and what a super cute Santa. Great tutorial.
Hugs Diane
I love this fabulous jumping-jack Santa with his jingly bell!! Super cute holiday design, Bev!! My school kids used to make characters like this when we studied simple machines, and they had a ball with them!!