Petal Cone Die

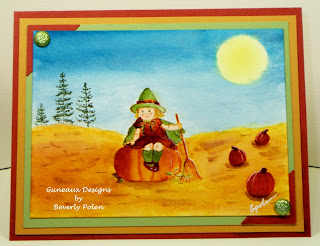
My share today is one of my creations using the new Stampin’ Up! Petal Cone Die from the new Occasions Mini Catalog.  This Petal Cone Die is one to buy.  You can create more than a cone with it, and tomorrow I will share other creations made with the cone.

Petal Cone Die
The petal cone is embellished with two of the beautiful Stampin’ Up! Embossing FoldersElegant Bouquet and Perfect Polka Dots.  The new Stampin’ Up! Designer Series PaperLove Impressions, was used to make the paper “LOVE” heart and two of the cone’s petals.  The charming pink button and the red one below is from the Big Designer Buttons, Candy Cane, which became unavailable on January 3th when the Holiday Mini Catalog expired.  As is with the red button, the pink button is threaded with the retired Stampin’ Up! Silver Elastic Cord.  The handle of the cone is the Stampin’ Up!’s Real Red 1/8″ Taffeta Ribbon.
Petal Cone Die
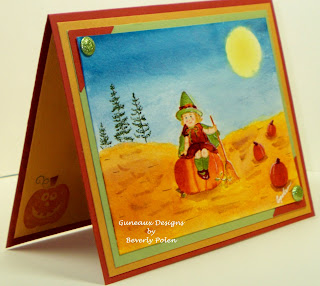
This side of the cone shows the “friend” stamp from the I {Heart} Hearts stamp set and the big beautiful red button.
Petal Cone DieThe same red ribbon was used on this side of the cone and threaded through an old pink heart brad that I dug out of my collection.  This side shows more clearly the embossing with the Elegant Bouquet Textured Folder.
Petal Cone Die
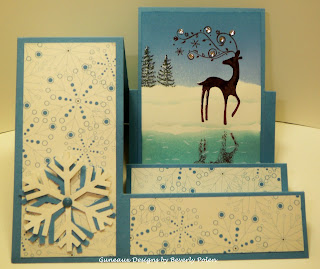
Inside the cone is lace tulle and it is filled with yummy heart shaped chocolate.
Please enjoy and email me with any questions.  Come back tomorrow to see my next creation with the Petal Cone Die!  Comments are appreciated as they let me know what you enjoy on my site and gives me information on what you would like in future postings.
Lastly, any item highlighted like this will take you directly to my Guneaux Designs store where you can enjoy shopping!  Therefore, place your cursor over the highlighted words, click, and shop!  I challenge you to be the first one to shop at my store within the next 24 hours!  An award awaits you!
God’s Blessings!
Guneaux Designs by Beverly Polen
Stampin’ Up! Demonstrator in Florida

Petal Cone Die

Candy Cane Christmas Wreath

Here is a Candy Cane Christmas Wreath, which is my last creation using the beautiful Candy Cane Christmas Designer Series Paper (DSP).

Do you ever reach back to your teenage years and think of the art that you created then? No matter how simple it was, I still remember a piece of art that I created in my high school “shorthand” class. (Art and shorthand….[scratching head]…somehow they went together then – LOL.) Well, this Candy Cane Christmas Wreath is a re-creation of that piece of art that I created in high school. Wow! Such a long time ago, but pleasant memories!

Candy Cane Christmas Wreath
The Candy Cane Christmas Wreath looks more difficult to create than it is. I cut strips of the Candy Cane Christmas DSP at approximately 5″ x 2-3/4″, glued together one of the long ends on each strip (creating a triangle), and began developing the wreath by adhering the first row to the outer edge of a piece of cardboard in the shape of a 12″ circle. I repeated the pattern until I had adhered all of the pieces that I needed to fill in the wreath. I cut the paper strips to about 4″ for the last two rows. I think the Candy Cane Christmas DSP makes the Candy Cane Christmas Wreath beautiful! What do you think?
I used the fabulous Pretty in Pink and Marina Mist Stampin’ Up! 1-1/4″ Striped Grosgrain Ribbon to form a bow. I used a strip of the Pretty in Pink Stampin’ Up! 1-1/4″ Striped Grosgrain Ribbon to create my “hanger”, adhered it to the back of the wreath and attached the bow at the top. You must buy this ribbon if you haven’t already. It is super to work with and so beautiful. You will not be disappointed!
The center of the Candy Cane Christmas Wreath is an eight-layer flower that I created using the Stampin’ Up! Fancy Flower Punch. I wove Stampin’ Up! Silver Tinsel Trim within the flower to give it a little glitz.
Candy Cane Christmas Wreath

 This is a closeup of the center of the Candy Cane Christmas Wreath.

Candy Cane Christmas Wreath

 This is the back side of the Candy Cane Christmas Wreath.


Candy Cane Christmas Wreath
Now it’s your turn. Make this easy wreath (using DSP of your choice) and send me pictures of your creation!  Don’t disappoint me! I want to see your creations; you still have time before Christmas arrives!
Jesus Christ is the reason for the Season!
Merry Christmas to All who believe in Him!

God’s Blessings!

Stamping With Guneaux Designs

by

Beverly Polen

Greeting Card Kids Stamp Set

GREETING CARD KIDS STAMP SET

 Living in FL does not allow me to enjoy the beautiful Fall season that I was so use to when I lived in N.VA.  Every year at this time, I have my friend, Sandy, send me pictures of her beautiful surroundings in PA so I can enjoy the Fall colors.  Missing the Fall colors prompted me to produce the following card made with the Stampin’ Up! Greeting Card Kids Stamp Set.  Also, I decided to take a stab at water coloring.  Please let me know what you think!
Greeting Card Kids Stamp Set
All products used to develop this card are from Stampin’ Up!, and are found HERE.
Stamp Sets:  Greeting Card Kids (item 120633); Got Treats (120627); and Plant Hope (120540)
Classic Ink (Ink Refills):  Pear Pizzazz (119674); Blushing Bride (119676); Pumpkin Pie (119672); Daffodil Delight (121604); Bashful Blue (105146); Marina Mist (121605); More Mustard (101990); Cajun Craze (121603); Always Artichoke 105177); and retired Blush Blossom
Paper:  Watercolor (105019); Cajun Craze (119684); More Mustard (100946); and Pear Pizzazz (119795)
Accessories:  In Color Glimmer Brads (121005; Pear Pizzazz); Photo Corner Punch (119878); and Aqua Painter (103954); 1/16″ Handheld Punch (101227); Sticky Strip (104294); and 2-Way Glue Pen (100425)
God’s Blessings to You!
Guneaux Designs by Beverly Polen
Stampin’ Up! Demonstrator in Parrish, FL

Stampin Up Dasher

The Stampin Up Dasher Stamp (item 116816) is soooo cute. I decided to make a different type of card featuring him. Here he is: 

 
Stampin Up Dasher
Stampin Up Dasher is standing in the snow by a partially frozen pond (see his shadow). His background is a snow scene created with the Stampin’ Up! Brayer (item 102395); and Bashful Blue (105209), Marina Mist (119668), and Baja Breeze (111833) Classic Ink. The trees in the background are from the Plant Hope stamp set (120540), and the snowflake is made with the Stampin’ Up! Extra-Large Snowflake Punch (119852). The cardstock used is Marian Mist (119682) and the paper is from the Christmas Cheer Simply Scrappin” (117401). Several rhinestones (119246) and a Subtles Marine Mist brad (119732) were used for embellishments. Hope you enjoy.
 
God Bless!
Guneaux Designs by Beverly Polen
Stampin’ Up! Demonstrator in Parrish, FL

STAMPIN UP DASHER 

Deck the Halls DSP

Stampin’ Up! made a superb business decision when it offered the Deck the Halls Designer Series Paper (DSP) (item 120810). I am so in love with the quality and beauty of this paper, and so many other products featured in the Holiday Mini. I have so enjoyed making cards with this DSP.

The following card features the Deck the Halls DSP on Always Artichoke (item 105119) and Cherry Cobbler (item 119685) cardstock (love, love Cherry Cobbler). The mat behind the sentiment from the Peaceful Season Hostess stamp set (item 121124) and the corners were dry embossed with the Stampin’ Up! Petals-A-Plenty textured embossing folder (item 116824). The “cannot live without” Big Shot Die Cutting Machine (item 113439) was used in the embossing process. For embellishments, I used the Silver (item 120994) and Clear (item 120993) Tinsel, and the Stampin’ Up! rhinestones (item 119246). What a beautiful card with so little product.
The card below, featuring another design in the Deck the Halls DSP, is beautiful also. I am enjoying working with the Stampin’ Up! Waffle Paper (item 120985), which is the “mat” behind the bells stamp from the gorgeous Bells and Boughs stamp set (item 121142). The sentiment is also from the same stamp set. This card is embellished with the bling-bling of the Real Red Glimmer Brads (item 121006). The Always Artichoke and Cherry Cobbler cardstock was used, as well as the Stampin’ Up! Champagne Glitter Glass (item 120997).
The following beauty features yet another design of the Deck the Halls DSP. I embossed the paper using the Embossing Buddy (item 103083), VersaMark (item 102283) and Clear Stampin’ Emboss Powder (item 109130). The Tags til Christmas stamp set (item 121169) was used for the ornament, which is embossed with the Iridecent Ice Emboss Powder (item 101930). The Basic Gray cardstock (item 121044) was cut with the Big Shot and Top Note Bigz Die (item 113463), modified, and embossed with the Petals-A-Plenty embossing folder. The embellishments are 5/16″ Silver Brads (item 112534), Silver Tinsel, Silver Glass Glitter (item 120995), and 5/8″ Basic Gray Satin Ribbon (item 117666) that is painted partially with Champagne Mist Shimmer Paint (116806).

I think pairing the Basic Gray and Cherry Cobbler is quite striking. Hope you enjoy!

God’s Blessings!

Guneaux Designs by Beverly Polen
Stampin’ Up! Demonstrator in Parrish, FL, the wonderful sunshine state!
FIRM RELIANCE ON DEVINE PROVIDENCE!

Stampin Up Waffle Paper Halloween Card

While attempting to utilize Stampin Up waffle paper, I discovered that it works great for the technique, Iris Folding. I used an Iris Folding pattern to create the large bat on my card, and filled it in with Stampin Up waffle paper, the Basic Black and Metallic Silver. Stampin Up Waffle Paper

I used the fantastic Stampin’ Up! Silver Glass Glitter in the center of the Iris Folding, which creates the “iris”. I love this stuff! Hopefully, you can see it well.
Stampin Up Waffle Paper
Now, let’s peek inside and see what pops up! Be careful that you don’t get scared when you flip the card open!
Stampin Up Waffle Paper

BOO!!!

Stampin Up Waffle Paper
Can’t you hear the little ghosts giggling because they scared you!! (hehe)
Let’s take a closer look at them!
Stampin Up Waffle Paper
OK, maybe you didn’t hear my ghost yelling, “Boo”, but I sure did when I was making the card ;-))
I hope you are inspired by the fun that Stampin’ Up! provides us if we allow our creativity to flow naturally!

PROJECT RECIPE FOR STAMPIN UP WAFFLE PAPER HOLLOWEEN CARD:

PAPER: Stampin’ Up! Wicked Fun Specialty Designer Series Paper, Basic Black Cardstock, and Pumpkin Pie Cardstock
STAMP SET: Grateful Thoughts
INK: Basic Gray (very lightly on the ghosts)
ACCESSORIES: Iris Folding Pattern, Stampin’ Up! Basic Black and Metallic Silver Waffle Paper, Stampin’ Up! Silver Glass Glitter, Basic Black Taffeta Ribbon, Stampin’ Up! Metallic Silver Eyelets, Stampin’ Up! Movers & Shakers Bigz xl Die – Modern Label Punch Window, VersaMark, White Stampin’ Emboss Powder, Glimmer Brads – Basics, My Digital Studio to create the word “Boo”, The Big Shot, and Original Big Shot Dies
God Bless! Guneaux Designs by Beverly Polen
Stampin’ Up Demonstrator
Firm Reliance on Devine Providence!