Stampin Up Postage Due

Do you allow the title of a stamp set to determine how you create with it, such as the Stampin Up Postage Due stamp set?  Does the word, postage, within the title tell you that your creation has to be postage-related?  How do you find it used mostly when you surf the Internet?  I have found many stampers allowing the title to impact their paper crafting and they tend to use more earth tones in their creations with a stronger focus on male-related projects.

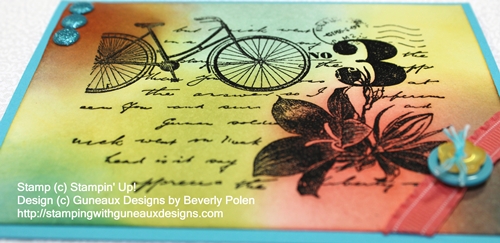
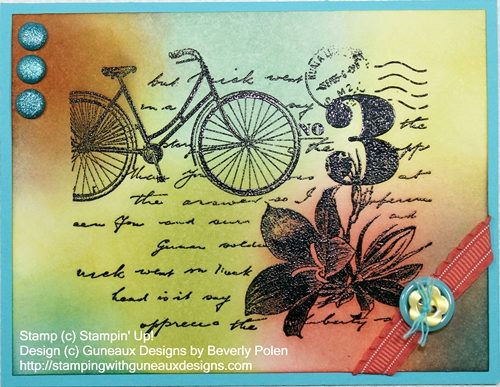
In my card share today, I did not allow the Stampin Up Postage Due stamp set title to impact the way I created my card.  I focused more on the main stamp and the bicycle within that stamp.  From my perspective, the bicycle in the stamp is a female bike, and anything female-related influenced how I would create my card.  Thinking of a female, I think of bright colors; thus, bright colors make up on my card.
STAMPIN UP PRODUCTS (includes product item number):

Stamp Set:  Stampin Up Postage Due (c – 126397)

Paper:  Tempting Turquoise Card Stock (102067) and Whisper White Card Stock (100730)

Ink (Classic):  Summer Starfruit (126991), Calypso Carol (126983), Lucky Limeade (126984), Cajun Craze (126965), Island Indigo (126986), Pool Party (126982), Wisteria Wonder (126985), Tempting Turquoise (126952), and VersaMark (102283)

Accessories:  Brights Glimmer Brads – Tempting Turquoise (121006), Calypso Carol 3/8″ Ruffled Ribbon (122976), Brights Designer Buttons – Tempting Turquoise and Daffodil Delight (119747), Whisper White Bakers Twine (124262), Black Embossing Powder (109133), Heat Tool (129053),  Paper Piercing Tool  (126189), Stampin’ Pierce Mat (126199), and Stampin’ Sponges Wedges (101610)

INSTRUCTIONS:

  • Cover the bicycle stamp with VersaMark and stamp it onto a 5-1/4″ x 4″ piece of Whisper White Card Stock
  • Cover the VersaMark ink with the Black Embossing Powder and set with Heat Tool
  • Using Stampin’ Sponges, apply the above inks (or inks of your choice) in a circular motion onto the card stock (start the sponge off of the card stock and slowly move it onto the card stock)
  • Use the Paper Piercing Tool and Mat to punch three holes in the upper-left side of the colored card stock
  • Insert three Tempting Turquoise Glimmer Brads and spread the prongs
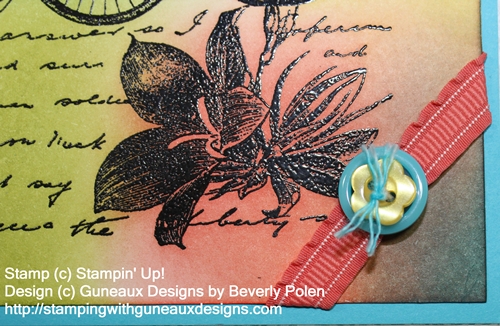
  • Cut a small piece of Calypso Carol Ruffled Ribbon
  • Thread the Bakers Twine into the larger button and then the smaller one
  • Before tying into a knot, insert the ribbon through the twine underneath the larger button
  • Tie a tight knot and separate the threads within the twine
  • Cover a sponge with Tempting Turquoise Ink and gently swipe the twine’s threads to apply the ink
  • Attach the buttons and ribbon along the bottom-right edge of the colored card stock
  • Cut an 8-1/2″ x 5-1/2″ piece of Tempting Turquoise Card Stock and fold in the center to create a card base
  • Attach the stamped and decorated card stock onto the front of the card base
  • Enjoy your creation!

NOTE:  Don’t forget that during the month of September, you get a free spool of the 2012-2014 In-Color 3/8″ Stitched Satin Ribbon for every $40 purchase of Stampin’ Up! products.  Spend $200 and get all 5 of the spools!


God’s Blessings!
Stamping With Guneaux Designs
by
Beverly Polen

My posts for the next couple of days will also focus on the Stampin Up Postage Due stamp set.  Come back to see those.

Labels Collection Framelits

Labels Collection Framelits are one of Stampin Up Framelits sets that you can use for various rubber stamping techniques.  Today, I have for you a “thinking of you card” made with the Labels Collection Framelits and the card features stamping multiple card stock layersStampin Up Framelits

Before discussing the Labels Collection Framelits, let me share information about the  first layer for the card.  It reflects the hot waxing technique, which I’ve not used before but really enjoyed it.  I heated gold, silver, and red wax, one at a time, and spread it across the cardstock to create the background.   I used one of the Adorning Accents Edgelits (125595) to shape the top of the card stock. 

Now, on to the Labels Collections Framelits cut outs that make up the center piece of the card.  I used three of the Labels Collections Framelits.  Counting from the largest to the smallest with the largest numbered 5, I used the 4th, 3rd, and 2nd frames from the Labels Collections Framelits.   To begin the layering of the frames on which to stamp, I used a temporary adhesive on the back side of the frames and glued the 2nd frame to the 3rd and the 3rd to the 4th, as shown below.

Labels Collection Framelits

To decorate the Labels Collection Framelits cut outs and create the card, follow these steps:

1. Using the flower image from the Papaya Collage Stamp Set (126612), cover the stamp with Pretty In Pink Ink (126955) and randomly stamp the image.

Labels Collection Framelits

2.  Using the multiple floral stamp from the Betsy’s Blossoms Stamp Set (126006), cover the largest flower with VersaMark Ink and randomly stamp around the Labels Collection Framelits cut outs.

3.  Cover the VersaMark images with Gold Emboss Powder (109129) and set with heat. Labels Collection Framelits

 4.  Cover the leaf on the flower stamp from the Papaya Collage Stamp Set with the Gumball Green Stampin’ Write Marker and stamp the image in the spots shown in the below image.

Stampin Up Framelits

5.  Cut an 8-1/2″ x 5-1/2″ piece of Pretty in Pink Card Stock (100459) and fold in the center to create the card base.

6.  Emboss the top front of the card base with one of the Adorning Accents Folders (125601).

7.  Adhere your first layer (mine is the waxed background) to the card base.

8.  Adhere the decorated Labels Collection Framelits cut outs onto the first layer.

9. Stamp the sentiment, “thinking of you” onto a piece of Pretty in Pink Card Stock with VersaMark ink.  Cover with Gold Emboss Powder and heat set it.  Attach to the card.

Buy Stampin Up Products

God’s Blessings!

Stamping With Guneaux Designs

by

Beverly Polen

Enjoy your Labels Collection Framelits!

Stamping Multiple Card Stock Layers – Guneaux Designs

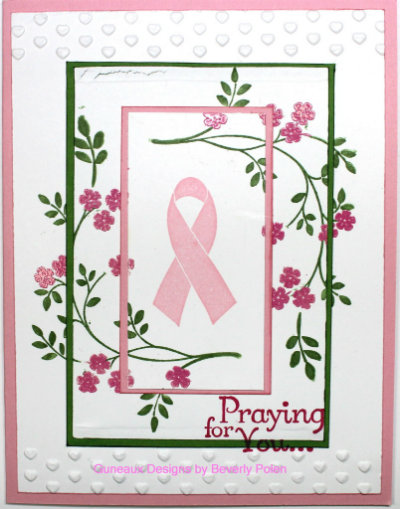
Stamping multiple card stock layers is a hot trend in the paper crafting world.  I created a card featuring the trend of stamping multiple card stock layers for an acquaintance who was diagnosed recently with breast cancer.  I wanted to send her a card to let her know that I care and am praying for her.  Therefore, I decided to use this technique of stamping multiple card stock layers for her card.

Everyone knows that the outcome of stamping multiple card stock layers would leave gaps in the stamped images, right?  Additionally, the result will be less than the aspired goal, which is to have a pretty card.  Agree?

Well, there is a method to use; however, you’ll still have gaps, but let’s see what we can do with those gaps.  Follow these instructions to use this technique:

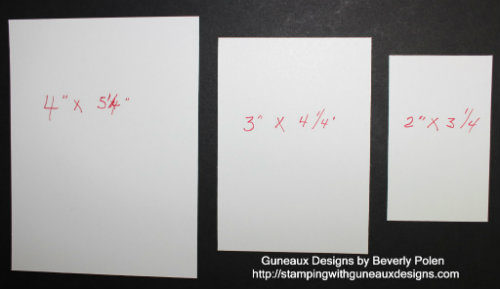
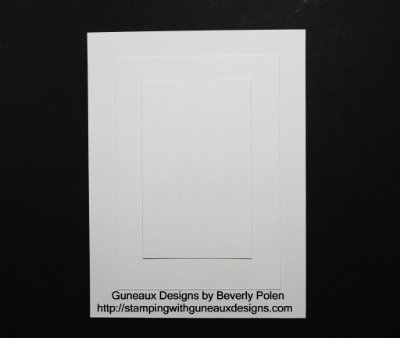
1.  Cut pieces of Whisper White Card Stock according to this picture:

2.  Layer the Whisper White Card Stock according to the following picture.  You’ll need to use a temporary glue on the backside of the two top layers to prevent them from moving as you stamp the images.

3.  Using a single inked stamp, randomly stamp the image around the multiple card stock layers.

4.  Disassemble the three pieces of card stock.

5.  Cut two pieces of colored card stock that match your ink (your choice) of a size to form mats for the top two layers.

6.  Assemble the pieces and your gaps will appear as intended, and you’ll have a beautiful card, like this one.

Stampin’ Up! Supplies Used for the Above Card (including item numbers):

Paper:  Whisper White Card Stock (100730), Pretty in Pink Card Stock (100459), and Gumball Green Card Stock (126840)

Stamp Sets:  Thoughts and Prayers (127805 – c) and the retired Ribbon of Hope

Ink:  Gumball Green Stampin’ Write Marker (126856 – comes in one package of the new 2012-2014 In Colors) and Pretty in Pink Classic Stampin’ Pad (126861)

Accessories:  VersaMark Ink (102283), Melon Mambo Stampin’ Emboss Powder (123223) , Heat Gun (129053) , and Adorning Accents Folders (125601)

 Enjoy!

God’s Blessings!

Stamping With Guneaux Designs By Beverly Polen

Have fun Stamping Multiple Card Stock Layers

Apothecary Accents Framelits, Bordering on Romance, and Bitty Banners Framelits

What are your thought about the new Stampin’ Up! Apothecary Accents Framelits (127003)?  I really like them.  Actually, all of Stampin’ Up! Framelits are really great.  The largest framelit from the Apothecary Accents Framelitswas used to produce the centerpiece of this card, which is explained at the end of this post.

 
This card measures 5-3/4″ by 5-1/2″, and the card base is Old Olive Cardstock (100702).  The beautiful new Raspberry Ripple Cardstock (126842) from the 2012-2014 In Color Collection is featured on the top portion of the card.  The sentiment is from a retired stamp set and it rests on another new In Color cardstock, Summer Starfruit (126839) and the Raspberry Ripple Cardstock.  Both were made with one of the Bitty Banners Framelits (129267).
 
This picture provides a different view of the card and the Apothecary Accents Framelits.
 
 
Card’s Centerpiece
 
The following steps were followed to create the centerpiece:
1.  Cut from Whisper White cardstock with the largest Apothecary Accents Framelit to create a stencil.
 
2.  Lay the stencil over a 5-1/2″ x 4-1/4″ piece of Whisper White cardstock and, using daubers, pounce Pretty in Pink, So Saffron, and Old Olive Classic Ink within the stencil.
 
 
3.  Cover the largest floral stamp from the Bordering on Romance stamp set with Raspberry Ripple (126856) and Old Olive Stampin’ Write Markers (100079).  Stamp this image onto the center of the piece below.
 
 
4.  Embellish this piece with the Perfect Polka Dots Embossing Folder (117305) and cut it out.
 
5.  Cut the same Apothecary Accents Framelit from Raspberry Ripple cardstock (5-1/2″ x 4-1/4″).   Embellish with the Vintage Wallpaper Embossing Folder (120175).   Adhere this piece on the upper part of the card base.
 
 
6.  Adhere the centerpiece (step 4) into the Raspberry Ripple cardstock.
 
7.  Cut another Apothecary Accents Framelit (same size) from Summer Starfruit cardstock (126839).  Following the impression left on the negative, cut out the frame and attach it over the centerpiece.
 
Enjoy!!
God’s Blessings!
 
Guneaux Designs

Stampin’ Up! Betsy’s Blossoms Stamp Set

Stampin’ Up! Betsy’s Blossoms Stamp Set

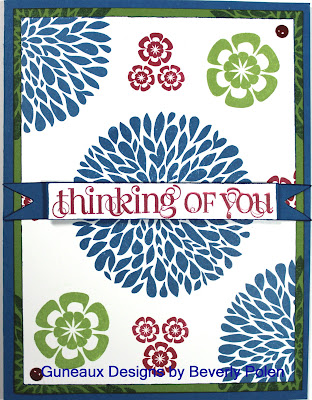
Hello, my friends!!  I’m providing you another sneak peek of a stamp set, the Stampin’ Up! Betsy’s Blossoms Stamp Set (126006), that becomes available on June 1.  Just a few more days!!

The card project is so easy.  All I did was stamp onto Whisper White Card Stock (100730) three of the six stamp images from the Stampin’ Up! Betsy’s Blossoms stamp set.  I used the new Gumball Green Ink (126861), Gumball Green Card Stock (126840), Pacific Point Ink (126951), Pacific Point Card Stock (111350), and the new Raspberry Ripple Ink(126859).  Now how simple is that?

God’s Blessings!
Stamping With Guneaux Designs
by
Beverly Polen
Stampin’ Up! Betsy’s Blossoms Stamp Set