Stampin Up Purse Card Design – Happy Birthday – Stamping With Guneaux Designs

How does a new Stampin Up Purse Card Design sound to you?  Well, I have one for you.  Listening to my readers and customers who have stated they want new card designs, I have created for you a Stampin Up Purse Card Design.  This purse card can be made with any color of card stock or designer series paper.  My instructions below for making the card describe the card stock and designer series paper that I used. 

Also, the purse card has a new flower design for you!
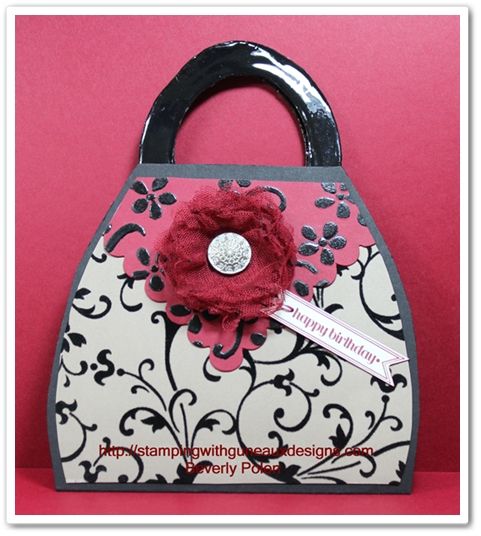
Stampin Up Purse Card Design

 STAMPIN UP SUPPLIES NEEDED FOR THE STAMPIN UP PURSE CARD DESIGN: (if you chose to make the purse card identical to mine):

Stamp Set:  Itty Bitty Banners (126257)

Paper:  Basic Black Card Stock (121045 – one 8-1/2″ x 11″ and a 4″ x 7″ scrap piece), Cherry Cobbler Card Stock (119685), Very Vanilla Card Stock (101650), and Mocha Morning Designer Series Paper (retired)

Ink: Cherry Cobbler Classic (126966)

Accessories:  Big Shot Die-Cutting Machine (113439), Simply Scored Stylus (125624), Sticky Strip (104294), Crystal Effects (101055), Paper Snips (103579), Bigz Clear Large Scallop Square Die (115950), VersaMarker Watercolor Pen (non-SU), Black Embossing Powder (109133), Elegant Bouquet Embossing Folder (115964), Heat Gun of your choice, Cherry Cobbler 3-1/2″ Scalloped Tulle Ribbon (127841), Bigz L Perfect Pennants Die (123126), Bitty Banners Framelits (129267), Antique Brad (117273), and Cherry Cobbler Baker’s Twine (123125). 

INSTRUCTIONS FOR MAKING THE STAMPIN UP PURSE CARD DESIGN:

  • Click HERE for the “Purse Card Template” 

If you have difficulty retrieving the template, here’s a picture that you can work from:

Picture of the Purse Card Template

 CARD BASE

  • Score the center of an 8-1/2″ x 11″ piece of Basic Black Card Stock and fold it.
  • Place the template over the folded card stock with the fold at the bottom (use a temporary adhesive to prevent the template from moving).  Using the Simply Scored Stylus and with pressure, trace the purse from below the handles (at the 5″ mark) to the bottom including the sides.

Stampin Up Purse Card Design

  •  Remove the template and cut along the traced lines.

Stampin Up Purse Card DesignStampin Up Purse Card Design

CARD HANDLES:

  • Fold a piece of 4″ x 7″ scrap Basic Black Card Stock and place the handle portion of the template over it with the folded part at the top (you’ll cut out two handles and you don’t want them connected).  So you have 1/4″ extra on the ends of the handles to adhere to the purse card base, lay the template about 1/4″ above the bottom of the folded card stock.
  • Using the Simply Scored Stylus and with pressure, trace around the handle of the template.
  • Cut out the handles following the traced lines.

Purse HandlesPurse Handles

  • Cover one side of the handles with Crystal Effects and let dry.
  • After drying, cover the other side of the handles with Crystal Effects and let dry.
  • Attached the handles to the inside of the purse card base with Sticky Strip after completing the following.

CARD EMBELLISHMENTS:

  • Lay the template onto the Mocha Morning Designer Series Paper (again, this project is organic, so other DSP can be used) and trace the inside lines around the purse card.  Cut around the traced lines.  Use the cut out for your template to cut a second piece of the Mocha Morning Designer Series Paper.  You will have one piece for the front of the purse card and one for the back.  Ensure the pieces are about 1/8″ smaller than the purse card base.
  • Cut 1/4″ off the top of these two pieces.

Purse Front and Back Pieces

  • Using the Bigz Clear Large Scallop Square Die, cut out two Cherry Cobbler large scallops.
  • Insert each scallop into the Elegant Bouquet Embossing Folder and run through the Big Shot Die-Cutting Machine.
  • OPTIONAL:  Swipe one scallop with the embossing buddy and, with a VersaMarker Watermarker Pen, carefully apply VersaMark on the raised portions of the scallop.  Apply Black Embossing Powder and set with a heat gun.  It’s best to do a small section of the raised portions at a time. (This isn’t an easy task and it’s difficult to not get specks of powder where you don’t want it.)

Card Embellishment

  • Lay the Mocha Morning Designer Series Paper purse front over back side of the embossed scallop, line it up just below the center of the top embossed flower, and draw a line with a pencil across the scallop.  Trace with the pencil about 1″ down the two sides of the purse front.  Cut along these penciled lines.  Repeat for the purse back.

Purse Embellishmen tPurse Embellishment

  • Trace the purse back DSP piece onto Very Vanilla Card Stock, trace around the piece, and cut it out.

Stampin Up Purse Card Design

  • Cover with Cherry Cobbler ink the sentiment “Happy Birthday” from the Itty Bitty Banners stamp set onto a piece of Very Vanilla Card Stock.
  • Use the appropriate Bitty Banners Framelit to cut out the sentiment.  Sit to the side.

CARD FLOWER:


CARD ASSEMBLY:

  • FRONT AND BACK DSP PIECES:  Adhere with Sticky Strip the DSP front piece to the front of the card base, placing it 1/4″ down from top card base showing.  Repeat for the back side of the card base.

Stampin Up Purse Card Design

  • HANDLES:  Draw a light pencil line on the left inside of the card base, 1/2″ from the top.  Place sticky strip on the card base from the top down to the 1/2″ pencil line, ensuring that the tape is no wider than the bottom of the handle ends.  Remove the red liner and adhere the handle to the card base.  Erase the pencil line.  Repeat this to adhere the other handle to the right inside of the card base.

  • This picture shows how it should look:
  • INSIDE CARD:  Adhere the Very Vanilla Card Stock inside the card on the right side, placing it over the handle.

Stampin Up Purse Card Design

  • At this point the card will look like this:

Stampin Up Purse Card Design

  • OUTSIDE CARD EMBELLISHMENTS:
  • Punch a hole at the top of the “happy birthday” sentiment.
  • Thread a piece of Cherry Cobbler Baker’s Twine throw the hole.
  • Wrap the twine around the prongs of the antique brad that was used for the tulle ribbon flower.
  • Punch a hole 1-1/2″ down from the top center of the Cherry Cobbler Black Embossed Large Scallop piece.

Stampin Up Purse Card Design

  • Insert the brad that is holding the tulle ribbon flower and baker’s twine into the hole and spread the prongs.

Stampin Up Purse Card Design

  • Attach this to the top of the card front. (You may want to use a glue dot to attach the end of the sentiment to the card front.)

Stampin Up Purse Card Design

  •  Attach the second Cherry Cobbler Embossed Large Scallop piece to the back side of the card.

Stampin Up Purse Card Design

If you followed these instructions and made the card, you now have a beautiful Stampin Up Purse Card that is worthy of a very special recipient!

Stampin Up Purse Card Design

Share your comments with me please on the Stampin Up Purse Card Design!

God’s Blessings!
Stampin With Guneaux Designs
by
Beverly Polen

Stampin Up Watercolor Winter

As the calendar turns to October, I begin to think about holiday cards like this one that features the Stampin Up Watercolor Winter Stamp SetThe card is actually a birthday card for a special person who has a birthday during December.    Stampin Up Watercolor Winter

This view of the card shows the dimensions of the key elements from the Stampin Up Watercolor Winter stamp set:

Stampin Up Watercolor Winter

I love the pine needles and cones from the Stamping Up Watercolor Winter set.  In the past I have resorted to making my own pine needles for cards.  So this set will go a long way in speeding up my stamping of pine-related elements on cards.

Stampin Up Watercolor Winter

Don’t you just love the new Vintage Faceted Designer Buttons as shown here?

Let’s make this card together.  Go to your craft room and get out the following supplies:


Stampin Up Supplies:

Stamp Sets (clear mount):  Stampin Up Watercolor Winter (129727) and Bring On The Cake (for the sentiment) – (121958)

Paper:  Crumb Cake Card Stock (120953), Cherry Cobbler Card Stock (119685), Gumball Green Card Stock (126840), Whisper White Card Stock (100730), and Be of Good Cheer Designer Series Paper (126896)

Ink (Classic):  Real Red (126949), Cherry Cobbler (126966), Gumball Green (126861),  (Markers) Soft Suede and Chocolate Chip (119703)

Accessories:  Big Shot Die-Cutting Machine (113439), Petals-A-Plenty Textured Impressions Embossing Folder (116824), Cherry Cobbler Dazzling Details (125585), Dazzling Details (124117), Vintage Faceted Designer Buttons (127555), and Brights Collection 3/16″ Brads (119740)


Buy Stampin Up Products

INSTRUCTIONS FOR MAKING THIS CARD FEATURING THE STAMPIN UP WATERCOLOR WINTER STAMP SET

  • Fold an 8-1/2″ x 5-1/2″ piece of Crumb Cake Card Stock in the middle to for a card base.
  • Cut a  5-1/4″ x 4″ piece of Cherry Cobbler Card Stock.
  • Place the Cherry Cobbler Card Stock into the Petals-A-Plenty Embossing Folder and run through the Big Shot.
  • Cut a 4-3/4″ x 2-1/4″ piece of Whisper White Card Stock. 
  • Cover the outline poinsettia stamp with Real Red Ink and stamp onto the center of the Whisper White Card Stock.
  • Cover the solid poinsettia stamp with Cherry Cobbler and stamp over the outline poinsettia stamp image (recommend using a Stamp-A-Ma-Jig – 101049).
  • Cover the pine needles stamp with Gumball Green Ink and stamp the image in the two places shown in the picture of the card.
  • Cover the outline pine cone stamp with a Soft Suede Stampin Write Marker and stamp the image in the two places shown in the picture.
  • Cover the solid pine cone stamp with a Chocolate Chip Stampin Write Marker and stamp the image over the outline pine cone image (recommend using a Stamp-A-Ma-Jig).
  • Apply Cherry Cobbler Dazzling Details onto the poinsettia as desired.
  • Apply Dazzling Details (white) onto the pine needles and cones as desired.
  • Take two Cherry Cobbler Designer Brads and cut off the prongs.
  • Adhere the brads into the center of two small Vintage Faceted Designer Buttons (I used Crystal Effects).
  • Adhere the buttons to the Whisper White card stock as shown in pictures.
  • Cover with Soft Suede the Birthday Wishes stamp from the Bring On The Cake Stamp Set and stamp as shown in the pictures. You want to ink the word “Birthday” first and stamp it and then the word “Wishes”.
  • Cut a 4-15/16″ x 2-7/16″ piece of Crumb Cake Card Stock and adhere the decorated Whisper White Card Stock to it to form a mat.
  • Cut two 2″ squares of design from the Be of Good Cheer Designer Series Paper (see pictures).
  • Cut two 2-1/4″ squares of Gumball Green Card Stock.
  • Adhere the two square pieces of the designer series paper to the two squares of Gumball Green Card Stock.
  • Adhere the Cherry Cobbler Embossed Card Stock to the front of the card base.
  • Adhere the designer series paper and mat squares to the Cherry Cobbler Embossed Card Stock (see pictures).
  • Place dimensionals on the back of the  Crumb Cake mat with the decorated Whisper White Card Stock.
  • Remove the backing from the dimensionals and adhere to the card front (see pictures).
  • Using a Gold Gel Pen, cover the center of the flowers that are embossed onto the Cherry Cobbler Card Stock.

Buy Stampin Up Products

God’s Blessings!
Stamping With Guneaux Designs
by
Beverly Polen
Enjoy the Stampin Up Watercolor Winter Stamp Set!

Stampin Up Postage Due Stamp Set – Happy Birthday

Stampin Up Postage Due Stamp Set is one of the coolest new sets from the Annual Catalog.  I know this stamp set was designed to be “vintage” like; however, I am a “think outside of the box” type of person and that influences my art work. As I shared yesterday, I encourage you to not let the “vintage” like stamp set or the words, “postage due”, influence your creations when using this stamp set.  By that I mean, don’t believe that your creation with this stamp set has to be vintage or relate to “postage”.  Think outside of the box!

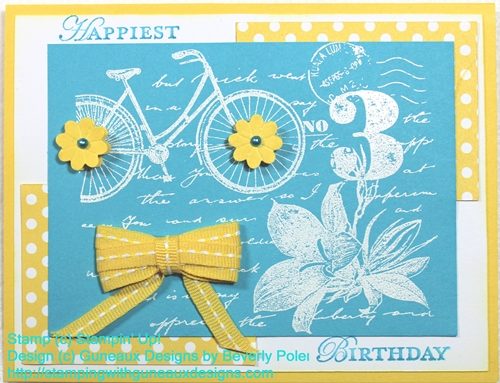
To that end, my second card share featuring the Stampin Up Postage Due Stamp Set is certainly not vintage or postage-related.  I wanted a card with Tempting Turquoise and Daffodil Delight colors as I love that color combination.  Here it is!

STAMPIN’ UP! SUPPLIES (with Catalog item numbers):

Stamp Set:  Stampin Up Postage Due (126397 – c) and Apothecary Art (125527 – c)

Paper:  Whisper White Card Stock (100730), Tempting Turquoise Card Stock (102067), Daffodil Delight Card Stock (119683), and Polka Dot Parade Designer Series Paper (126902 – daffodil delight)

Ink:  VersaMark Ink Pad (102283), Tempting Turquoise Classic Ink (126952), and Permanent Turquoise Marker (local craft store)

Accessories:  White Embossing Powder (109132), Heat Tool (129053), Boho Blossoms Punch (119858), Basic Pearls (119247), Daffodil Delight 1/4″ Stitched Grosgrain Ribbon (126872), Stampin’ Dimensionals (104430), and Adhesive of your choice

INSTRUCTIONS:

1.  Cut card stock or designer series paper according to the following:

  • 8-1/2″ x 5-1/2″ piece of Daffodil Delight Card Stock (fold in half to create the card base)
  • 5-1/4″ x 4″ piece of Whisper White Card Stock
  • 4-1/2″ x 3-1/4″ pieced of Tempting Turquoise Card Stock
  • two 2-5/8″ x 2″ of Polka Dot Parade Designer Series Paper (daffodil delight)

2.  Cover the bicycle stamp with VersaMark Ink and stamp it onto the Tempting Turquoise Card Stock.

3.  Cover with White Embossing Powder and set with the Heat Tool.

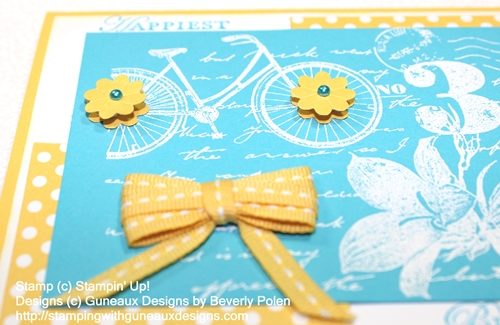
4.  Punch out four flowers of your choice from one of the designs of the Boho Blossoms Punch.

5.  Using Stampin’ Dimensionals, adhere together two flowers to create one flower (I double up the dimensionals).  Repeat with the other two punched out flowers.

6.  Using a turquoise permanent marker, color two Basic Pearls and attach to the center of the two flowers.

7.  Cut a piece of the Daffodil Delight 1/4″ Stitched Grosgrain Ribbon and tie it into a bow.

8.  Using Tempting Turquoise ink, stamp “Happiest” “Birthday” from the Apothecary Art Stamp Set onto the Whisper White Card Stock as shown in picture.

9.  Assemble the card as stated below (also reference picture):

  • Attach the two pieces of the Daffodil Delight designer series paper to the Whisper White Card Stock; one on the bottom-left and the other on the top-right as shown in picture.
  • Attach the Tempting Turquoise stamped card stock onto the center of the card front.
  • Attach the two flowers in the center of the bicycle wheels.
  • Attach the Daffodil Delight bow.

10.  Enjoy the card you made with the Stampin Up Postage Due stamp set!


 God’s Blessings!
Stamping With Guneaux Designs
by
Beverly Polen

 Check out the new My Digital Studio downloads!

Come back tomorrow for another Stampin Up Postage Due creation!

Flowering Flourishes Stamp Set & Tool Tip

Welcome to Guneaux Designs! Today I am sharing with you a card that features a new stamp set from the 2012 Stampin’ Up! Annual Catalog, the Flowering Flourishes Stamp Set.  I was so disappointed when Stampin’ Up! retired the Baroque Motifs Stamp Set; however, I am quite pleased with the Flowering Flourishes Stamp Set which is similar. The stamp set includes three “flourishes“, and the one on this card is the largest. I think it is so cute!  I will also share with you a tool tip regarding “photo corners”.

Happy Birthday Card

This picture gives you another view of the Flowering Flourishes stamp image: Happy Birthday Card - Flowering Flourishes

 STAMPIN’UP! SUPPLIES:

Stamp Sets:  Flowering Flourishes (126367) and Bring on the Cake (121958 – sentiment)

Paper: Gumball Green Card Stock (126840),Primrose Petals Card Stock (126841), and Whisper White Card Stock (100730)

Ink (Stampin’ Write Markers):  Gumball Green Marker, Primrose Petals Marker, Raspberry Ripple Marker, Midnight Muse Marker, and Summer Starfruit Marker (all in one package – 126856)

Accessories:Midnight Muse 3/8” Stitched Satin Ribbon (126847), Basic Pearls (119247), Curly Label Punch (119851) and 1-1/4”Square Punch

HOW TO MAKE THIS HANDMADE CARD:

  • Cut a 8-1/2″ x 5-1/2″ piece of Gumball Green Card Stock and fold it in the middle to create a card base.
  • Cut a 5-1/4″ x 4″ piece of Primrose Petals Card Stock and adhere it onto the front of the card base.
  • Cut a 5″ x 3-3/4″ piece of Whisper White Card Stock.
  • Using the above listed Stampin’ Write Markers, cover the flowering flourish stamp with Gumball Green, Primrose Petals, Raspberry Ripple, and Summer Starfruit ink (see picture for guidance).
  • Stamp the image onto the Whisper White Card Stock.
  • Fill in with ink the places on the stamped image where needed.
  • Use a permanent yellow marker and color three Basic Pearls.
  • Adhere the pearls onto the three flowers as shown in picture.
  • Underneath the stamped image, stamp the “Happy Birthday” sentiment from the Bring on the Cake stamp set.
  • Tie a piece of Midnight Muse 3/8″ Stitched Satin Ribbon into a bow and adhere it to the top-left of the stamp image.
  • Follow the information below to create the two corner pieces.
TOOL TIP: 
Remember when we had the Stampin’ Up! Photo Corner Punch to create corner decorations for our handmade cards?  I loved that punch and I miss it.  Well, I decided to look for another way to make attractive photo corner pieces. Therefore, I did, and this is how I did it.


1. Cut a piece of cardstock using the Curly Label Punch. 

Stampin' Up! Curly Label Punch

2. Place the corner of the long side of the curly label into the corner of the 1-1/4″ Square Punch, lining it up evenly and cutting it. Stampin' Up! Curly Label

 3. This is the result. Cut more and add them to the corners of your card.

 Photo Corners


God’s Blessings!

Stamping With Guneaux Designs


A Cherry on Top Stamp Set, Floral District DSP, Labels Collection Framelits – Happy Birthday

Don’t you love making Stampin’ Up! greeting cards for people who are very special to you?  I sure do.  This card is just that ~ a happy birthday card for a very special friend.  It features the new Hostess Stamp Set, A Cherry On Top (125971).  Also featured are the beautiful Floral District Designer Series Paper (126919) and Labels Collection Framelits(125598).

INSTRUCTIONS:
  • Cut a 6″ x 12″ piece from a 12″ x 12″ piece of Rich Razzleberry Card Stock, folding it in a 6″ square so it opens from the bottom up.
  • Cut a 5-3/4″ square of Floral District DSP, round the edges with the  Stampin’ Up! Corner Punch(119871), and adhere to the card base.
  • Using the two largest Labels Collection Framelits, cut two frames; the largest with Rich Razzleberry Cardstock and second one with Lucky Limeade Card Stock.
  • Cover the cake dish top stamp image from the A Cherry On Top Stamp Set with VersaMark ink and stamp onto Whisper White Card Stock.
  • Emboss it with White Embossing Powder(109132).
  • Using Rich Razzleberry and Lucky Limeade inks, stamp the cake dish pedestal and cupcake bottom and top images on the Whisper White Card Stock in appropriate location (see pics).
  • Using Real Red ink, stamp the cherry on top of the cupcake.
  • Cover only the cake dish top with Crystal Effects (101055) and let dry.
  • Cut out the images as one piece and adhere it the Lucy Limeade Card Stock.
  • If desired, place a ribbon bow onto the pedestal.
  • Place foam dimensionals on the back of the Lucky Limeade frame.
  • Adhere it to the Rich Razzleberry frame.
  • Adhere that to the Floral District DSP.

The following pictures are of the recipient of this beautiful card!  Happy Birthday, Lin!

God’s Blessings!
 
Stamping With Guneaux Designs

Stampin Up Comfort Cafe DSP and Apothecary Accents Framelits


Are you getting excited about the debut of the new Stampin’ Up! Catalog?  When it debuts on June 1, you’ll notice a lot of changes – good ones that is.  This project share features one of the beautiful, upcoming Designer Series Paper (DSP), the Stampin Up Comfort Cafe (126898) and a Framelits, Apothecary Accents Framelits (127003).  This card features two of the designs for the Stampin Up Comfort Cafe DSP. The key color for these designs is Cajun Craze.
 
TIP:  If you will note, you can see that I used the negative of the Stampin Up Comfort Cafe DSP that is cut out with the new Apothecary Accents Framelit  for the first card layer.  Try that when you get yours.  Also, I covered it with Crystal Effects (love that stuff!).
 

The picture above and below show the dimensional aspects of the card.

 
Other Stampin’ Up! products used are:
 
Perfectly Penned Stamp Set (122892) – sentiment
Adorning Accents Embossing Folders (125601) – the hearts
A ribbon that was featured in the last Holiday Mini, Very Vanilla Designer Velvet Ribbon
 
 God’s Blessings!
Stamping With Guneaux Designs
by
Beverly Polen
 
Stampin Up Comfort Cafe and Apothecary Accents Framelits