Stampin’ Up! Petal Cone Die-Happy July 4th!

Do you have plans to celebrate today with family and friends?  How do you plan on decorating the table that will hold all of the yummy food?  I have an idea for you that features the Petal Cone Die, but you’ll need to get started creating it early in the day so you’ll have your table decorated prior to food being served.  Making several of these would further enhance your table.

Again, this table decoration features the Stampin’ Up! Petal Cone Die.  I love this die and use it often.

(Click on the pictures to enlarge)

 SUPPLIES:
 
Paper: Real Red Cardstock (102482), Whisper White Cardstock (100730), Night of Navy Cardstock (100867), Silver Glimmer Paper (124005), and Red Glimmer Paper (121790)
Accessories:  Big Shot Die-Cutting Machine (113439), Petal Cone Bigz L Die (121810), Retired Stars #2 Original Die, Full Heart Punch (119883), Strips Embossing Folder (123128), Vanilla Shimmer Smooch Spritz (118772), Adhesive of your choice, and Fourth of July decorations from a local craft store
 
To make this table decoration, follow these steps:
 
  • Cut 3 petal cones using the Petal Cone Die – 1 Whisper White, 1 Real Read, and 1 Night of Navy
  • Emboss each cone with the Strips Embossing Folder
  • Spritz each with the Vanilla Shimmer Smooch Spritz
  • Fold along each score line
  • Adhere the Real Red cone to the Whisper White cone, lining up the embossed strips
  • Adhere the Whisper White cone to the Night of Navy cone, lining up the embossed strips
  • Lay the adhered pieces face down (at this point you have not adhered the Night of Navy flap yet)
  • Adhere your craft store decorations about 1″ down from the top portion of the Whisper White cone (you will need to cut a small half circle from the top of each cone so that when you close and adhere the final pieces together, the decorations fit nicely into the top)
  • Place adhesive on the flap of the Night of Navy cone and adhere it to the Real Red cone, folding under the flaps of each cone
  • Adhere the folded flaps to each other
  • Set the adhered cones down on Real Red Cardstock and trace around it
  • Cut out the traced piece of Real Red Cardstock and adhere it to the bottom of the cones (this provides a bottom cover to hide the flaps)
  • Using the Stars #2 Die (or a star punch), cut out stars from the Red Glimmer and Silver Glimmer paper and Night of Navy Cardstock
  • Adhere the stars onto the final adhered cone where desired.
  • Decide on your sentiment and place it onto Whisper White Cardstock
  • Using the Full Heart Punch, punch out the sentiment from the Whisper White Cardstock, as well as a heart from the Read Glimmer Paper and Night of Navy Cardstock
  • Layer the hearts as shown in the pictures and adhere them to the cone
  • Enjoy
 
God’s Blessings!
 
 
Stamping With Guneaux Designs by Beverly Polen

Designer Rosette Bigz XL Die

Stampin’ Up!’s Designer Rosette Bigz XL Die  comes in handly this week; a special week that has been since July 4, 1776 when the U.S. declared its independence from the Kingdom of Great Britain.  Do you have special plans for celebrating the 4th?  I plan to spend the early evening at an outdoor concert and afterwards watch beautiful fireworks.

It can get quite hot here in Florida, so I decided to make a hand fan to use while at the concert, and the Designer Rosette Bigz XL Die will do the job for me.  Of course the hand fan had to be patriotic.  I think it is so cute, and it is actually quite sturdy.

The steps I followed to make the hand fan are:

  • Cut an 11″ x 5-1/4″ piece of Real Red, Whisper White, and Night of Navy Cardstock
  • Place each piece onto the Stampin’ Up! Designer Rosette Big XL Die (125594) and run through the Big Shot(113439)
  • Cut off the pointed ends of each rossette
  • Fold each piece into accordian folds
  • Glue the three pieces together
  • Add glue to the ends of the rosettes and dip them into Silver Glass Glitter (120995) – let it dry
  • Insert a piece of twine into the half-circles along the bottom of the rosettes and tie them together tightly (this will cause the pieces to spread into a fan)
  • Cut an 11″ x 1-1/2″ piece of Real Red Cardstock
  • Score this piece at the 1/2″ and 1″ marks
  • Fold along the two score lines and glue the piece together to form a band for the outer sides of the fan
  • Glue the band onto the outer edges of the fan, leaving the very bottom unglued
  • Use a glue gun to apply hot wax at the very bottom of the fan to further reinforce and stabilize it
  • Decorate as desired
God’s Blessings!
Stamping With Guneaux Designs
by Beverly Polen
Have fun creating your fan using the Designer Rosette Bigz XL Die!

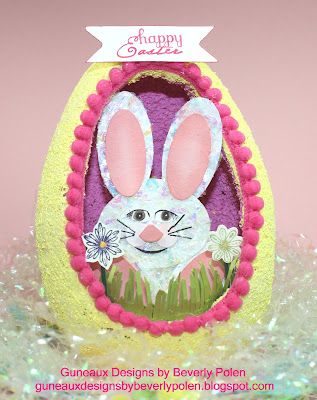
Faberge-Styled Easter Egg

Hello, my friends, I have for you a Faberge-Styled Easter Egg!   But first I want to share why I have been absent from my blog for several days. I have been out of town taking care of my brother, Bill, who was in a grave health situation. With powerful prayers and the grace of God, a miracle occurred with him and I praise God for His healing blessings. My brother has a long journey to a complete recovery, so if you have an inclination to pray for him, your prayers would be greatly appreciated. I plan to get back to daily postings.

For today, I am sharing a cute Faberge-Styled Easter Egg that I made with a 6″ x 4″ egg-shaped piece of Styrofoam.

Faberge-Styled Easter EggIsn’t she cute!  I cut an opening in the front of the Styrofoam egg and then removed most of the inside. I used a craft paint to paint the inside pink and the outside yellow. I placed some carefully-cut Lucky Limeade card stock just inside the opening for grass. I stamped two flowers and glued them on small pieces of floral wire and placed them inside behind the grass. At the back of the inside I placed the primary element of the egg – the cute bunny. To decorate the opening of the egg, I glued on some retired Stampin’ Up! ribbon.
This picture is a side view of the Faberge-Styled Easter egg.

Faberge-Styled Easter Egg

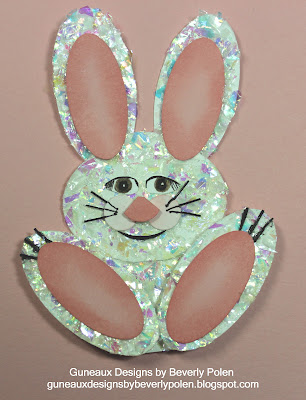
This is the key element of the Faberge-Styled Easter Egg, the bunny. To give the bunny an extra “punch”, I glued Stampin’ Up!’s retired Mica Flakes onto its body.

Faberge-Styled Easter Egg
Now it is your turn to make a Faberge-Styled Easter Egg!
God’s Blessings!
Stamping With Guneaux Designs
by
Beverly Polen

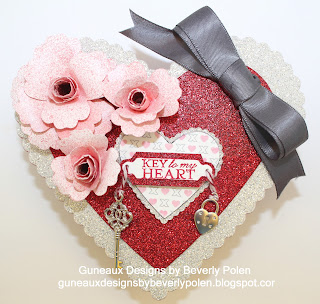
Key To My Heart Valentine Box Video Tutorial – Hearts Collection Framelits

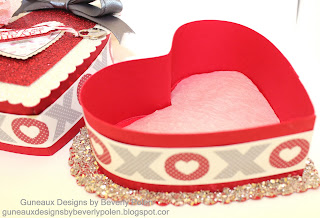
I have a beautiful item for you today; it is my Key To My Heart Valentine Box. Isn’t it stunning? I recorded a video to instruct you on how to make the Valentine box. It’s my very first video, and being a beginner at developing videos, it’s a little rough, and it took about two weeks to develop. :-(( Regardless, I got it completed and I hope you enjoy it.

Key To My Heart Valentine Box

Some of the key Stampin’ Up! Products I used are the Hearts Collection Framelits, Red and Silver Glimmer Paper, Key and Heart Trinkets, Whisper White and Real Red Cardstock, Basic Gray Satin Ribbon, and the Scalloped Heart of Hearts Embosslits Die.

Regardless of the products I used, the purpose of this post is to provide instructions on making the Key To My Heart Valentine box itself.

Key To My Heart Valentine Box

Did you notice the Love Impressions Designer Series Paper from last year around the box sides? I used My Digital Studio (MDS) and the Love Impressions digital download to print the paper! MDS is a must-have product!

Key To My Heart Valentine Box

I placed inside the box a heart made with White Waffle Paper and a Heart Framelit.

Enjoy the Key To My Heart Valentine Box video, and feedback is welcome!

God’s Blessings!
 Stamping With Guneaux Designs
by
Beverly Polen 

Pine Cone Christmas Ornament

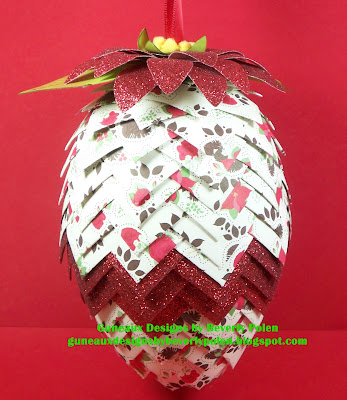
I have for you today a beautiful Pine Cone Christmas Ornament that I made.

Pine Cone Christmas Ornament

I recall being on vacation in South Carolina around 2001 and seeing some very LARGE pine cones. I had never seen such large cones before. I bagged up a bunch and took them home (Northern Virginia) to decorate for Christmas.

This Stampin’ Up! Pine Cone Christmas Ornament reminds me of those large pine cones.  The Pine Cone Christmas Ornament is my significant Stampin’ Up! 3-D item for Christmas 2011.  It is 7″ in length and 4-1/2″ in width. I am so pleased with the way it turned out.

Once again, I used the Holly Berry Bouquet Specialty Designer Series Paper (DSP), my favorite Stampin’ Up! DSP for the holidays.  It took hours for me to make the pine cone, and it required MANY 1″ x 2″ pieces of the DSP and MANY straight pens. But it is so worth it!

Pine Cone Christmas Ornament

I used the Stampin’ Up! Red Glimmer Paper for three rows around the cone, and for the poinsettia that rests on top of the cone.

God’s Blessings!

Stamping With Guneaux Designs
by
Beverly Polen

I hope you have enjoyed my Pine Cone Chistmas Ornament!

Beyond the Garden Designer Series Paper Purse #2

My share today is another Stampin’ Up! Beyond the Garden Designer Series Paper  Purse that I made using my pattern for the Beyond the Garden Designer Series Paper Purse that I posted yesterday. This purse will hold five 5-1/2″ x 4-1/4″ cards, depending on the cards’ embellishments. The pattern, as contained in my Beyond the Garden DSP Purse tutorial, allows for different decorations on the front of the purse. This purse front is embellished with many blossom petals made with the Blossom Petals Punch. I’m sure you’ve seen purses with numerous petals covering the purse front. This purse resembles such purses.

Beyond the Garden Designer Series Paper Purse

The Poppy Parade Card Stock was used for the body of the purse and the blossom petals. One of the designs within the Beyond the Garden DSP was used for the purse closure and the center flower of the purse front. The petals were embossed with the Stampin’ Up! Perfect Polka Dots Embossing Folder and spritzed with the Vanilla Shimmer Smooch Spritz. The handle on the purse was made with Poppy Parade 1/2″ Stitched-Poly Ribbon.

Don’t waste time searching for item numbers to purchase any of the products used in this project. Simply click on the links and you’ll be taking right to the product.
God’s Blessings!
Guneaux Designs by Beverly Polen
Stampin’ Up! Demonstrator in Florida

BEYOND THE GARDEN DESIGNER SERIES PAPER PURSE #2